Project Management
Projects view provides a suite of possibilities for creating or importing an application. Also, this view is responsible to manage the created projects in order to add/remove components, build, debug, remove existing ones.
Project types
The following project types offer different options for locating project files:
Repository application- application is located directly in the repository folder (example’s source code will not be copied)Freestanding application- example’s source code will be copied in the destination folderWorkspace application- a Freestanding Application created in the folders of the active Zephyr Workspace (see Zephyr Application Development for details).
| Repository Type | Project Type | ||
| Repository | Freestanding | Workspace | |
| MCUXpresso SDK 2.x | ✓ | ||
| MCUXpresso SDK 24.12 to 25.09 | ✓ | ✓ | |
| MCUXpresso SDK 25.12 and newer | ✓ | ✓ | |
| Zephyr | ✓ | ✓ | ✓ |
| Matter | ✓ | ✓ | |
New Project Wizard
Introduction
New Project Wizard can be used to generate a minimal project from scratch. The Wizard can be found in the Quickstart Panel.
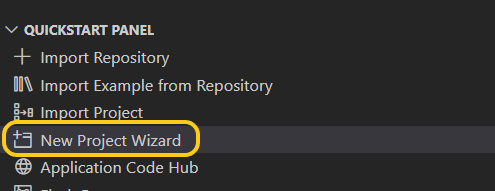
New Project Wizard supports projects based either on MCUXpresso SDK or Zephyr.
Generated projects are based on the new_project template wherever possible, but fall back to hello_world and blinky if any of the past templates are not available for the board.

Searching and filtering
The New Project Wizard is initially empty (no boards displayed). To narrow down and display the list of boards, first select a project type.
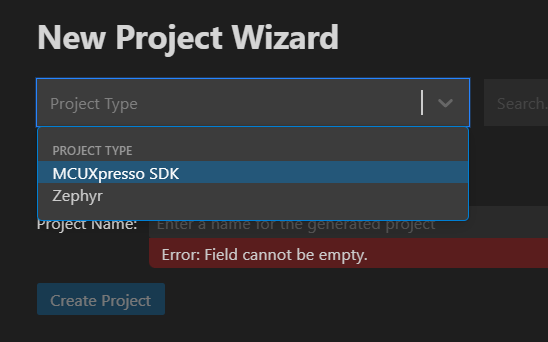
One or multiple values may be selected. In the case of multiple values, the boards that match at least one of the selected project types will be displayed.

The search tries to match boards with the identifier or name provided in the query. However, you can also search for other board-related data in the query. Partial matching is also supported.

It is also possible to further narrow the results by filtering. Boards can be filtered by the features that they support. The filter conditions are applied with an OR operator, therefore results that match at least one property will be fetched.

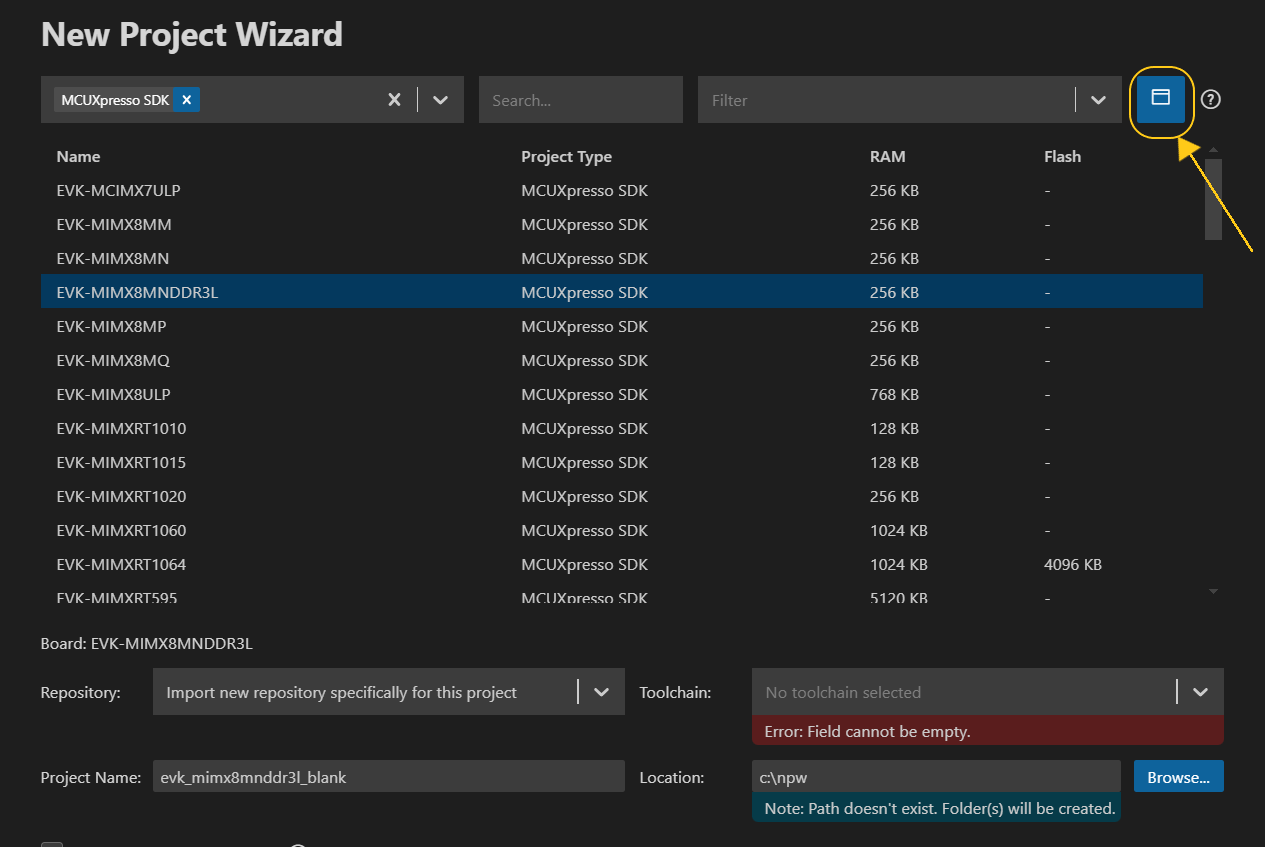
The view can also be converted from a grid view to a list view, that contains more information, such as RAM and Flash.
Project generation
Upon selecting a board, the wizard expands to allow you to select a repository, a build toolchain, a project name, and a location.
The repository can either be a new repository that will be cloned specifically for this new project, or an already existing one.
Note: Importing a new repository for the project will also import the repository into the list of available repositories, except in the case of Zephyr. New Project Wizard will clone a minimal Zephyr repository that can only be used for that project.
There is also the option to open the configuration tools specific for the project type, after import. In the case of MCUXpresso SDK, Configuration Tools will be opened, as opposed to GUIConfig for Zephyr (kernel configuration, KConfig).

Note: The wizard displays the full destination path where the project will be created, combining the selected location and project name fields.
After pressing “Create Project”, the project will start generating at the specified location. A notification will show the progress of the operation.
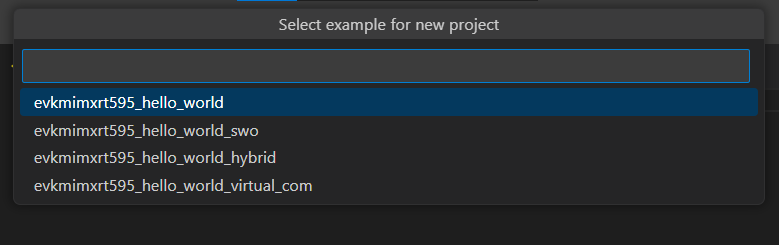
In some cases, specifically for MCUXpresso projects, a new project may have multiple variants (some examples may be variants of the same template, but for different cores of the target). Since the Wizard cannot determine which sample should be used, it prompts for a selection in a quick pick.
Import a Project from Software Repository
Once a source repository is available in MCUXpresso for VS Code, you can create your own application by importing an example from the repository.
You have several options to open the wizard to create a project:
Select the desired available repository within Imported Repositories view, right-click on it and select “Import Example Application from an Installed Repository” or
From Projects view (in case it has no projects yet) press “Import Example from Repository” button or
From Projects view toolbar select “Import Example Application from an Imported Repository” option.
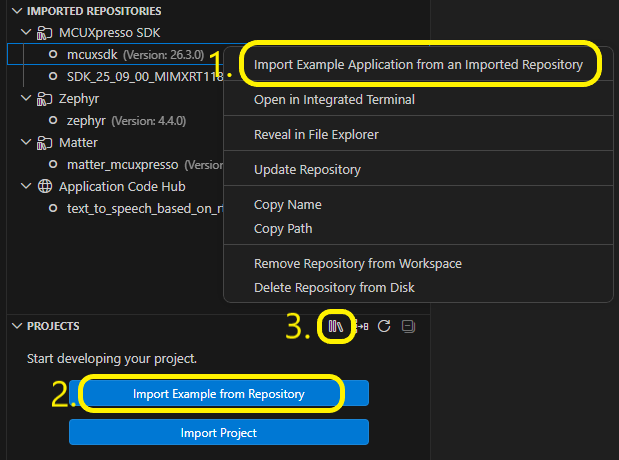
Selecting one of the above options opens a wizard with a few steps to follow until the project can be generated.
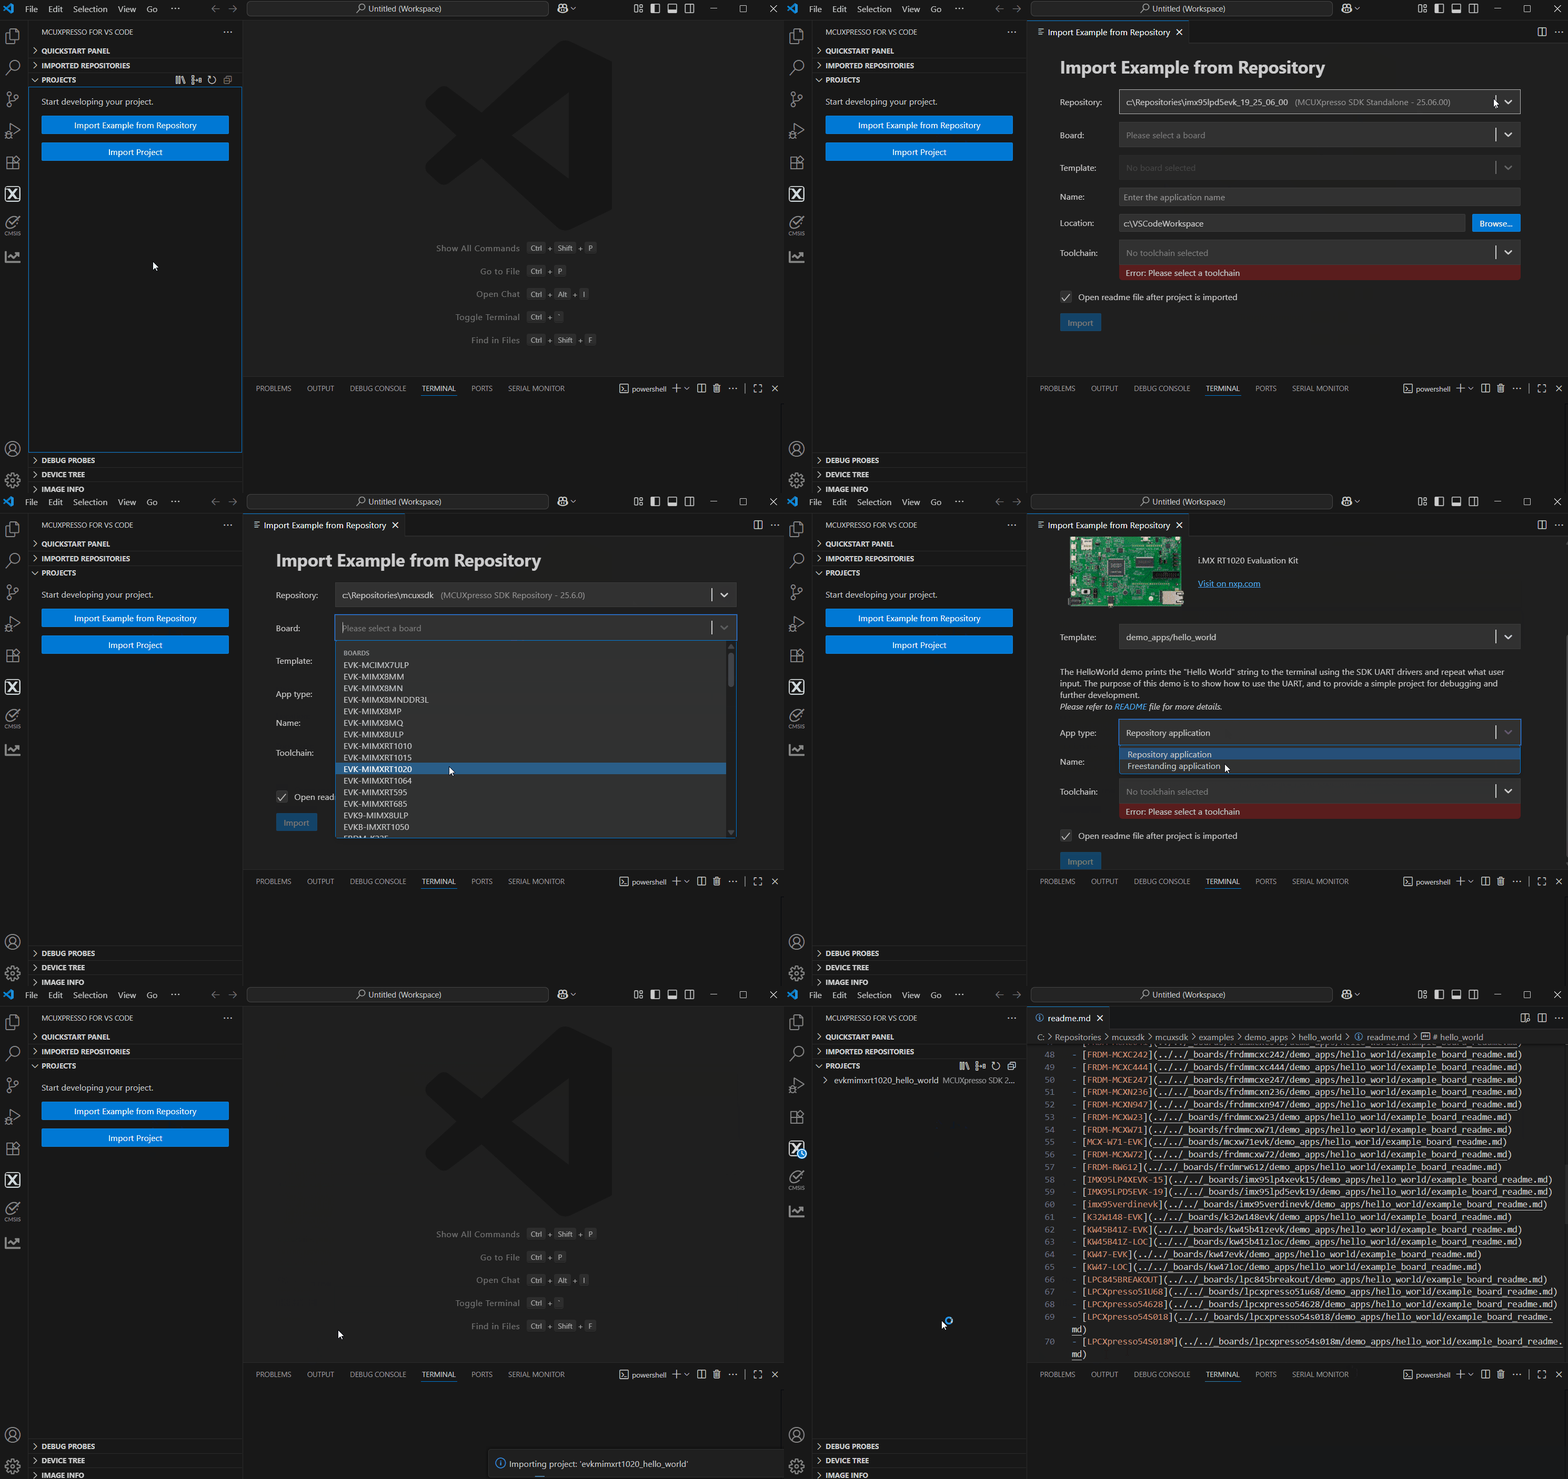
You then have to fulfill some required fields:
Choose a repository - select from the imported source repository (can be MCUXpresso, Zephyr or a custom one)
Choose a board - select one listed here (the ones available within the selected repository)
Choose a template - this is the list of available project templates for selected repository/board from above
Project type - project type selection (see Project Types below)
Name - project name. This will be further referred in the workspace. If the project’s name already exists, an error will indicate this
Location - path for the project. The path will be created if not exists. This field is available, unless the application is kept in repository. The wizard displays the full destination path where the example will be imported, combining the selected location and project name fields.
Choose a toolchain - select one of the already installed toolchains
Open readme file after project is imported - this option will open existing example readme in case it exists (when the project will be created, after pressing “Import” button); this option is unchecked by default
Import Existing Project
Import an existing MCUXpresso project by selecting one of the following options:
From Projects view (in case it has no projects yet) press “Import MCUXpresso for VS Code Project” button or
From Projects view toolbar select “Import MCUXpresso for VS Code Project” option.
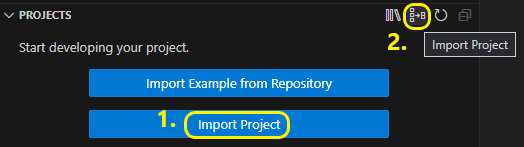
From the wizard, select the existing project (choose from archived, folder project options or executable; choosing an executable file will result in creating a new project that will allow debugging and accessing the available binary tools options for that executable).
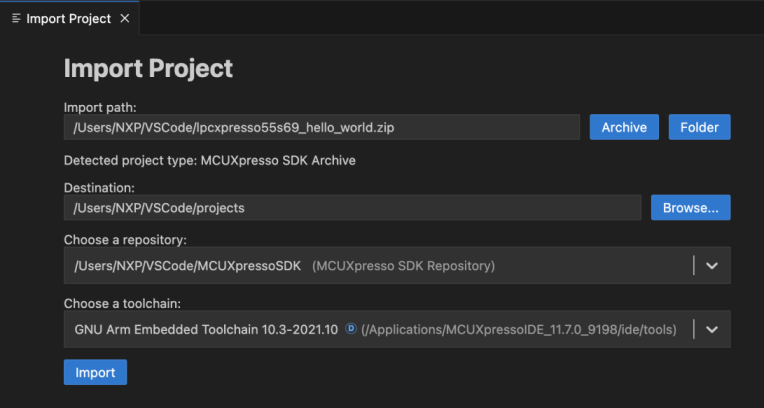
You have to fill the required fields:
Import path - select the project archive path or folder
Location - select the path where the project will be imported. This field is only available when importing from an archive (any project type) or an Executable file. For folder-based imports of other project types (MCUXpresso IDE, MCUXpresso SDK, Zephyr, CMake, Matter), the project is imported in-place and no destination is needed.
Choose a repository - select one of the already Imported Repositories which are compatible with the imported project type. Pick a suitable one or use Add repository path option from the combobox. Alternatively, select No associated repository to import the project without associating a repository; in this case a note informs you that a repository can be associated later from the project’s Associate Repository context menu option.
Choose a toolchain - select one of the already installed toolchains. Pick a suitable one or use Add toolchain path option from the combobox
Importing from an archive
When an archive file (.zip, .tar, .gz, .tgz) is selected as the import path, the extension inspects the archive contents in memory to discover all contained projects across all supported project types:
Single project found - the project type is auto-detected and the wizard proceeds without any additional prompt.
Multiple projects found - a picker is shown so the user can select the desired project. The Selected project field in the wizard reflects the chosen sub-folder within the archive.
The archive is always extracted into a folder named after the archive file (without extension) inside the selected Location. If a folder with that name already exists at the destination, an error is shown indicating the full path that would be overwritten.
Importing from a folder (in-place)
When a folder is selected as the import path, the project is imported in-place — the project files remain at their current location. The Location field is not shown for folder-based imports of MCUXpresso IDE, MCUXpresso SDK, Zephyr, CMake, and Matter projects. Only Executable folder imports allow selecting a separate destination.
Linked projects
If the selected project references other projects (linked projects), a Linked projects that will also be imported section is shown in the wizard listing all projects that will be imported alongside the main one. This applies to both archive-based and folder-based imports.
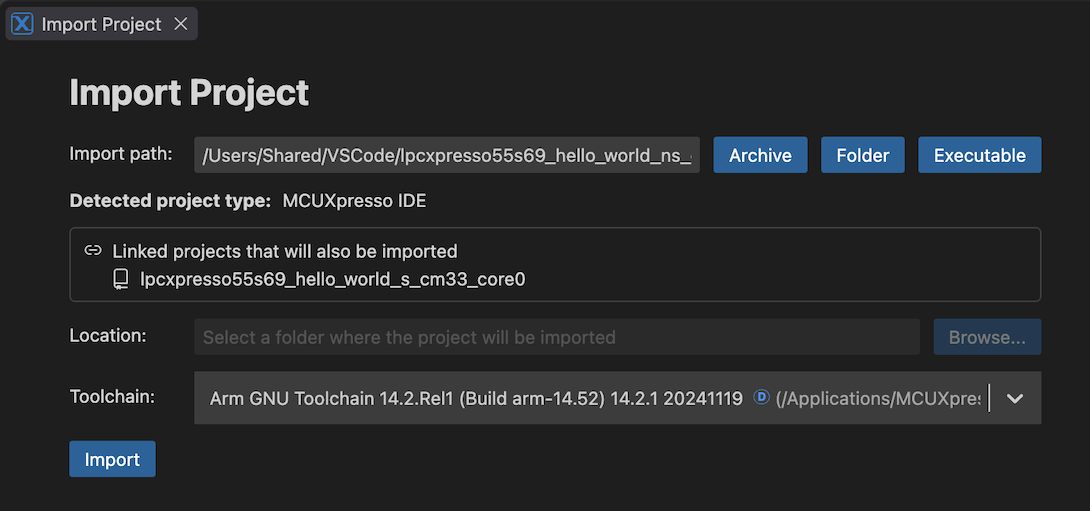
Import a project based on an existing executable file
To import a project from an existing executable press the “Executable” button from the import project wizard, choose the executable file and fill in the required information ( destination, toolchain).
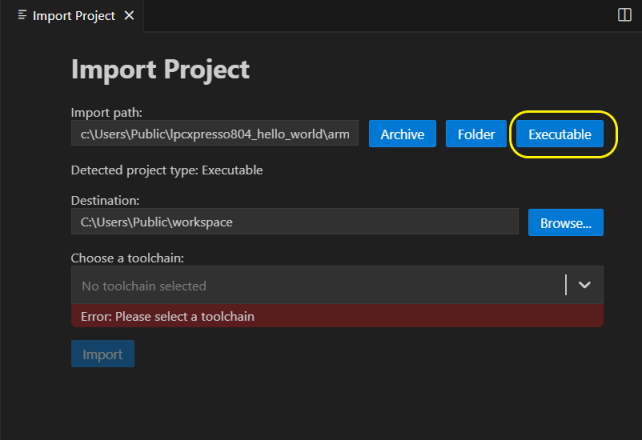
Since the newly created project won’t contain any source files this project won’t have the option to build/rebuild the project or to create any build configuration. However, the project can be debugged once a device target is associated with the project. This can be done by either associating a repository with the project or by simply starting a debug session and providing the necessary information.
For example, on LinkServer the extension will first present a list of all the supported devices.
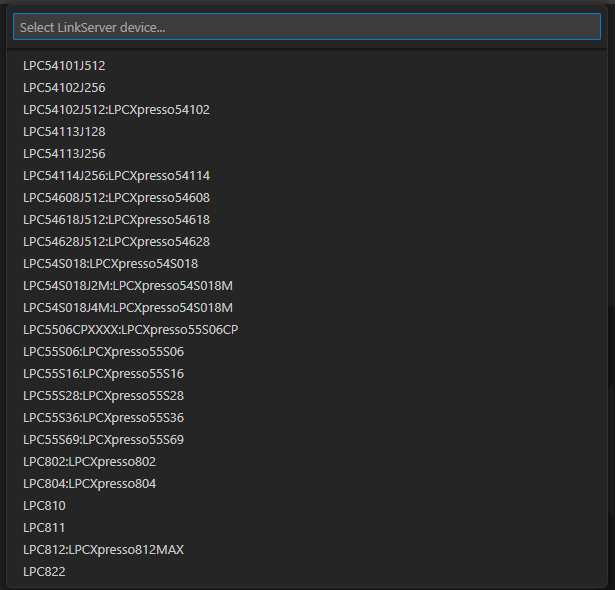
A project resulted from importing an executable file has the existing binary tools support: Image Info options and the tools from “Binary utilities” menu are available.
Import an existing project from folder
To import an existing project from folder choose “Folder” button from the import project wizard.
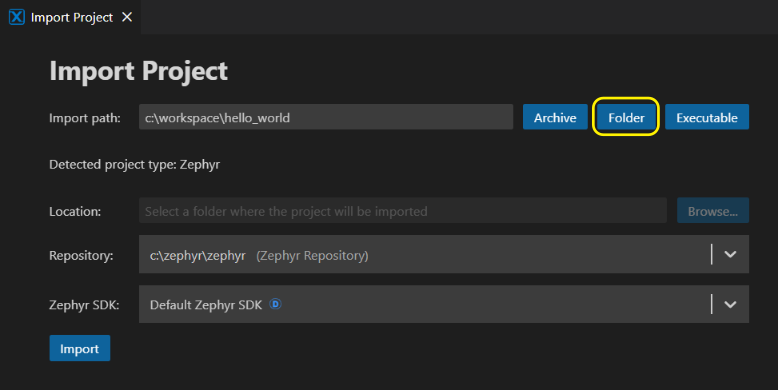
If the selected folder is an actual project, the path will be automatically filled in “Import Path” field.
Otherwise, a quick pick will appear listing the available projects in the given folder plus its nested directories, recursively. User can choose only one project from the list, and the “Import Path” field will be filled accordingly.
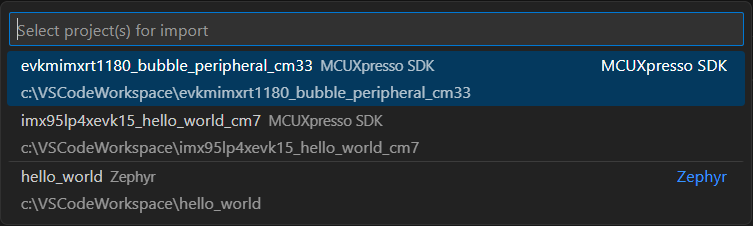
Note: Importing projects from installed repositories is not available using “Import Project from Folder”. To import an SDK project, please use the “Import Example from Repository” option.
Export a project
An existing project can be exported to an archive. This can be achieved by selecting a project, open context menu and select Project -> Export MCUXpresso Project Archive.
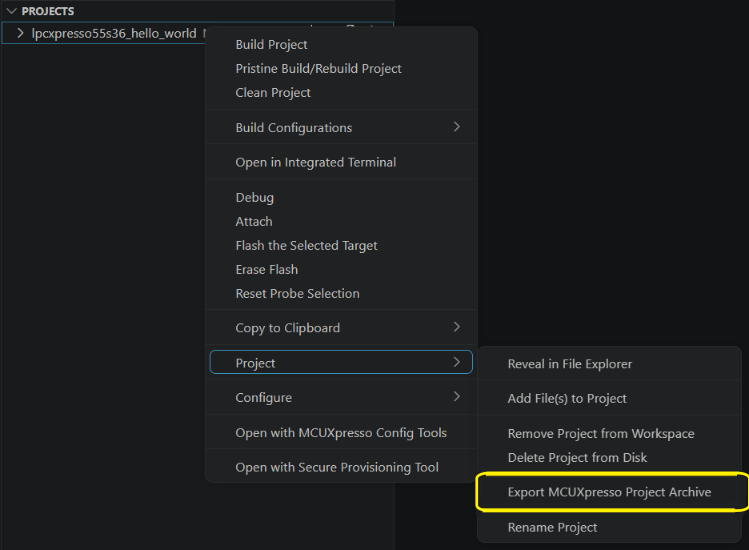
You’ll be asked then to provide a path where the archive will be generated. The default is the path where the project is located.
Import Multiple Projects
The Import Multiple Projects command allows importing several projects into the workspace at once. It is accessible from the VS Code command palette.

Select source location
After launching the command, an input box is shown where you specify the source — either a directory or an archive file. The path can be provided in three ways:
Typing or pasting the path directly into the input box.
Using the Browse Folder button to open a folder browser dialog.
Using the Browse Archive button to open a file browser dialog filtered to supported archive formats (
.zip,.gz,.tgz,.tar).
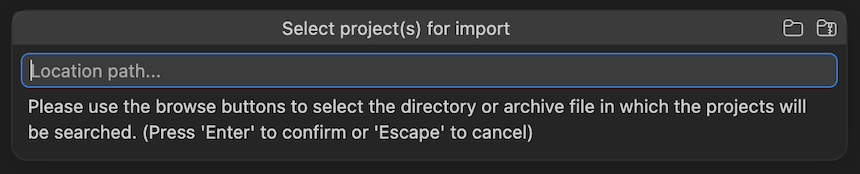
If an archive file is selected, you will be prompted to choose the destination folder where its contents will be extracted. The extraction is performed automatically before the project search begins.
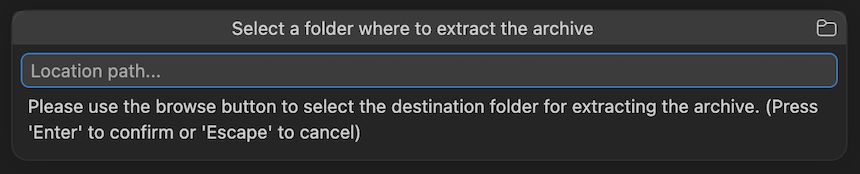
Select projects
The extension recursively searches the selected directory (or the extracted archive contents) and lists all recognized projects, grouped by type. Supported project types include MCUXpresso IDE, MCUXpresso SDK, Zephyr, CMake, and Matter.
One or multiple projects can be selected from the list.
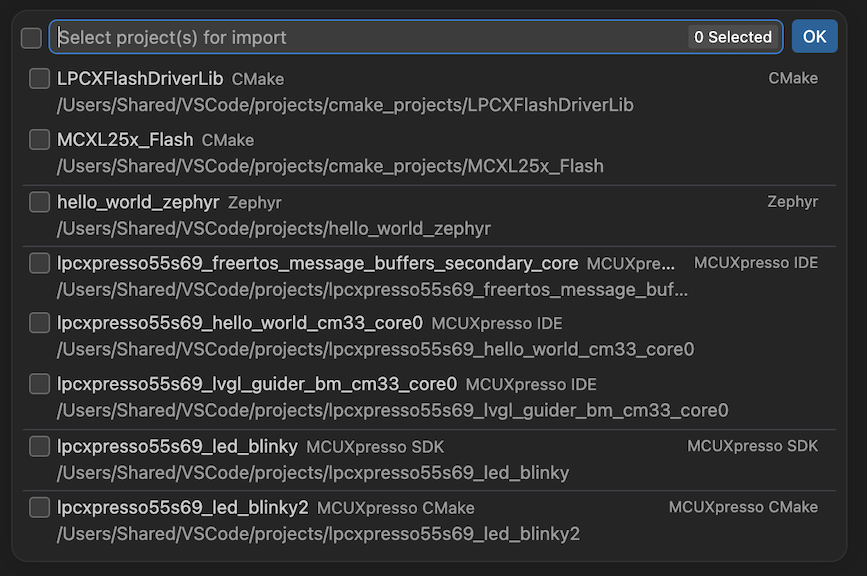
Note: If the same folder contains projects of different types, selecting one type will automatically deselect projects of a different type from that folder.
Select repository and toolchain


Depending on the selected project types, prompts for a repository and toolchain will be shown. For Zephyr projects, a Zephyr SDK selection is requested. For all other project types, an Arm GCC toolchain is requested. The listed options represent the intersection of repositories and toolchains compatible with all selected projects.
Move a project from one machine to another
A project can be moved from one machine to another by using the export and import project features.
First you need to export the desired project using Export MCUXpresso Project Archive option. After that, you need to copy the generated project archive to the other machine.
Once the project archive is available on the second machine, you can use the Import Project Wizard feature to import the project.
After importing the project, the repository and toolchain paths are updated according to the values selected in the Import Project Wizard.
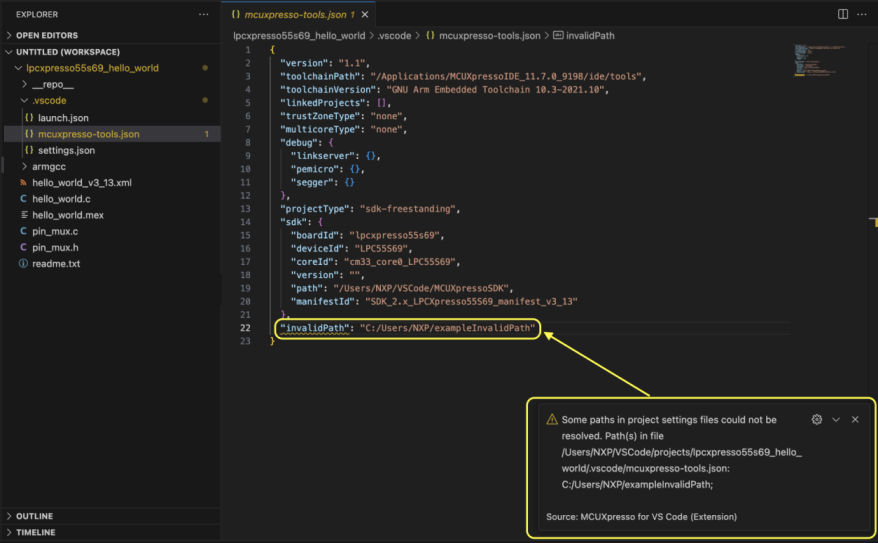
The extension reports all paths in project settings files (files in .vscode project directory) that could not be automatically resolved. In this case, the user needs to manually update them.
Removing projects
Projects view offers two ways to remove a project:
Remove Project from Workspace: Remove the project from the current VS Code workspace without deleting it from the disk. This can be done by right-clicking a project and navigating to “Project” -> “Remove Project from Workspace”.
Delete Project from Disk: Remove the project from the current VS Code workspace and delete it from the disk. This can be done by right-clicking a project and navigating to “Project” -> “Delete Project from Disk”.
When removing a project that also has linked projects, a notification dialog informing about the possibility to remove the linked projects as well will be displayed.
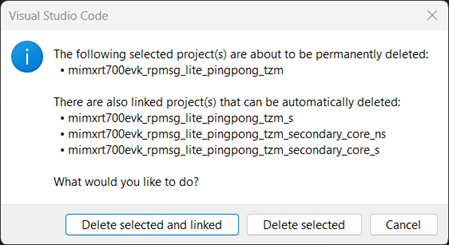
A notification will also be displayed when trying to remove a project that will still be referenced by projects remaining in the workspace.

Build configuration
The Projects view displays all available build configurations for each project. One is selected by default, any other can be selected using “Set as Default” option.

Additionally, you can add, duplicate, edit or delete a build configuration.

Sysbuild (System build)
Sysbuild is a higher-level build system that can be used to combine multiple other build systems. For more details please follow the Zephyr Sysbuild (System build) documentation.
Note: Sysbuild is a notion that originates from Zephyr. However, it is currently also used by the west-based MCUXpresso SDK (SDK version 24.12 or newer), which relies on the same west/CMake build infrastructure. As a result, the Sysbuild enablement and behavior described here apply both to Zephyr projects and to west-based MCUXpresso SDK projects.
Enable or disable Sysbuild
To enable or disable Sysbuild, go to the context menu of the project, select “Set Sysbuild” under the “Configure” group and select the desired option.


Controlling Sysbuild from the Tasks Automation Framework
Sysbuild enablement can also be controlled programmatically through the Tasks Automation Framework. The "buildProject", "cleanProject", and "rebuildProject" task commands each expose an optional sysbuild boolean property inside their commandOptions.
When the sysbuild property is set, it overrides the enablement state for that task execution. By default, the enablement state is the one specified in the example/project definition at import/creation time.
For example, to disable Sysbuild when building a project:
{
    "type": "MCUXpresso",
    "version": "1.0.0",
    "label": "Build without Sysbuild",
    "commandOptions": {
        "command": "buildProject",
        "projectName": "my_project",
        "buildConfigName": "debug",
        "sysbuild": false
    }
}
The same sysbuild property is available for the "cleanProject" and "rebuildProject" commands. Refer to the Tasks Definition documentation for the full list of properties supported by each command.
Known issues and workarounds
For some boards (e.g. EVK-MIMXRT595 and MIMXRT700-EVK), certain example projects (such as the DSP and eIQ examples) can only be built when the Xtensa development toolchain is available. As a result, these projects cannot be built with Sysbuild enabled in environments that provide only the Arm toolchain.
Workaround: Disable Sysbuild for the affected project before building, either from the UI (“Set Sysbuild” under the “Configure” contextual menu) or by setting the
sysbuildproperty tofalsein the"buildProject","cleanProject", or"rebuildProject"task definition.
Open Linker script
The MCUXpresso for VS Code extension provides an Open Linker Script action that locates and opens the linker script associated with the selected build configuration. The action is available in the Build Configuration panel and is supported for MCUXpresso SDK CMake-based and Zephyr projects, including sysbuild multi-domain configurations.
Opening a Linker script
In the Projects view, select a project and open its Build Configuration panel.
Click Open Linker Script.
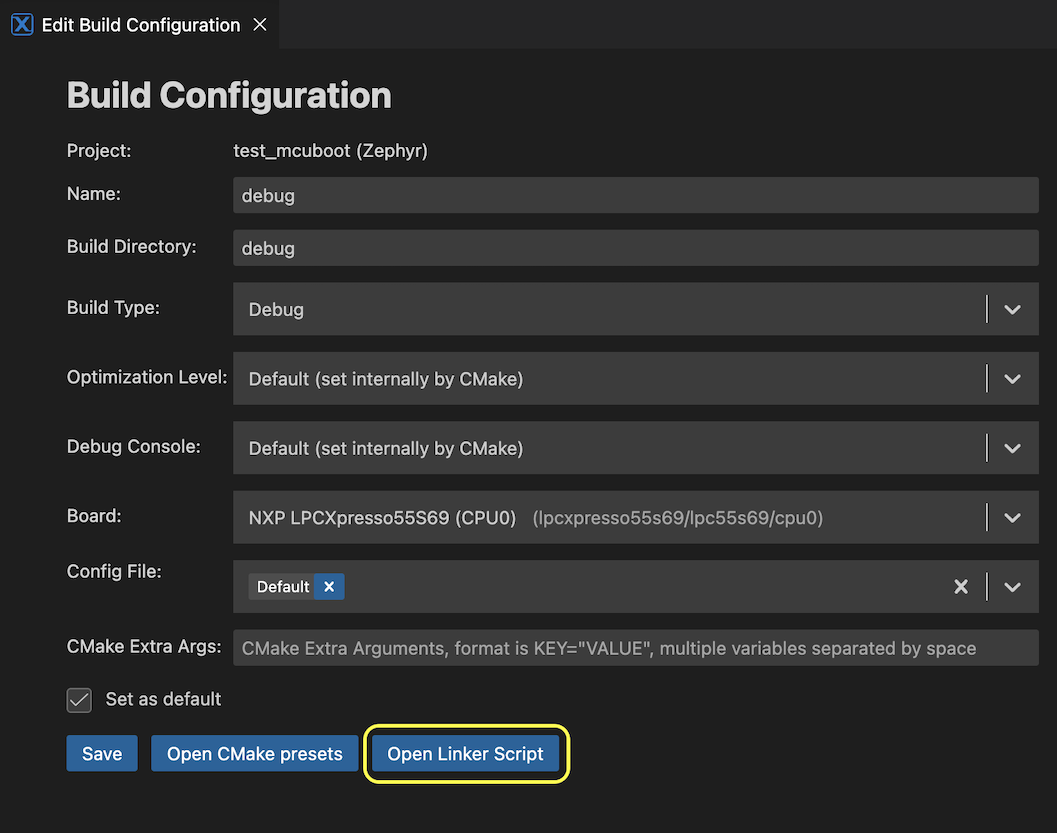
The extension resolves the linker script for the selected build configuration and opens it in the editor with syntax highlighting.
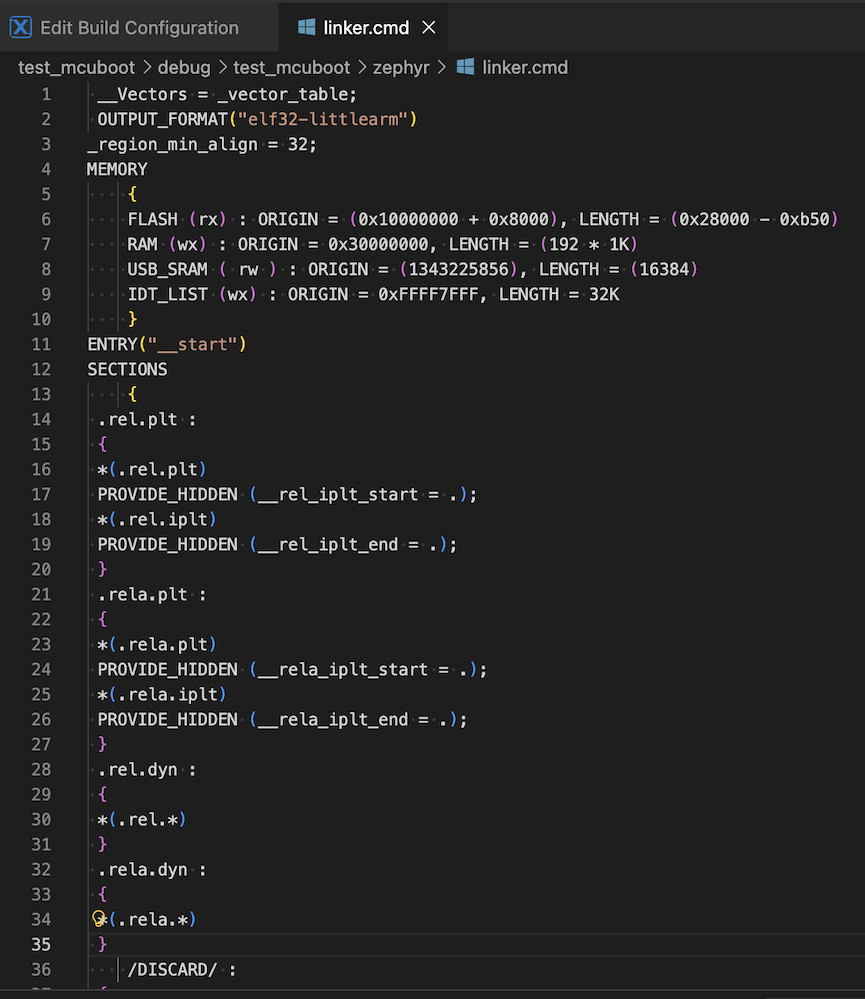
Note: If the project is not yet configured or built, the extension automatically performs the required steps before opening the file. A progress notification is displayed throughout this process.
Zephyr projects
For Zephyr projects, the final linker script is a generated file produced at build time. If the file does not exist on disk, the extension triggers a build automatically before opening it.
The linker script is regenerated on every build. Any manual edits are overwritten the next time the project is built. When saving modifications to the file, the following warning is displayed:
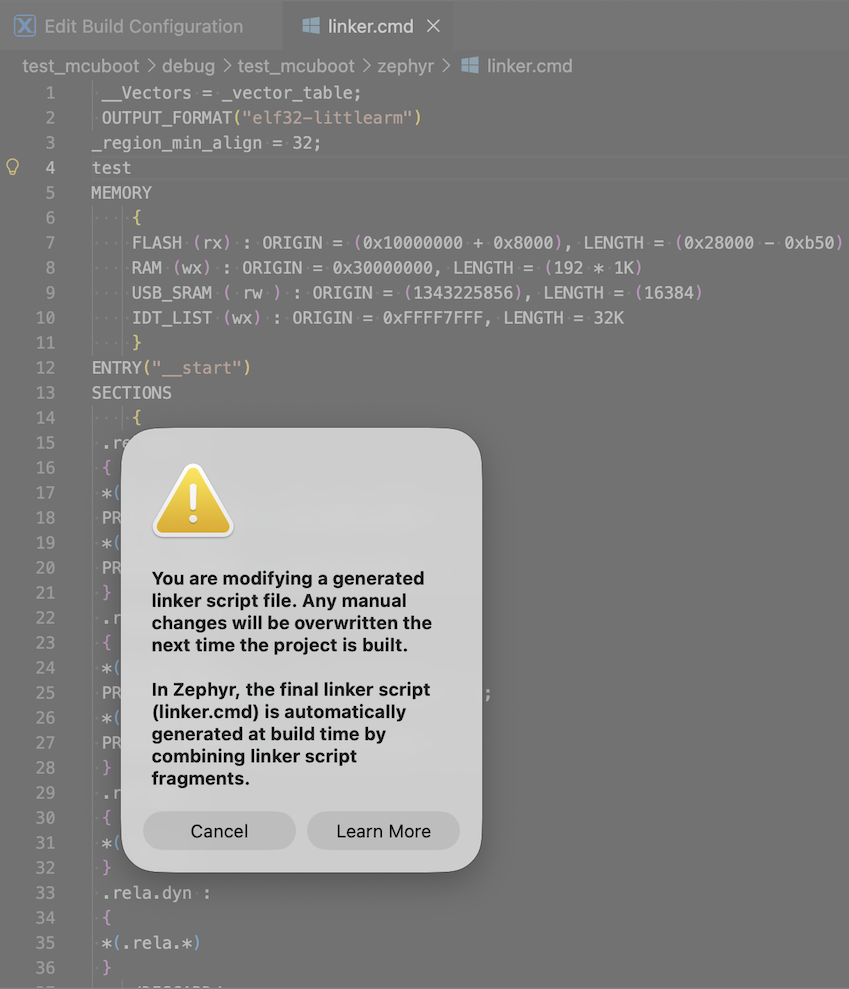
A Learn More button in the dialog opens the Zephyr Build System documentation. The save operation is not blocked by the warning.
Sysbuild multi-domain projects
For sysbuild projects with multiple build domains, a selection dialog lists the available domains. Select the domain whose linker script to open. Dismissing the dialog cancels the operation without displaying an error.
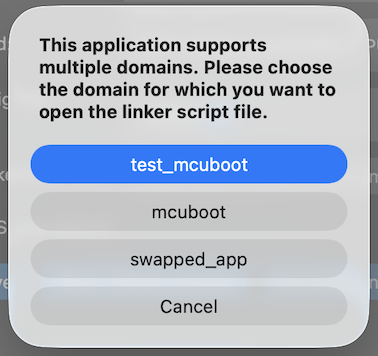
For single-domain sysbuild projects, no selection is required and the file opens directly.
Troubleshooting
Problem |
Resolution |
|---|---|
Open Linker Script button is disabled |
The button is disabled when the Build Directory field is empty or contains an invalid path, when the build configuration form has validation errors, or when an open-linker-script operation is already in progress. |
Linker script not found |
The build output does not contain a linker script reference. |
Configure step fails |
Review the Terminal panel for CMake errors. Verify that the toolchain is installed and correctly configured in the extension settings. |
Build step fails (Zephyr) |
Review the Terminal panel for compilation errors. Resolve any code or configuration issues in the project before retrying. |
Binary Utilities
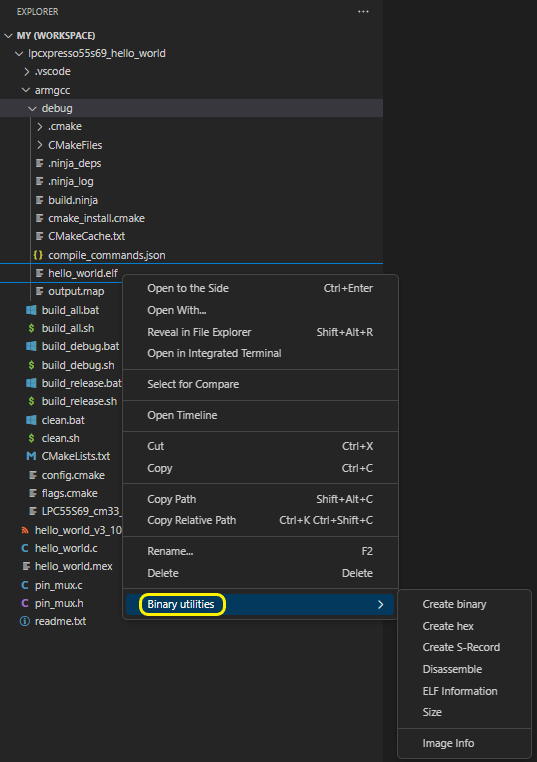
The context menu on the object or executable files provides various operations that can be done using different binary utilities:
Create binary - generates the binary format file invoking objcopy utility
Create hex - generates the hex format file invoking objcopy utility
Create S-Record - generates the hex format file invoking objcopy utility
Disassemble - generates the disassemble file invoking objdump utility and opens it in the editor
ELF Information - generates some information about the ELF file using the readelf utility
Size - generates size information on the ELF file using the size utility
Image Info - generates static callgraph and memory details with types, usage, sections and symbols of the selected binary files. Follow the Image Info section for details.
Build project
The next step is to build the executable file. Use the Build Project option from the toolbar or right-click on the desired project and select the Build Project context menu action. This starts building the configuration marked as default. The build artifacts can be inspected in the MCUXpresso Projects view, and in VS Code’s Explorer view.
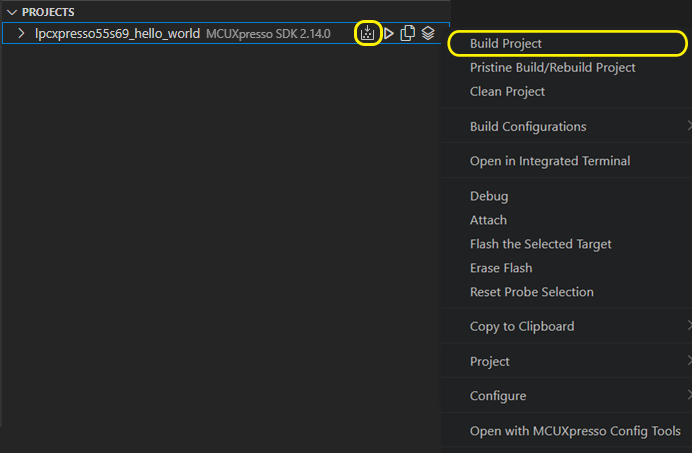
If you need to build all configurations, use the project’s context menu option Build Configuration, and then select Build All. Options to Clean and Rebuild all build configurations are also available under the project’s Build Configuration context menu option.

Debug configurations
The Projects view allows you to manage debug configurations for your projects. You can add, remove, duplicate, and edit debug launch configurations. Moreover, using the inline buttons associated to each debug configuration, you can easily start a debug session using the selected configuration.
There is also a Default debug configuration that you can manually set. The default debug configuration will be used when you start a debug session by clicking the Debug button associated to the project.
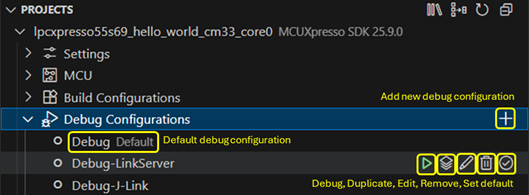
When there is no Default debug configuration and the Debug button associated to a project is clicked, the extension will prompt you to select a debug configuration from a list of available configurations, if this is the case. The debug configuration selected using the quick-pick will be set as the default debug configuration for the project.

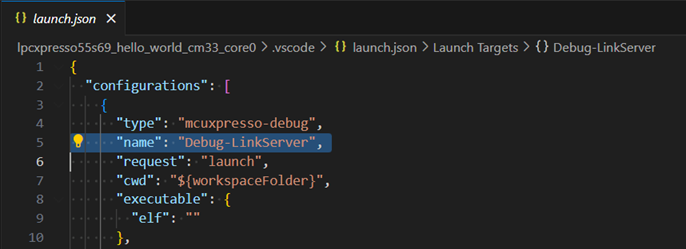
Debug configuration editing is achieved by using the built-in VS Code editor. The MCUXpresso for VS Code extension will open launch.json file in a dedicated editor, and highlight the name of the specific debug configuration.
Toolchain Management
One important aspect is the toolchain management. This extension is able to identify existing MCUXpresso SDK or Zephyr installed toolchains, depending on the selected repository type, and can also detect the user-added options. Users can choose their preferred toolchain either during project creation or when configuring an existing project.
Additionally, the extension can automatically detect and install the recommended toolchain version for your project (see Using the Recommended Toolchain Version for more details).
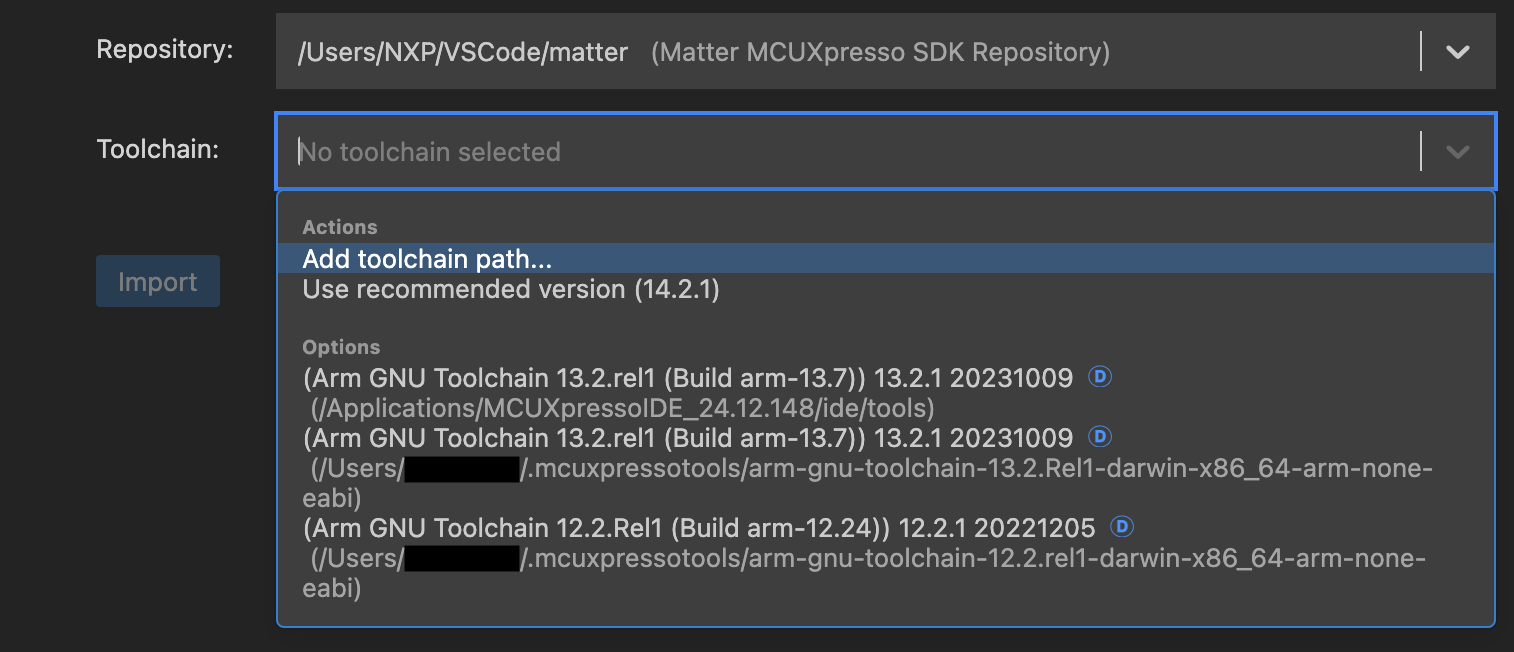
Once the project is created, the toolchain selection is preserved in project settings, in JSON format in the file mcux_include.json. This file contains all variables for the CMakePresets.json file.
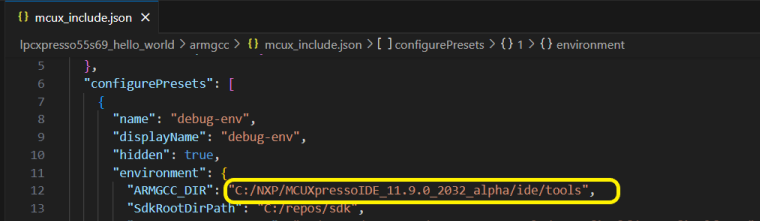
Using the Recommended Toolchain Version
The extension provides an option to automatically detect and install the recommended toolchain version for your project. The recommended version is determined by the requirements of the associated repository.
This feature is available in two scenarios:
During project creation - When importing a project using one of the importing options: Import Example from Repository, New Project Wizard, or Import Project view.
For existing projects - When changing the associated toolchain or Zephyr SDK.
When you select “Use recommended version”, the extension will:
Detect the recommended toolchain version from the repository information.
Verify if the version is already installed on your system.
Initiate an automatic installation process if the version is not found.
Once the recommended version is installed and detected, it will be automatically associated with your project.
Changing the associated toolchain or Zephyr SDK for an existing project
The associated toolchain or Zephyr SDK can be modified for an existing project. To change it, right-click on the project, navigate to “Configure”, and select “Associate Toolchain” or “Associate Zephyr SDK”.
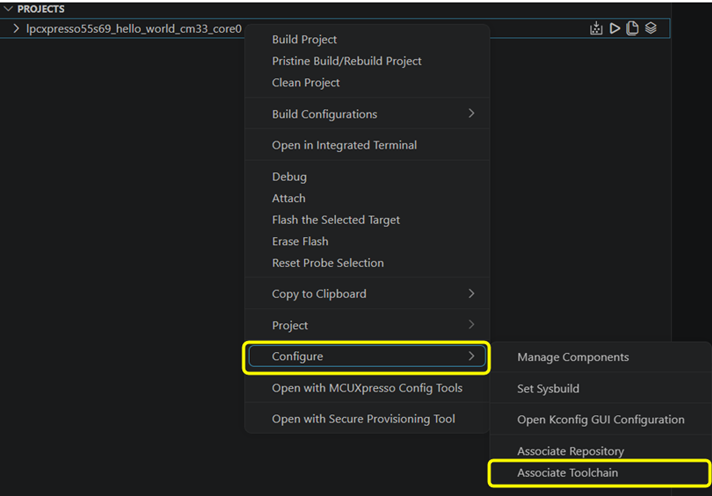

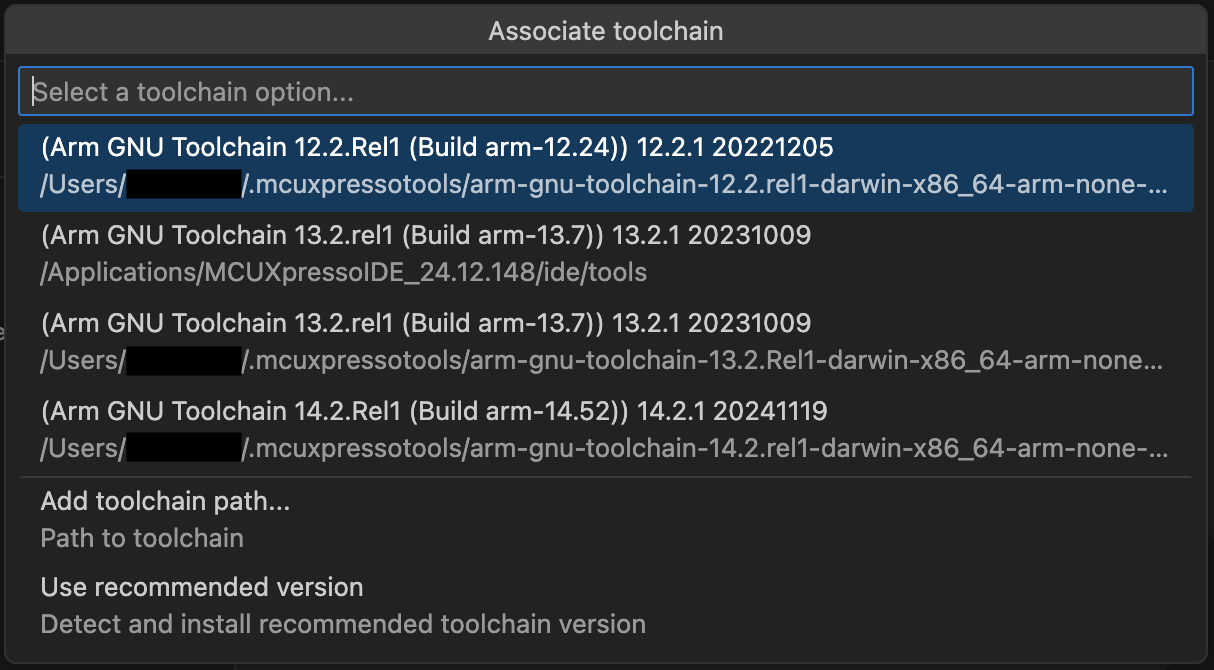
A quick pick menu will appear with the following options:
Available toolchains or Zephyr SDKs - Lists all toolchains or Zephyr SDKs currently installed on your system.
Add toolchain path… - Allows you to manually specify a custom toolchain location.
Use recommended version - Automatically detects and installs the recommended toolchain version for your project (see Using the Recommended Toolchain Version) section above for details).
Default Zephyr SDK - Available only for Zephyr projects, this option allows you to use the default Zephyr SDK configuration, the build system will decide which Zephyr SDK to use from the installed ones.

Toolchain and Zephyr SDK version validation when building a project
When building a project, if the associated toolchain or Zephyr SDK version does not match the recommended version for that project, the extension will display a warning notification. This ensures that your project builds with the correct toolchain or Zephyr SDK configuration and helps avoid potential compatibility issues.
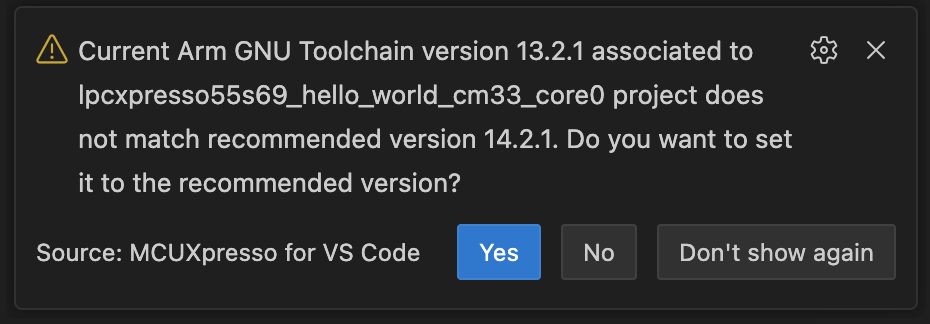
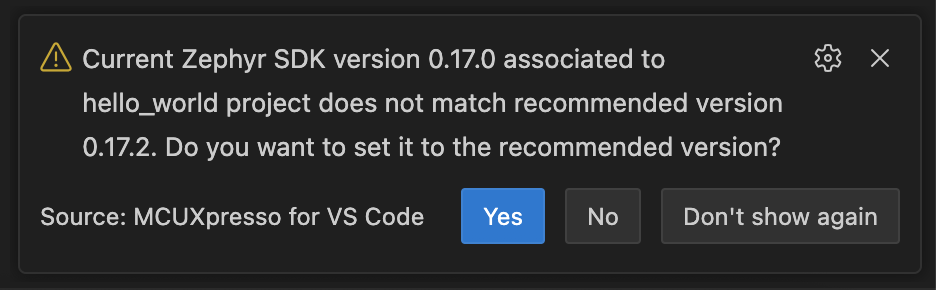
The notification will show:
The current toolchain or Zephyr SDK version associated with your project.
The recommended toolchain or Zephyr SDK version for your project.
Options to update or keep the current version.
Selecting “Yes” triggers an automatic update to the recommended version. The extension will detect and install the recommended version if needed, following the same workflow as described in Using the Recommended Toolchain Version section above.


Selecting “No” maintains the currently associated version for your project. Additionally, you can select “Don’t show again” to disable future version mismatch warnings for this specific project.
Rename project
You can rename a project in MCUXpresso for VS Code by right-clicking the project and selecting ‘Project -> Rename Project’ from the context menu and updating the project name in the quick input dialog.

Variables Reference
Variable substitution is supported in mcuxpresso-tools.json for defining paths (like: toolchainPath, sdk.path).
You can use environment variables, like:
"toolchainPath": "%HOMEPATH%/.mcuxpressotools/arm-gnu-toolchain-12.2.rel1-mingw-w64-i686-arm-none-eabi".
The following predefined variables are supported:
${userHome}- the path of the user’s home folder${workspaceFolder}- the path of the current project${workspaceFolderBasename}- the name of the current project${pathSeparator}- the path separator used by the operating system