Generate i.MX RT bootable image
There are two types of bootable image for i.MX RT devices.
Normal boot image: This type of image can boot directly by BootROM.
Plugin boot image: This type of image can be used to load a boot image from devices that are not natively supported by BootROM.
Both types of images can be unsigned, signed, and encrypted for different production phases and different security level requirements:
Unsigned Image: The image does not contain authentication-related data and is used during development phase.
Signed Image: The image contains authentication-related data (CSF section) and is used during production phase.
Encrypted Image: The image contains encrypted application data and authentication-related data and is used during the production phase with higher security requirement.
The above types of bootable images can be generated by using the elftosb utility. The detailed usage of the elftosb utility is available in elftosb Users Guide.
Description of the elftosb utility
The elftosb utility is a command-line host program used to generate the i.MX RT bootable image for the i.MX RT BootROM. The utility also generates a wrapped binary file with command sequences and a bootable image. To create an SB file, use command-line options and an input text file (also called BD or command file).
The elftosb utility options
The below table shows the command line options used to create the i.MX RT bootable image.
elftosb utility options
Option |
Description |
|---|---|
-f |
Specify the bootable image format To create the i.MX RT bootable image, the usage for family argument “-f” is: “-f imx” To create the SB file, the usage is: “-f kinetis” |
-c |
Command file to generate corresponding bootable image For example, “-c program_flexspi_nor_hyperflash.bd” |
-o |
Output file path For example, “-o ivt_flashloader.bin” |
-V |
Print extra detailed log information |
-? |
Print help info |
BD file
Each BD file consists of the following four blocks: options, sources, constants, section
The image paths are defined in the “sources” block.
The constant variables are defined in the “constants” block.
The memory configuration and programming-related operations are defined in the “section” block.
The elftosb utility supports two types of BD files. The first type of file is used for the i.MX RT bootable image generation. The “-f imx” option is mandatory during boot image generation using the elftosb utility. The second type of file contains commands that are used for memory programming. The “-f kinetis” flag is mandatory in this use case.
BD file for i.MX RT bootable image generation
The BD file for i.MX RT bootable image generation usually consists of four blocks. These blocks are options, sources, constants, and section.
Options block
The below table shows the options used to generate a bootable image for the Options block.
Supported options in the “Options” block
Options |
Description |
|---|---|
Flags |
Generates unsigned, signed, encrypted boot images, and plugin images: • bit 2 - Encrypted image flag • bit 3 - Signed image flag • bit 4 - Plugin image flag For example: • 0x00 - unsigned image • 0x08 - signed image • 0x04 - encrypted image (encrypted image is always a signed image) • 0x18 - signed plugin image |
startAddress |
Provides the starting address of the target memory where image should be loaded by ROM. |
ivtOffset |
Provides offset where the IVT data structure must appear in the boot image. The default is 0x400 if not specified. The valid value is 0x400 or 0x1000 for i.MX RT boot image. |
initialLoadSize |
Defines the start of the executable image data from elf or the srec file. The default value is 0x2000 if not specified. In general, this value should be 0x1000 or 0x2000. |
DCDFilePath |
Defines the path to DCD file. If not specified, the DCD pointer in the IVT will be set to NULL (0) else the dcd file contents will be loaded at offset 0x40 from ivtOffset. The dcd file size is limited to (initialLoadSize - ivtOffset-0x40). |
cstFolderPath |
Defines the path for platform dependent CST. (windows, linux) If not specified, elftosb tool will search for cst executable in same path as elftosb executable. |
entryPointAddress |
Provides the entry point address for ELF or SREC image. If not specified, ELF image uses its source image entry point address but SREC image will use default entry point address (0). |
Sources block
Typically, all the application image paths are provided in this section. Currently, the ELF file and SREC file are supported for i.MX RT Bootable image generation, for example:
sources {
    elfFile = extern(0);
}
Constants block
The Constants block provides a constant variable that is used to generate CSF data for image authentication and decryption. The Constants block is optional for an unsigned image. The supported constants are listed below.
Constants {
    SEC_CSF_HEADER = 20;
    SEC_CSF_INSTALL_SRK = 21;
    SEC_CSF_INSTALL_CSFK = 22;
    SEC_CSF_INSTALL_NOCAK = 23;
    SEC_CSF_AUTHENTICATE_CSF = 24;
    SEC_CSF_INSTALL_KEY = 25;
    SEC_CSF_ AUTHENTICATE_DATA = 26;
    SEC_CSF_INSTALL_SECRET_KEY = 27;
    SEC_CSF_DECRYPT_DATA = 28;
    SEC_NOP = 29;
    SEC_SET_MID = 30;
    SEC_SET_ENGINE = 31;
    SEC_INIT = 32;
    SEC_UNLOCK = 33;
}
Section blocks
The Section blocks are used to create the sections for an i.MX RT bootable image, for example, all sections for CSF data. For the unsigned image, the Section block is a fixed blank section, as shown below.
section (0)
{
}
For signed and encrypted image, the following sections are defined for the elftosb utility to generate the CSF descriptor file which is required by CST for CSF data generation.
SEC_CSF_HEADER
This section defines the necessary elements required for CSF Header generation as well as default values used for other sections throughout the remaining CSF.
Elements for CSF Header section generation
Element |
Description |
|
|---|---|---|
Header_Version |
HAB library versionValid values: 4.0, 4.1, 4.2, 4.3 |
|
Header_HashAlgorithm |
Default Hash Algorithm Valid values: sha1, sha256, sha512 |
|
Header_Engine |
Default Engine Valid values: ANY, DCP, CAAM, SW |
|
Header_EngineConfiguration |
Default Engine Configuration Recommended value: 0 |
|
Header_CertificateFormat |
Default Certificate Format Valid values: WTLS, X509 |
|
Header_SignatureFormat |
Default signature format Valid values: PKCS, CMS |
|
Header_SecurityConfiguration |
Fused security configuration Valid values: Engineering, Production |
|
Header_UID |
Generic (matches any value) U0, U1,… Un where each Ui=0..255 and n<255 |
|
Header_CustomerCode |
Value expected in “customer code” fuses 0..255 |
An example section block is shown as follows.
section (SEC_CSF_HEADER;
    Header_Version="4.3",
    Header_HashAlgorithm="sha256",
    Header_Engine="DCP",
    Header_EngineConfiguration=0,
    Header_CertificateFormat="x509",
    Header_SignatureFormat="CMS"
    )
{
}
SEC_CSF_INSTALL_SRK
This section contains the elements to authenticate and install the root public key for use in subsequent sections, as shown in the following table.
Elements for CSF Install SRK section generation
Element |
Description |
|---|---|
InstallSRK_Table |
Path pointing to the Super Root Key Table file |
InstallSRK_Source |
SRK index with the SRK table |
InstallSRK_HashAlgorithm |
SRK table hash algorithm. Valid values: SHA1, SHA256 and SHA512 |
An example section block is shown as follows.
section (SEC_CSF_INSTALL_SRK;
    InstallSRK_Table="keys/SRK_1_2_3_4_table.bin", // "valid file path"
    InstallSRK_SourceIndex=0
    )
{
}
SEC_CSF_INSTALL_CSFK
This section consists of the elements used to authenticate and install a public key for use in subsequent sections.
Elements for CSF Install CSFK section generation
Element |
Description |
|---|---|
InstallCSFK_File |
File path pointing to CSFK certificate |
InstallCSFK_CertificateFormat |
CSFK certificate format Valid values: WTLS, X509 |
section (SEC_CSF_INSTALL_CSFK;
    InstallCSFK_File="crts/CSF1_1_sha256_2048_65537_v3_usr_crt.pem", // "valid file path"
    InstallCSFK_CertificateFormat="x509" // "x509"
    )
{
}
SEC_CSF_INSTALL_NOCAK
The Install NOCAK command authenticates and installs a public key for use with the fast authentication mechanism (HAB 4.1.2 and up). With this mechanism, one key is used for all signatures.
The following table lists the install NOCAK command arguments.
Elements for CSF Install NOCAK section generation
Element |
Description |
|---|---|
InstallNOCAK_File |
File path pointing to CSFK certificate |
InstallNOCAK_CertificateFormat |
CSFK certificate format Valid values: WTLS, X509 |
An example section block is shown as follows:
section (SEC_CSF_INSTALL_NOCAK;
    InstallNOCAK_File= "crts/SRK1_sha256_2048_65537_v3_usr_crt.pem") // "valid file path"
    InstallNOCAK_CertificateFormat= "WTLS" // "WTLS", "X509"
    )
{
}
SEC_CSF_AUTHENTICATE_CSF
This section is used to authenticate the CSF from which it is executed using the CSFK mentioned in the section above. See the following table for more details.
Elements for CSF Authenticate CSF section generation
Element |
Description |
|---|---|
AuthenticateCSF_Engine |
CSF signature hash engine Valid values: ANY, SAHARA, RTIC, DCP, CAAM and SW |
AuthenticateCSF_EngineConfiguration |
Configuration flags for the hash engine. Note that the hash is computed over an internal RAM copy of the CSF Valid engine configuration values corresponding to engine name. |
AuthenticateCSF_SignatureFormat |
CSF signature format Valid values: PKCS1, CMS |
An example section block is shown as follows:
section (SEC_CSF_AUTHENTICATE_CSF)
{
}
SEC_CSF_INSTALL_KEY
This section consists of elements used to authenticate and install a public key for use in subsequent sections, as shown in the following table.
Elements for CSF Install Key section generation
Element |
Description |
|---|---|
InstallKey_File |
File path pointing to a Public key file |
InstallKey_VerificationIndex |
Verification key index in Key store Valid values: 0, 2, 3, 4 |
InstallKey_TargetIndex |
Target key index in key store Valid values: 2, 3, 4 |
InstallKey_CertificateFormat |
Valid values: WTLS, X509 |
InstallKey_HashAlgorithm |
Hash algorithm for certificate binding. If present, a hash of the certificate specified in the File argument is included in the command to prevent installation from other sharing the same verification key Valid values: SHA1, SHA256, SHA512 |
section (SEC_CSF_INSTALL_KEY;
    InstallKey_File="crts/IMG1_1_sha256_2048_65537_v3_usr_crt.pem",
    InstallKey_VerificationIndex=0, // Accepts integer or string
    InstallKey_TargetIndex=2) // Accepts integer or string
{
}
SEC_CSF_AUTHENTICATE_DATA
This section contains elements that are used to verify the authenticity of pre-loaded data in memory.
Elements for CSF Authenticate Data section generation
Element |
Description |
|---|---|
AuthenticateData_VerificationIndex |
Verification key index in key store |
AuthenticateData_Engine |
Data signature hash engine Valid values: ANY, DCP, CAAM, SW |
AuthenticateData_EngineConfiguration |
Configuration flags for the engine |
AuthenticateData_SignatureFormat |
Data signature format Valid values: PKCS1, CMS |
AuthenticateData_Binding |
64-bit unique ID (UID) for binding. If present, authentication succeeds only if the UID fuse value matches this argument, and the TYPE fuse value matches the Security Configuration argument from the Header command Valid values: U0, U1, … U7 with Ui: 0, …, 255. UID bytes separated by commas |
An example section block is shown as follows:
section (SEC_CSF_AUTHENTICATE_DATA;
    AuthenticateData_VerificationIndex=2,
    AuthenticateData_Engine="DCP",
    AuthenticateData_EngineConfiguration=0)
{
}
SEC_CSF_INSTALL_SECRET_KEY
This section contains elements used to install the secret key to the MCU secret key store which is used for KeyBlob decryption. This section is required for encrypted image generation and not for signed image.
Elements for CSF Install Secret Key section generation
Element |
Description |
|---|---|
SecretKey_Name |
Specifies the file path used for CST to generate the random decryption key file |
SecretKey_Length |
Key length in bits Valid values: 128, 192, and 256 |
SecretKey_VerifyIndex |
Master KEK index Valid values: 0 or 1 |
SecretKey_TargetIndex |
Target secret key store index Valid values: 0-3 |
SecretKey_BlobAddress |
Internal or external DDR address |
An example section block is shown as follows:
section (SEC_CSF_INSTALL_SECRET_KEY;
    SecretKey_Name="dek.bin",
    SecretKey_Length=128,
    SecretKey_VerifyIndex=0,
    SecretKey_TargetIndex=0)
{
}
SEC_CSF_DECRYPT_DATA
This section is required for encrypted image generation and not for signed image. It contains the necessary elements used to decrypt and authenticate a list of code/data blocks using the secret key stored in the secret key store, as shown in the following table.
Elements for CSF Decrypt Data section generation
Element |
Description |
|---|---|
Decrypt_Engine |
MAC engine Valid value: CAAM, DCP |
Decrypt_EngineConfiguration |
Configuration flags for the engine Default value: 0 |
Decrypt_VerifyIndex |
Secret key index in the Secret key store Valid values: 0-3 |
Decrypt_MacBytes |
Size of MAC in bytes If engine is CAAM, the valid value is even number between 4-16. The recommended value is 16. If engine is DCP, the valid value is 16. |
An example section block is shown as follows.
section (SEC_CSF_DECRYPT_DATA;
    Decrypt_Engine="DCP",
    Decrypt_EngineConfiguration="0", // "valid engine configuration values"
    Decrypt_VerifyIndex=0,
    Decrypt_MacBytes=16)
{
}
SEC_NOP
The command in this section has no effect. It also has no arguments.
An example section block is shown as follows.
section (SEC_NOP)
    // NOP command has no arguments
{
}
SEC_SET_MID
The Set MID command selects a range of fuse locations to use as a manufacturing identifier (MID). MID values are bound with Authenticate Data signatures when verified using keys with the MID binding flag in the Install Key command.
Elements for CSF Set MID section generation
Element |
Description |
|---|---|
SetMID_Bank |
Fuse bank containing MID. Valid values: 0, …, 255 |
SetMID_Row |
Starting row number of MID within bank. Valid values: 0, …, 255 |
SetMID_Fuse |
Starting fuse of MID within row. Valid values: 0, …, 255 |
SetMID_Bits |
Number of bits for MID. Valid values: 0, …, 255 |
An example section block is shown as follows:
section (SEC_SET_MID;
  SetMID_Bank = 4,
  SetMID_Row = 0,
  SetMID_Fuse = 7,
  SetMID_Bits = 64)
{
}
SEC_SET_ENGINE
The Set Engine command selects the default engine and engine configuration for a given algorithm.
Elements for CSF Set Engine section generation
Element |
Description |
|---|---|
SetEngine_Engine |
Engine Use ANY to restore the HAB internal criteria. Valid values: ANY, SAHARA, RTIC, DCP, CAAM and SW |
SetEngine_HashAlgorithm |
Hash algorithm Valid values: SHA1, SHA256 and SHA512 |
SetEngine_EngineConfiguration |
Configuration flags for the engine. Valid engine configuration values corresponding to engine name. |
An example section block is shown as follows:
section (SEC_SET_ENGINE;
  SetEngine_HashAlgorithm = "sha256",
  SetEngine_Engine = "DCP",
  SetEngine_EngineConfiguration = "0")
{
}
• SEC_INIT
The Init command initializes specified engine features when exiting the internal BootROM.
Elements for CSF Init section generation
Element |
Description |
|---|---|
INIT_Engine |
Engine to initialize Valid value – SRTC |
INIT_Features |
Comma-separated list of features to initialize Valid engine feature corresponding to engine argument. |
An example section block is shown as follows:
section (SEC_INIT;
  Init_Engine = "SRTC")
  // Init_Features= "MID"
{
}
• SEC_UNLOCK
The Unlock command prevents specified engine features from being locked when exiting the internal BootROM.
Elements for CSF Unlock section generation
Element |
Description |
|---|---|
Unlock_Engine |
Engine to unlock Valid values: SRTC, CAAM, SNVS and OCOTP |
Unlock_features |
Comma-separated list of features to unlock Valid engine feature corresponding to engine argument. |
Unlock_UID |
Device specific 64-bit UID U0, U1, …, U7 with Ui=0…255 UID bytes separated by commas |
An example section block is shown as follows:
section (SEC_UNLOCK;
  Unlock_Engine = "OCOTP",
  Unlock_features = "JTAG, SRK REVOKE",
  Unlock_UID = "0x01, 0x23, 0x45, 0x67, 0x89, 0xab, 0xcd, 0xef")
{
}
BD file for memory programming
Typically, “load”, “enable”, and “erase” commands are the most commonly used commands in a BD file for memory programming.
“load” command: This command loads raw binary, srec file, elf file, and hex string. It also supports loading data to external memory devices, for example:
Load itcm_boot_image.bin > 0x8000; (Load data to ITCM)
Load flexspi_nor_boot_image.bin > 0x60001000; (Load data to the memory mapped memory device)
Load semc_nor_boot_image.bin > 0x80001000; (Load data to SEMC NOR, memory mapped memory device)
Load spinand boot_image.bin > 0x04; (Load data to SPI NAND)
Load sdcard boot_image.bin > 0x400; (Load data to the SD Card)
Load mmccard boot_image.bin > 0x400; (Load data to eMMC)
Load spieeprom boot_image.bin > 0x400; (Load data to SPI EEPROM/NOR)
Load semcnand boot_image.bin > 0x400; (Load data to SLC raw NAND via SEMC)
Load fuse 0x00000000 > 0x10; (Load data to the Fuse block)
“enable” command: This command configures external memory devices, for example:
Enable flexspinor 0x1000
Enable spinand 0x1000
Enable sdcard 0x1000
Enable mmccard 0x1000
Enable spieeprom 0x1000
Enable semcnor 0x1000
Enable semcnand 0x1000
“erase” command: This command erases a memory range in the selected memory device. For example:
Erase 0x60000000..0x60010000 (Erase 64 KB from FlexSPI NOR)
Erase spinand 0x4..0x08 (Erase 4 blocks from SPI NAND)
Erase sdcard 0x400..0x14000
Erase mmccard 0x400..0x14000
Erase spieeprom 0x400..0x14000
Erase semcnand 0x400..0x14000
Generate unsigned normal i.MX RT bootable image
Typically, the unsigned bootable image is generated and programmed to the destination memory during the development phase.
The elftosb utility supports unsigned bootable image generation using options, BD file, and ELF/SREC file generated by toolchain.
Using the Flashloader project as an example, here are the steps to create a bootable image for the Flashloader.
Create a BD file. For unsigned image creation, the “constants” block is optional, as shown below.
options {
    flags = 0x00;
    startAddress = 0x20000000;
    ivtOffset = 0x400;
    initialLoadSize = 0x2000;
}
sources {
    elfFile = extern(0);
}
section (0)
{
}
After the BD file is created, place it into the same folder that has the elftosb utility executable.
Copy Flashloader.srec provided in the release package into the same folder that has the elftosb utility executable.
Generate the bootable image using the elftosb utility.
Example command to generate unsigned boot image

Then, there are two bootable images generated by the elftosb utility.
The first one is ivt_flashloader_unsigned.bin. The memory regions from 0 to ivt_offset are filled with padding bytes (all 0x00s).
The second one is ivt_flashloader_nopadding.bin, which starts from ivtdata directly without any padding before ivt.
Generate signed normal i.MX RT bootable image
To generate a signed bootable image using the elftosb utility, perform the following steps:
Create a BD file. The BD file can be as follows.
options {
    flags = 0x08;
    startAddress = 0x30000000;
    ivtOffset = 0x1000;
    initialLoadSize = 0x2000;
}
sources {
    elfFile = extern(0);
}
constants {
    SEC_CSF_HEADER              = 20;
    SEC_CSF_INSTALL_SRK         = 21;
    SEC_CSF_INSTALL_CSFK        = 22;
    SEC_CSF_INSTALL_NOCAK       = 23;
    SEC_CSF_AUTHENTICATE_CSF    = 24;
    SEC_CSF_INSTALL_KEY         = 25;
    SEC_CSF_AUTHENTICATE_DATA   = 26;
    SEC_CSF_INSTALL_SECRET_KEY  = 27;
    SEC_CSF_DECRYPT_DATA        = 28;
    SEC_NOP                     = 29;
    SEC_SET_MID                 = 30;
    SEC_SET_ENGINE              = 31;
    SEC_INIT                    = 32;
    SEC_UNLOCK                  = 33;
}
section (SEC_CSF_HEADER;
    Header_Version="4.2",
    Header_HashAlgorithm="sha256",
    Header_Engine="ANY",
    Header_EngineConfiguration=0,
    Header_CertificateFormat="x509",
    Header_SignatureFormat="CMS"
    )
{
}
section (SEC_CSF_INSTALL_SRK;
    InstallSRK_Table="keys/SRK_1_2_3_4_table.bin", // "valid file path"
    InstallSRK_SourceIndex=0
    )
{
}
section (SEC_CSF_INSTALL_CSFK;
    InstallCSFK_File="crts/CSF1_1_sha256_2048_65537_v3_usr_crt.pem", // "valid file path"
    InstallCSFK_CertificateFormat="x509" // "x509"
    )
{
}
section (SEC_CSF_AUTHENTICATE_CSF)
{
}
section (SEC_CSF_INSTALL_KEY;
    InstallKey_File="crts/IMG1_1_sha256_2048_65537_v3_usr_crt.pem",
    InstallKey_VerificationIndex=0, // Accepts integer or string
    InstallKey_TargetIndex=2) // Accepts integer or string
{
}
section (SEC_CSF_AUTHENTICATE_DATA;
    AuthenticateData_VerificationIndex=2,
    AuthenticateData_Engine="ANY",
    AuthenticateData_EngineConfiguration=0)
{
}
section (SEC_SET_ENGINE;
    SetEngine_HashAlgorithm = "sha256", // "sha1", "Sha256", "sha512"
    SetEngine_Engine = "ANY", // "ANY", "SAHARA", "RTIC", "DCP", "CAAM" and "SW"
    SetEngine_EngineConfiguration = "0") // "valid engine configuration values"
{
}
section (SEC_UNLOCK;
    Unlock_Engine = "SNVS",
    Unlock_features = "ZMK WRITE"
    )
{
}
After the blank BD file is created, place it into the same folder that holds the elftosb utility executable.
Copy Flashloader.srec provided in the release package into the same folder that holds the elftosb utility executable.
Copy the “cst” executable, “crts” folder, and “keys” folder from “<cst_installation_dir>” to the same folder that holds the elftosb utility executable.
Generate a bootable image using the elftosb utility.
Example command to generate a signed boot image

Then, there are two bootable images generated by the elftosb utility. The first one is ivt_flashloader_signed.bin. The memory regions from 0 to ivt_offset is filled with padding bytes (all 0x00s). The second one is ivt_flashloader_signed_nopadding.bin, which starts from ivt_offset directly. The CSF section is generated and appended to the unsigned bootable image successfully.
Note: Engine support varies across the i.MX RT devices. Not all engines are supported by a certain RT model. For details on the engine support, see the Reference Manual of the device.
Generate encrypted normal i.MX RT bootable image
To generate an encrypted image, perform the following steps:
Create a BD file.
options {
    flags = 0x0c;
    startAddress = 0x20000000;
    ivtOffset = 0x400;
    initialLoadSize = 0x2000;
}
sources {
    elfFile = extern(0);
}
constants {
    SEC_CSF_HEADER              = 20;
    SEC_CSF_INSTALL_SRK         = 21;
    SEC_CSF_INSTALL_CSFK        = 22;
    SEC_CSF_INSTALL_NOCAK       = 23;
    SEC_CSF_AUTHENTICATE_CSF    = 24;
    SEC_CSF_INSTALL_KEY         = 25;
    SEC_CSF_AUTHENTICATE_DATA   = 26;
    SEC_CSF_INSTALL_SECRET_KEY  = 27;
    SEC_CSF_DECRYPT_DATA        = 28;
    SEC_NOP                     = 29;
    SEC_SET_MID                 = 30;
    SEC_SET_ENGINE              = 31;
    SEC_INIT                    = 32;
    SEC_UNLOCK                  = 33;
}
section (SEC_CSF_HEADER;
    Header_Version="4.3",
    Header_HashAlgorithm="sha256",
    Header_Engine="ANY",
    Header_EngineConfiguration=0,
    Header_CertificateFormat="x509",
    Header_SignatureFormat="CMS"
    )
{
}
section (SEC_CSF_INSTALL_SRK;
    InstallSRK_Table="keys/SRK_1_2_3_4_table.bin", // "valid file path"
    InstallSRK_SourceIndex=0
    )
{
}
section (SEC_CSF_INSTALL_CSFK;
    InstallCSFK_File="crts/CSF1_1_sha256_2048_65537_v3_usr_crt.pem", // "valid file path"
    InstallCSFK_CertificateFormat="x509" // "x509"
    )
{
}
section (SEC_CSF_AUTHENTICATE_CSF)
{
}
section (SEC_CSF_INSTALL_KEY;
    InstallKey_File="crts/IMG1_1_sha256_2048_65537_v3_usr_crt.pem",
    InstallKey_VerificationIndex=0, // Accepts integer or string
    InstallKey_TargetIndex=2) // Accepts integer or string
{
}
section (SEC_CSF_AUTHENTICATE_DATA;
    AuthenticateData_VerificationIndex=2,
    AuthenticateData_Engine="ANY",
    AuthenticateData_EngineConfiguration=0)
{
}
section (SEC_CSF_INSTALL_SECRET_KEY;
    SecretKey_Name="dek.bin",
    SecretKey_Length=128,
    SecretKey_VerifyIndex=0,
    SecretKey_TargetIndex=0)
{
}
section (SEC_CSF_DECRYPT_DATA;
    Decrypt_Engine="ANY",
    Decrypt_EngineConfiguration="0", // "valid engine configuration values"
    Decrypt_VerifyIndex=0,
    Decrypt_MacBytes=16)
{
}
Copy Flashloader.srec into the same folder that holds the elftosb utility executable.
Copy the “cst” executable, “crts” folder, and “keys” folder from “<cst_installation_dir>” to the same folder that holds the elftosb utility executable.
Generate an encrypted bootable image using the elftosb utility.
Example command to generate an encrypted image
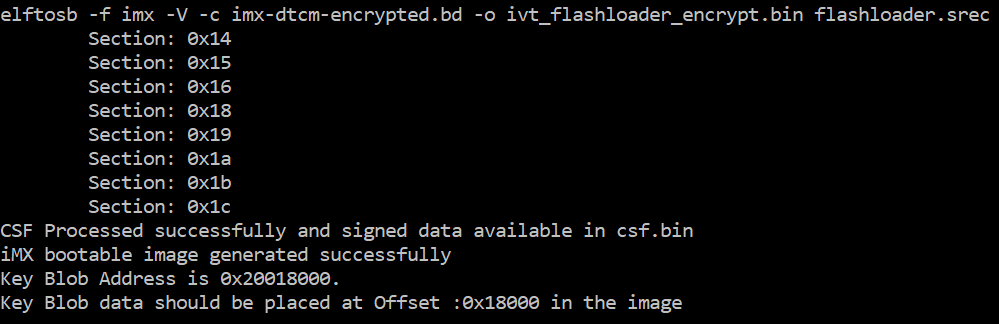
Then, there are two bootable images generated by the elftosb utility. The first one is ivt_flashloader_encrypt.bin. The memory regions from 0 to ivt_offset are filled with padding bytes (all 0x00s).
The Key Blob offset in the example above is used in later section.
The second one is ivt_flashloader_encrypt_nopadding.bin, which starts from ivt_offset directly. The CSF section is generated and appended to the unsigned bootable image successfully.
Generate the KeyBlob section using the Flashloader.
The encrypted image generated by the elftosb utility is incomplete because the KeyBlob section must be generated on the SoC side only.
There are two methods to generate the KeyBlob block:
Generate KeyBlob using the
generate-key-blob <dek_file> <blob_file>command supported by the Flashloader and blhost. See Appendix for more details.Generate KeyBlob during manufacturing and use the KeyBlob option block. See the following chapter for additional information.
Generate Plugin boot image
The plugin boot image generation process is similar to the one for normal boot image. The only difference is that the bit 4 in the “flags” element within the “options” block must be set to 1. In other words, the valid flags value list for the plugin boot image is {0x10, 0x18, 0x1c}.
An example BD file for plugin boot image generation is shown as follows.
options {
    flags = 0x10;
    startAddress = 0x60000000;
    ivtOffset = 0x1000;
    initialLoadSize = 0x2000;
}
sources {
    elfFile = extern(0);
}
section (0)
{
}