TrustZone Examples on MCXN947 and MCUXpresso SDK 24.12
The following are required to follow this chapter:
MCUXpresso for VS Code v25.12 or later
FRDM-MCXN947 development board
FRDM-MCXN947 version 24.12 SDK or later
A conceptual understanding of Arm TrustZone helps with understanding the features shown in this article.
Finally, familiarity with the use of MCUXpresso for VS Code and MCUXpresso SDK installation is assumed.
Overview
In essence, MCUs incorporating Arm TrustZone technology are able to provide systemwide isolation between Secure (S) and Non Secure (NS) worlds. Within the Non Secure environment, access to certain operations, peripherals, and so on is controlled from the Secure world. This behavior is delivered by a single CPU with execution time being shared between these two worlds.
Developing for systems using TrustZone features presents several challenges, in particular providing Secure World services for Non Secure application developers, debugging of both Secure and Non Secure worlds (projects) and delivering a usage model within the IDE that can be easily used and understood.
The examples supplied with the SDK contain both Secure and Non Secure linked projects and are configured within the IDE to demonstrate both Secure and Non Secure development.
The documentation below refers to two major development and debugging scenarios:
Developing and debugging the Non Secure project, while the Secure project acts as a ‘black box’ (or bootloader) that provides several explicit secure operations.
Development and debugging both Secure and Non Secure projects.
Note: the MCXN947 is a multicore MCU that incorporates two physical CPU cores - numbered 0 and 1. In these examples, all code is targeted at CPU 0, and the use of CPU 1 is outside the scope of this article.
Importing example project
First, ensure that you have imported SDK version (at least) 24.12 for the FRDM-MCXN947 board into MCUXpresso for VS Code. Once installed, it is visible within the Imported Repositories view and its version is shown as below (either as a GitHub repo or as a standalone SDK):

Note: You can install and use either a GitHub repository or a GitHub pack repository. For more details on each option, see MCUXpresso SDK.
Also, use MCUXpresso Installer to install at least an ARM GNU toolchain component plus a Debug Probe software dedicated for your available debug probe (LinkServer, SEGGER J-Link, or PEmicro).
From the Quickstart Panel, select Import Example from Repository, then select the imported repository, toolchain, and the FRDM-MCXN947 board.
On the “Choose a template” section, type “trustzone*hello_world”, the filter displays only the examples containing the words “trustzone” and “hello_world” and select the filtered selection.

Once imported, the Projects view contains the chosen project.

Project Settings Exploration
The TrustZone application consists of two projects, one for the Secure world and one for the Non Secure world. In newer SDKs (v24.12 or newer), only one project is loaded. The other project is linked using the sysbuild mechanism (similar to multicore, library projects, and so on). Build the project. Once built, the two projects are visible as “Domains”, each domain representing one project in the sysbuild system.

Memory Configuration
Apart from the veneer table, these projects can be considered as separate entities and must have non-overlapping memory regions.
Secure: A feature of the address space security is that the setting of address bit 28 signifies a secure location (odd numbers in the most significant nibble).
The SG_veneer_table block at 0x1000FE00 is used for code to provide a gateway to (certain) secure functions and inherits the same flash driver.
Check the output.map file to see the sections:

Non Secure: For these addresses, bit 28 is not set, which signifies non-secure locations (even numbers in the most significant nibble).
Project Properties
TrustZone-capable MCUs have various dedicated Project Properties primarily addressing linkage and debug.
A project set to be Secure generates an additional Secure Gateway Import Library (in the project directory -> hello_world_s/CmakeLists.txt).

Building the Example Projects
Building the examples is as simple as selecting the project and clicking the Build icon. Building the Non Secure project forces the Secure project to build first to provide linkage to the Secure Gateway library. The sysbuild mechanism ensures this by providing a single “build” action for all chained projects.

Assuming neither project has been built before, building the Non Secure Hello World project generates both the Secure and Non Secure .elf files and produces the output shown below:
[24/24] Linking C executable frdmmcxn947_hello_world_ns_cm33_core0_ns_cm33_core0.elf
Memory region         Used Size  Region Size  %age Used
    m_interrupts:         688 B         1 KB     67.19%
          m_text:        2648 B       639 KB      0.40%
   m_core1_image:           0 B       256 KB      0.00%
          m_data:        3424 B       280 KB      1.19%
    rpmsg_sh_mem:           0 B          0 B
        m_flash1:           0 B         1 MB      0.00%
         m_sramx:           0 B        96 KB      0.00%
      m_usb_sram:           0 B         4 KB      0.00%
[27/27] Linking C executable frdmmcxn947_hello_world_ns_cm33_core0_s_cm33_core0.elf
Memory region         Used Size  Region Size  %age Used
    m_interrupts:         688 B         1 KB     67.19%
          m_text:       19592 B     129536 B     15.12%
  m_veneer_table:          32 B        512 B      6.25%
   m_core1_image:           0 B       256 KB      0.00%
          m_data:        3456 B        32 KB     10.55%
    rpmsg_sh_mem:           0 B          0 B
        m_flash1:           0 B         1 MB      0.00%
         m_sramx:           0 B        96 KB      0.00%
      m_usb_sram:           0 B         4 KB      0.00%
Debugging the Example Projects
Debugging the Non Secure Project
The initial flow is intended to show debugging into the Non Secure world.
Therefore, begin by flashing the Secure image first.


Then, select the Debug option.

Once programming is complete, you should arrive at the default Breakpoint at main() within the Non Secure world as below:
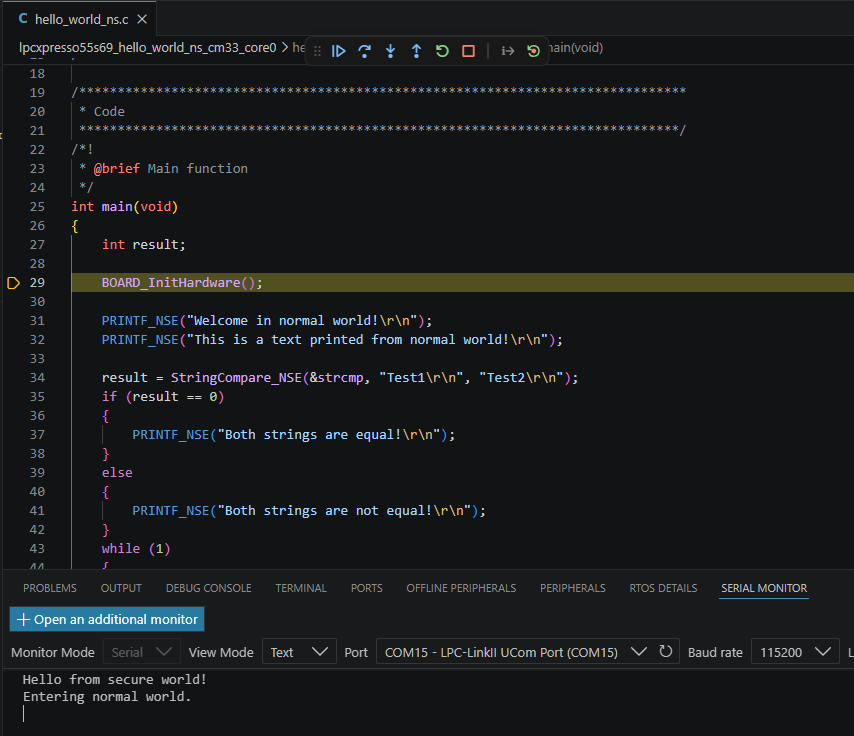
You can now start debugging through the Non Secure application.
Debugging both the Non Secure and Secure Projects
If you want to flash and debug through both Secure and Non Secure images, you have to flash both images but also to load debug symbols for both. While in the previous model you just flashed the Secure image, now, you must also load its debug symbols so you can stop at main() in Secure world, put breakpoints, alternatively jump from Secure to Non Secure world and back, and so forth.
As a first step, in the main Non Secure project, open the Settings -> launch.json file. Add options to download the Secure image and also load debug symbol files.
"extraLoadFiles": ["${workspaceFolder}/debug/hello_world_s/frdmmcxn947_hello_world_ns_cm33_core0_s_cm33_core0.elf"],
"extraSymbolFiles":["${workspaceFolder}/debug/hello_world_s/frdmmcxn947_hello_world_ns_cm33_core0_s_cm33_core0.elf"],
Note: In this configuration, no separate flash action is necessary for flashing the secure image. You can use this method (without the extraSymbolFiles option) as an alternative to the flow shown at Debugging the Non Secure Project
Now choose the Debug option. Once programming is complete, you should arrive at the default breakpoint at main() within the Secure world as below:
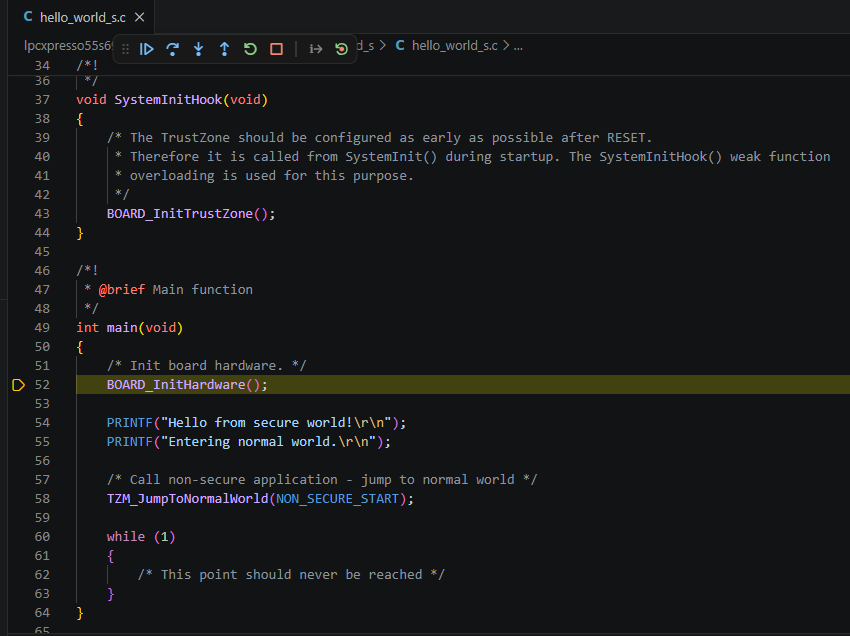
Put a breakpoint on line 58, where the TZM_JumpToNormalWorld call to the normal world is located. This project first performs some board/MCU initialization and prints a greeting (as below).
Next, the TZM_JumpToNormalWorld function will set up the environment for the method shown at [Debugging the Non Secure Project]
Note: this step is necessary because the non secure project is not run from reset, so it cannot rely on the default hardware behavior for initialization of Stack, Interrupt handlers, etc. This is essentially the same operation that a bootloader would perform.
Note: since the non secure project is not debugged directly, it has no default breakpoint at its
main()function. To explore the execution, it is recommended to open the Non Secure project’s Source -> hello_world_ns.c and manually set a breakpoint, then execute to it, as shown below:

Finally, click the Continue button to run this example.

Note: the significance of this example is that the String Compare operation was supplied to the Non Secure project by the Secure project and accessed securely via the Non Secure Entry (NSE).
This step concludes the expected use of this example.
If Debug operations fail…
It is possible to program an image into flash that, when run, prevents further debug operations from succeeding. If this occurs, follow the steps below:
Terminate debug session
Disconnect the USB cable from your board to remove power
Place a jumper on the ISP header (J21) - this prevents the board from booting the image in flash by forcing the MCU to enter ISP mode
Now, reconnect the USB cable to the Debug Link connector (J17)
Select Flash Programmer (from Quickstart Panel or directly from the Debug Probes view) - and use this to mass erase the flash
If this succeeds, then:
Disconnect the USB cable from your board
Remove the jumper on the ISP header (J21)
Now, reconnect the USB cable to the Debug Link connector (J17)
Try starting a debug session for your project again using the Debug button from the project’s toolbar. If this problem occurs as part of application development, try programming a known working example to ensure that there are no underlying problems.