Installation
NOTE
If the installation instruction asks/selects whether to have the tool installation path added to the PATH variable, agree/select the choice. This option ensures that the tool can be used in any terminal in any path. Verify the installation after each tool installation.
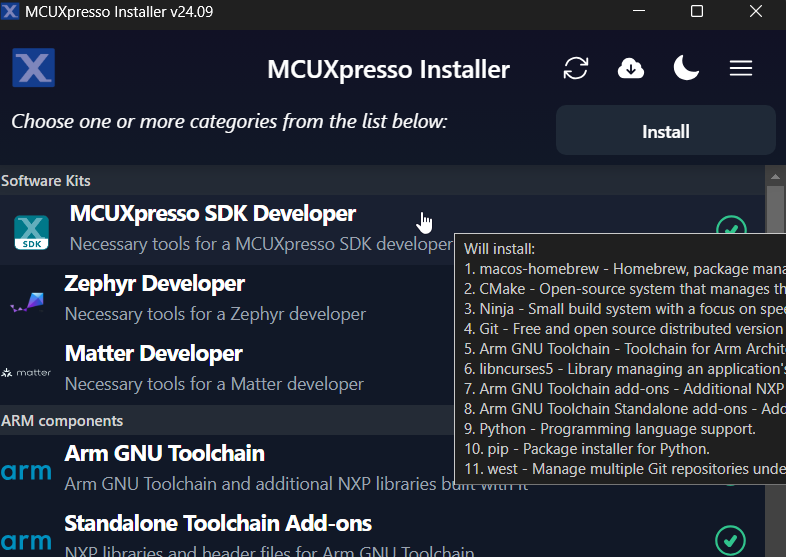
Install Prerequisites with MCUXpresso Installer
The MCUXpresso Installer offers a quick and easy way to install the basic tools needed. The MCUXpresso Installer can be obtained from https://github.com/nxp-mcuxpresso/vscode-for-mcux/wiki/Dependency-Installation. The MCUXpresso Installer is an automated installation process, simply select MCUXpresso SDK Developer from the menu and click install. If you prefer to install the basic tools manually, refer to the next section.
Alternative: Manual Installation
Basic tools
Git
Git is a free and open source distributed version control system. Git is designed to handle everything from small to large projects with speed and efficiency. To install Git, visit the official Git website. Download the appropriate version(you may use the latest one) for your operating system (Windows, macOS, Linux). Then run the installer and follow the installation instructions.
User git --version to check the version if you have a version installed.
Then configure your username and email using the commands:
git config --global user.name "Your Name"
git config --global user.email "youremail@example.com"
Python
Install python 3.10 or latest. Follow the Python Download guide.
Use python --version to check the version if you have a version installed.
West
Please use the west version equal or greater than 1.2.0
# Note: you can add option '--default-timeout=1000' if you meet connection issue. Or you may set a different source using option '-i'.
# for example, in China you could try: pip install -U west -i https://pypi.tuna.tsinghua.edu.cn/simple
pip install -U west
Build And Configuration System
CMake
It is strongly recommended to use CMake version equal or later than 3.30.0. You can get latest CMake distributions from the official CMake download page.
For Windows, you can directly use the .msi installer like cmake-3.31.4-windows-x86_64.msi to install.
For Linux, CMake can be installed using the system package manager or by getting binaries from the official CMake download page.
After installation, you can use cmake --version to check the version.
Ninja
Please use the ninja version equal or later than 1.12.1.
By default, Windows comes with the Ninja program. If the default Ninja version is too old, you can directly download the ninja binary and register the ninja executor location path into your system path variable to work.
For Linux, you can use your system package manager or you can directly download the ninja binary to work.
After installation, you can use ninja --version to check the version.
Kconfig
MCUXpresso SDK uses Kconfig python implementation. We customize it based on our needs and integrate it into our build and configuration system. The Kconfiglib sources are placed under mcuxsdk/scripts/kconfig folder.
Please make sure python environment is setup ready then you can use the Kconfig.
Ruby
Our build system supports IDE project generation for iar, mdk, codewarrior and xtensa to provide OOBE from build to debug. This feature is implemented with ruby. You can follow the guide ruby environment setup to setup the ruby environment. Since we provide a built-in portable ruby, it is just a simple one cmd installation.
If you only work with CLI, you can skip this step.
Toolchain
MCUXpresso SDK supports all mainstream toolchains for embedded development. You can install your used or interested toolchains following the guides.
Toolchain |
Download and Installation Guide |
Note |
|---|---|---|
Armgcc |
ARMGCC is default toolchain |
|
IAR |
||
MDK |
||
Armclang |
||
Zephyr |
||
Codewarrior |
||
Xtensa |
||
NXP S32Compiler RISC-V Zen-V |
After you have installed the toolchains, register them in the system environment variables. This will allow the west build to recognize them:
Toolchain |
Environment Variable |
Example |
Cmd Line Argument |
|---|---|---|---|
Armgcc |
ARMGCC_DIR |
|
–toolchain armgcc |
IAR |
IAR_DIR |
|
–toolchain iar |
MDK |
MDK_DIR |
|
–toolchain mdk |
Armclang |
ARMCLANG_DIR |
|
–toolchain mdk |
Zephyr |
ZEPHYR_SDK_INSTALL_DIR |
|
–toolchain zephyr |
CodeWarrior |
CW_DIR |
|
–toolchain codewarrior |
Xtensa |
XCC_DIR |
|
–toolchain xtensa |
NXP S32Compiler RISC-V Zen-V |
RISCVLLVM_DIR |
|
–toolchain riscvllvm |
The
<toolchain>_DIRis the root installation folder, not the binary location folder. For IAR, it is directory containing following installation folders:
MDK IDE using armclang toolchain only officially supports Windows. In Linux, please directly use armclang toolchain by setting
ARMCLANG_DIR. In Windows, since most Keil users will install MDK IDE instead of standalone armclang toolchain, theMDK_DIRhas higher priority thanARMCLANG_DIR.For Xtensa toolchain, please set the
XTENSA_COREenvironment variable. Here’s an example list:Device Core
XTENSA_CORERT500 fusion1
nxp_rt500_RI23_11_newlibRT600 hifi4
nxp_rt600_RI23_11_newlibRT700 hifi1
rt700_hifi1_RI23_11_nlibRT700 hifi4
t700_hifi4_RI23_11_nlibi.MX8ULP fusion1
fusion_nxp02_dsp_prodIn Windows, the short path is used in environment variables. If any toolchain is using the long path, you can open a command window from the toolchain folder and use below command to get the short path:
for %i in (.) do echo %~fsi
Tool installation check
Once installed, open a terminal or command prompt and type the associated command to verify the installation.
If you see the version number, you have successfully installed the tool. Else, check whether the tool’s installation path is added into the PATH variable. You can add the installation path to the PATH with the commands below:
Windows: Open command prompt or powershell, run below command to show the user PATH variable.
reg query HKEY_CURRENT_USER\Environment /v PATH
The tool installation path should be C:\Users\xxx\AppData\Local\Programs\Git\cmd. If the path is not seen in the output from above, append the path value to the PATH variable with the command below:
reg add HKEY_CURRENT_USER\Environment /v PATH /d "%PATH%;C:\Users\xxx\AppData\Local\Programs\Git\cmd"
Then close the command prompt or powershell and verify the tool command again.
Linux:
Open the
$HOME/.bashrcfile using a text editor, such asvim.Go to the end of the file.
Add the line which appends the tool installation path to the PATH variable and export PATH at the end of the file. For example, export PATH=”/Directory1:$PATH”.
Save and exit.
Execute the script with
source .bashrcor reboot the system to make the changes live. To verify the changes, runecho $PATH.
macOS:
Open the
$HOME/.bash_profilefile using a text editor, such asnano.Go to the end of the file.
Add the line which appends the tool installation path to the PATH variable and export PATH at the end of the file. For example, export PATH=”/Directory1:$PATH”.
Save and exit.
Execute the script with
source .bash_profileor reboot the system to make the changes live. To verify the changes, runecho $PATH.
Get MCUXpresso SDK Repo
Establish SDK Workspace
To get the MCUXpresso SDK repository, use the west tool to clone the manifest repository and checkout all the west projects.
# Initialize west with the manifest repository
west init -m https://github.com/nxp-mcuxpresso/mcuxsdk-manifests/ mcuxpresso-sdk

# Update the west projects
cd mcuxpresso-sdk
west update

# Allow the usage of west extensions provided by MCUXpresso SDK
west config commands.allow_extensions true
Install Python Dependency(If do tool installation manually)
To create a Python virtual environment in the west workspace core repo directory mcuxsdk, follow these steps:
Navigate to the core directory:
cd mcuxsdk
[Optional] Create and activate the virtual environment: If you don’t want to use the python virtual environment, skip this step. We strongly suggest you use venv to avoid conflicts with other projects using python.
python -m venv .venv

# For Linux/MacOS
source .venv/bin/activate

# For Windows
.\.venv\Scripts\activate
# If you are using powershell and see the issue that the activate script cannot be run.
# You may fix the issue by opening the powershell as administrator and run below command:
powershell Set-ExecutionPolicy RemoteSigned
# then run above activate command again.
Once activated, your shell will be prefixed with
(.venv). The virtual environment can be deactivated at any time by runningdeactivatecommand.Remember to activate the virtual environment every time you start working in this directory. If you are using some modern shell like
zsh, there are some powerful plugins to help you auto switch venv among workspaces. For example, zsh-autoswitch-virtualenv.Install the required Python packages:
# Note: you can add option '--default-timeout=1000' if you meet connection issue. Or you may set a different source using option '-i'.
# for example, in China you could try: pip3 install -r mcuxsdk/scripts/requirements.txt -i https://pypi.tuna.tsinghua.edu.cn/simple
pip install -r scripts/requirements.txt