Install Xplorer Toolchains#
This section provides information on Xtensa Software Tools Platform Support and steps to:
Xtensa Software Tools Platform Support#
The Xtensa Software Tools are officially supported on the following platforms:
Windows: Win 10 64-bit, Win 8 64-bit, Win 7 64-bit.
Linux: RHEL 6 64-bit (with ‘Desktop’ package installed).
There may be compatibility issues with other versions of Linux or Windows, especially when using the IDE.
Note: The security-enhanced Linux (SELinux) is not a supported platform because the OS can prevent different shared libraries (including Xtensa Tools) from loading.
For more information on platform support and installation guidelines, see the Xtensa Development Tools Installation Guide.
Parent topic:Install Xplorer Toolchains
Install the Xtensa Xplorer IDE and Tools#
To install the Xtends Xplorer IDE and tools, perform the following steps:
Go to the URL https://tensilicatools.com/download/hifi-dsp-development-tools-for-rt700/ and log in. If you are accessing the site for the first time, make sure to register.
Make sure to use your corporate email address to register.
Once registered you should receive an email confirmation with an activation link from ‘Tensilica Tools’ no-reply@tensilicatools.com. Make sure to check the spam folder if this email does not show up in the inbox.
To complete the registration, click the activation link.
Once registered, log in to see the material available for download:
Download and install the Xplorer IDE V10.1.11 for your operating system (Windows or Linux).
Download the DSP Configuration for your operating system – installed later through the IDE, see Install RT700 DSP Build Configuration. Note: NXP recommends version 10.1.11 of the Xtensa Xplorer IDE and tools for use with the RT700 DSP.
Parent topic:Install Xplorer Toolchains
Install License Key#
Xtensa development tools use FLEXlm for license management. FLEXlm licensing is required for tools such as the Xtensa Xplorer IDE, Xtensa C and C++ compiler.
Currently RT700 supports node-locked license for Xtensa tools. A node-locked license permits tools to run on a specific computer, tied to the MAC address of the primary network interface permanently attached to the machine.
Identify PC MAC Address#
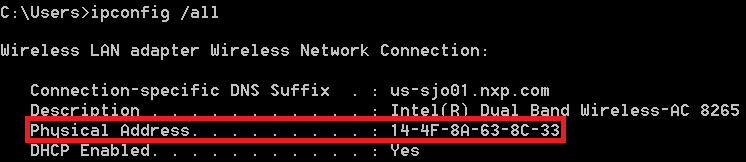
To generate the correct license file, you should first identify the appropriate MAC for the computer you plan to run Xtensa tools on. Remove ‘-‘ or ‘:’ symbols in the MAC address.
Windows:
|
|
Linux:
|
|
Note: For Linux: MAC address must be associated with eth0 interface. If not, FLEXlm cannot perform the license checkout, compilation, or simulation of code is not possible. If the host has the MAC address associated with another interface, for example em1, the following approach may be used.
# Add udev rule for naming interface
$ sudo vim /etc/udev/rules.d/70-persistent-net.rules
# udev rule (replace ‘XX’ with the MAC address of your PC):
SUBSYSTEM=="net", ACTION=="add", ATTR{address}=="XX:XX:XX:XX:XX:XX", NAME="eth0"
# Change "em1" to "eth0" in your interfaces file.
$ sudo vim /etc/network/interfaces
# Restart udev or reboot machine
$ sudo reboot
Alternatively, you can use the approach recommended by your IT team to rename the interface to eth0.
Parent topic:Install License Key
Download License Key#
To download the license key:
Reload or return to the Tensilica URL: https://tensilicatools.com/download/hifi-dsp-development-tools-for-rt700/.
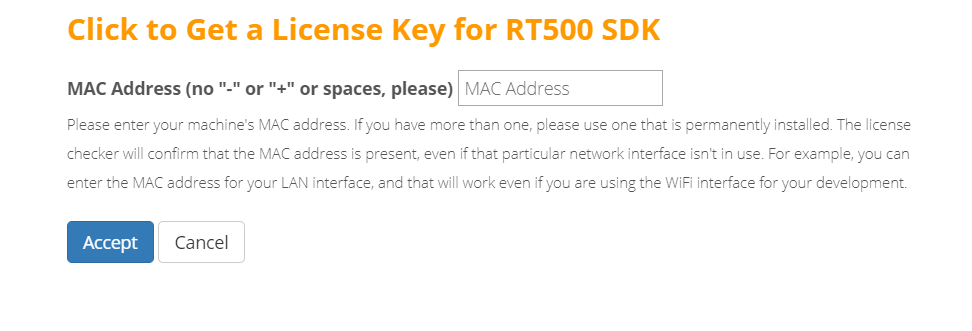
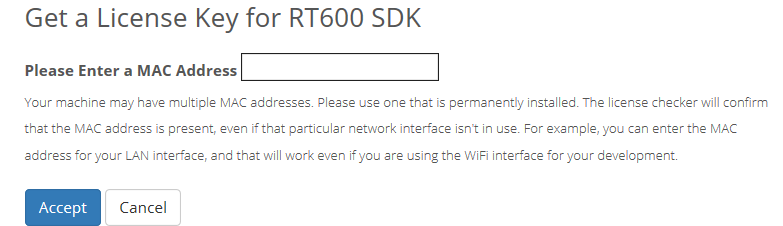
Click the button and get the license key for RT700 SDK.
|
|
Provide the address.
|
|
Once the license file has been generated and downloaded, open your recently installed Xplorer V10.1.11.
Select menu Help > Xplorer License Keys > Install Software Keys.
Select the license key file.
|

|
Click the Finish button.
Note: The generated license file only supports debug/run on the RT700 device target. It does not support software simulation/Xplorer ISS. If you have special requirements to run the software simulations, contact Cadence directly.
Parent topic:Install License Key
Parent topic:Install Xplorer Toolchains
Install RT700 DSP Build Configuration#
‘Build Configuration’ is a term that describes all parameters and necessary build includes for the Tensilica processor implementation for development. It is mandatory to install a specific build configuration before starting development on RT700.
The build configuration is provided by NXP as a binary file and is imported into the Xplorer IDE. The binary file for the OS is available at the Tensilica URL: https://tensilicatools.com/download/rt700-download-page/.
|
|
The build configuration is installed into the IDE using the System Overview panel available in the lower left corner, by default. If the System Overview panel is not visible, toggle using the Window > Show View > System Overview menu item.
|
|
Click OK for build download to install.
|
|
Parent topic:Install Xplorer Toolchains
Install Xtensa On Chip Debugger Daemon#
The Xtensa On Chip Debugger Daemon (xt-ocd), is a gdb-based debugging tool but is not installed by default with the Xplorer IDE. For installation, a self-extracting executable installer is included with the IDE, which can be found at the following location:
Windows:
C:\usr\xtensa\XtDevTools\downloads\RI-2023.11\tools\xt-ocd-14.11-windows64-installer.exe
Linux:
~/xtensa/XtDevTools/downloads/RI-2023.11/tools/xt-ocd-14.11-linux64-installer
Currently, xt-ocd supports J-Link and Arm RVI/DSTREAM probes over Serial Wire Debug (SWD) for RT700. xt-ocd installs support for J-Link probes but does not install the required J-Link drivers which must be installed separately. Make sure that the latest version of J-Link software is installed.
Note: For Linux: When installing xt-ocd on Linux, ensure that the symlink is manually added to the installed J-Link driver: ln -s <jlink-install-dir>libjlinkarm.so.6 <xocd-install-dir>/modules/libjlinkarm.so.6.
xt-ocd is configured with an XML input file ‘topology.xml’ that modifies to fit the debugger hardware. Using J-link as an example, use the content below to replace the original template for HiFi4 DSP
Note: It is mandatory to replace the ‘usbser’ section with the J-Link serial number on the back of the J-Link hardware in use.
<configuration>
 <controller id='Controller0' module='jlink' usbser='600116164' type='swd' speed='1000000' locking='1'/>
 <driver id='XtensaDriver0' dap='1' xdm-offset='0x80020000' module='xtensa' step-intr='mask,stepover,setps' />
 <chain controller='Controller0'>
 <tap id='TAP0' irwidth='4' />
 </chain>
 <system module='jtag'>
 <component id='Component0' tap='TAP0' config='trax' />
 </system>
 <device id='Xtensa0' component='Component0' driver='XtensaDriver0' ap-sel='3'/>
 <application id='GDBStub' module='gdbstub' port='20000' sys-reset='0'>
 <target device='Xtensa0' />
 </application>
</configuration>
Below is another topology.xml example for HiFi1 DSP.
<configuration>
        <controller id='Controller0' module='jlink' usbser='600116164' type='swd' speed='1000000' locking='1'/>

  <driver id='XtensaDriver0' dap='1' xdm-offset='0x80030000' module='xtensa' step-intr='mask,stepover,setps' />
  <chain controller='Controller0'>
    <tap id='TAP0' irwidth='4' />
  </chain>
  <system module='jtag'>
    <component id='Component0' tap='TAP0' config='trax' />
  </system>
  <device id='Xtensa0' component='Component0' driver='XtensaDriver0' ap-sel='3'/>
  <application id='GDBStub' module='gdbstub' port='20000' sys-reset='0'>
    <target device='Xtensa0' />
  </application>
</configuration>
Congratulations! All Xplorer toolchains are installed.
For more details on Xtensa software tools, build configurations, or xt-ocd daemon, see the full set of documents in Xplorer menu Help > PDF Documentation.
Parent topic:Install Xplorer Toolchains
Program MCU-Link Debug Probe with SEGGER J-Link (Optional)#
In addition to standalone probes, the onboard MCU-Link debug probe can be used to debug HiFi4 DSP over SWD port. The RT700 EVK has an LPC55S69 MCU (top right corner on EVK) and by default has been pre-programmed as CMSIS-DAP probe. CMSIS-DAP is not compatible with HiFi4 the DSPs, but to enable serial logging of Core 1, CMSIS-DAP firmware is required.
To use the on-board J-Link without Core 1 serial logging, a few extra steps are required to flash it with J-Link firmware.
The steps are:
Install MCU-Link, a command-line tool for programming onboard MCU-Link debug probe with the CMSIS-DAP and J-Link firmware. MCU-Link installer is available for download from: https://www.nxp.com/design/design-center/software/development-software/mcuxpresso-software-and-tools-/mcu-link-debug-probe:MCU-LINK#t996.
After the download is complete, run the installer.
Note: During the installation, the DFU, and VCOM drivers are automatically installed for all platforms.
To update the MCU-Link debug circuit firmware, unplug the USB cable on J54 and then connect the JP20 jumper. .
Reconnect the board to the host computer over the debug link USB connector J54.
Go to the scripts folder in the MCU-Link install location:
C:\NXP\MCU-LINK_installer_2.263\scripts.
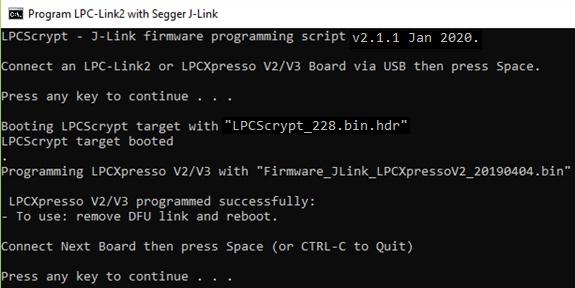
In that command shell, run the program_JLINK script to install the JLink debug firmware.
|

|
**Note:** File paths in this document use the Windows directory separator, on Linux or Mac OSX. The file paths must be replaced with ‘/.’ For Windows users, shortcuts to the scripts are available from the MCU-LInk entry on the Start menu.
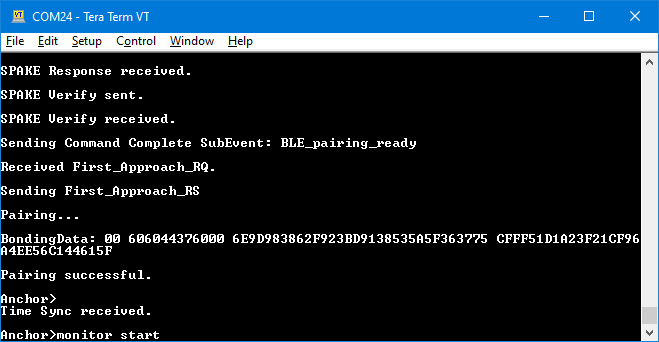
Verify once you select the firmware (in this case J-Link), MCU-Link. The console appears as shown in Figure 4.
|
|
Open/ Disconnect JP20 and power cycle the board. The onboard MCU-Link is ready to be used as SEGGER J-Link probe.
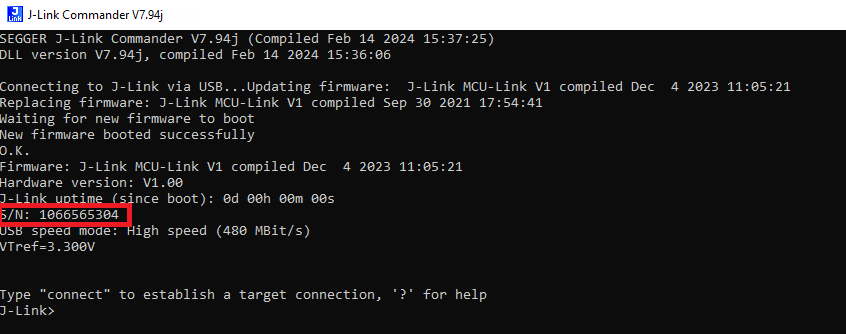
Every EVK/ MCU-Link has a different J-Link S/N. Therefore, make sure to write down the S/N for xt-ocd and topology.xml as indicated in Install Xtensa On Chip Debugger Daemon.
|
|
MCU-Link debug probe creates a virtual serial port over USB, so the extra UART2USB cable for debugging is not required.
|

|
The download link provides the document, demo videos and details on MCU-Link. If you have any questions, or have difficulties to program the probe, see [https://www.nxp.com/document/guide/getting-started-with-the-mcu-link:GS-MCU-LINK](https://www.nxp.com/document/guide/getting-started-with-the-mcu-link:GS-MCU-LINK).
Parent topic:Install Xplorer Toolchains
Install Xtensa Software Tools without IDE#
The Xtensa Software Tools can also be installed without the use of the IDE. The installation without the IDE is useful in a command-line only Linux environment, or for better compatibility with an unsupported Linux environment.
The command-line tools package is available as a redistributable zip file that is extracted with an Xplorer IDE install. To gain access to the tools package, the IDE must be installed once in the organization. The tools package is available at: ~/xtensa/XtDevTools/downloads/RI-2023.11/tools/XtensaTools_RI_2023_11_linux.tgz..
With the tools package and the DSP Build Configuration package available from the Tensilica Tools download site, the toolchain can be set up as follows:
# Create Xtensa install root
mkdir -p ~/xtensa/tools
mkdir -p ~/xtensa/builds
# Set up the configuration-independent Xtensa Tool:
tar zxvf XtensaTools_RI_2023_11_linux.tgz -C ~/xtensa/tools
# Set up the configuration-specific core files:
tar zxvf nxp_rt700_RI23_11_newlib_linux_redist.tgz -C ~/xtensa/builds
# Install the Xtensa development toolchain:
cd ~/xtensa
./builds/RI-2023.11-linux/nxp_rt700_RI23_11_newlib/install \
--xtensa-tools./tools/RI-2023.11-linux/XtensaTools \
--registry ./tools/RI-2023.11-linux/XtensaTools/configg
Parent topic:Install Xplorer Toolchains