IDE Project Generation#
CMake is a text-oriented tool that uses the command-line. For many developers especially those who get used to working on Windows operating system with IDE such as IAR or MDK, the user experience for coding and debugging is not good. Therefore, we provide CMake targets guiproject and standalone_project to create IDE GUI project which analyzes the build.ninja file to get source files, include path, assembler/compiler/linker flags and set them into project
template files. The build system supports GUI project generation for IAR, MDK, Xtensa and CodeWarrior.
Usage#
Ruby environment#
The IDE GUI project generation is implemented in ruby, please refer Ruby environment setup to setup environment.
GUI project#
It’s quite easy for you to generate a GUI linked project, only --toolchain [iar|mdk|xtensa] -t guiproject is required in the west command. It tells CMake to run guiproject target to generate project files for specific toolchain. The GUI project files are located in build/${toolchain} folder, it uses relative path to refer source files and include path in repository.
If you are running a pristine build, please specify board/examples/toolchain/core_id on the command line, for example:
west build -b evkbmimxrt1170 examples/demo_apps/hello_world --toolchain iar -Dcore_id=cm7 --config flexspi_nor_debug -p always -t guiproject
If you have run west build command, there is a simpler and faster command:
west build -t guiproject
After the command runs, the project files are generated into the compilation directory. You can find it in command line, for example:
Standalone Example#
Please refer Standalone Example chapter.
IDE Setting Data#
IDE.yml#
For GUI project, the build information of assembler/compiler/linker comes from artifacts of CMake configuration, more specifically, the build.ninja file. However, it is not enough for build system. Since the IDE will provide rich download debugging capabilities, we need to record this additional information. The IDE related data are recorded in IDE.yml.
Load Sequence#
The IDE yml files are are automatically loaded and merged by the build system in a certain order and do not need to be manually loaded by the user. The loading sequence is:
1. devices/IDE.yml
2. devices/<soc_series>/IDE.yml
3. devices/<soc_series>/<device>/IDE.yml
4. devices/<soc_series>/<device>/<core_id>/IDE.yml
5. examples/IDE.yml
6. examples/_boards/IDE.yml
7. examples/_boards/<board>/IDE.yml
8. examples/_boards/<board>/<core_id>/IDE.yml
9. examples/<example_category>/IDE.yml
10. examples/<example_category>/<example>/IDE.yml
11. examples/_boards/<board>/<example_category>/IDE.yml
12. examples/_boards/<board>/<example_category>/<example>/IDE.yml
13. examples/_boards/<board>/<example_category>/<example>/<core_id>/IDE.yml
For shield, it is like
1. devices/IDE.yml
2. devices/<soc_series>/IDE.yml
3. devices/<soc_series>/<device>/IDE.yml
4. devices/<soc_series>/<device>/<core_id>/IDE.yml
5. examples/IDE.yml
6. examples/_boards/IDE.yml
7. examples/_boards/<board>/IDE.yml
8. examples/_boards/<board>/<core_id>/IDE.yml
9. examples/<shield_example_category>/IDE.yml
10. examples/<shield_example_category>/<example>/IDE.yml
11. examples/_boards/<board>/<shield>/IDE.yml
12. examples/_boards/<board>/<shield>/<shield_example_category>/IDE.yml
13. examples/_boards/<board>/<shield>/<shield_example_category>/<example>/IDE.yml
14. examples/_boards/<board>/<shield>/<shield_example_category>/<example>/<core_id>/IDE.yml
These IDE.yml files are optional. The higher load sequence, the higher priority. High priority IDE.yml will override low priority IDE.yml data.
There are 3 kinds of IDE data: project templates, IDE option and Special functional files.
Project templates#
The project template files are the most basic and original IDE definition files for GUI project generation. All IDE settings are set based on these files. We have prepared project template files in advance, which are located in the mcuxsdk/scripts/guigenerator/templates, for example
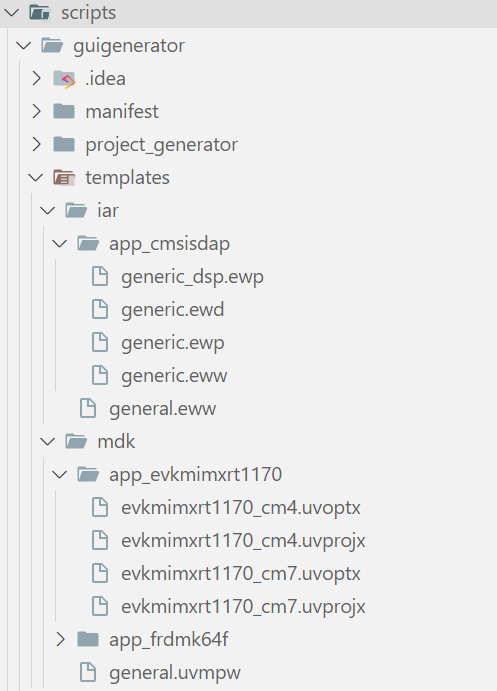
Currently, only IAR and Keil MDK are supported. For IAR, the *.ewp and *.ewd are necessary. For Keil MDK, we have provided project template files for each board, you need to set *.uvprojx and *.uvoptx.
To record such files in CMake, you need to record them under specific toolchain with “project-templates” field.
If you want to replace previous setting, just reset the setting in files loaded later
Here is the example:
# mcuxsdk/boards/evkbmimxrt1170/cm7/IDE.yml
mdk:
  project-templates:
    - scripts/guigenerator/templates/mdk/app_evkbmimxrt1170/app_evkbmimxrt1170.uvprojx
    - scripts/guigenerator/templates/mdk/app_evkbmimxrt1170/app_evkbmimxrt1170.uvoptx
iar:
  project-templates:
    - scripts/guigenerator/templates/iar/app_cmsisdap/generic.ewp
    - scripts/guigenerator/templates/iar/app_cmsisdap/generic.ewd
    - scripts/guigenerator/templates/iar/general.eww
# mcuxsdk/boards/evkbmimxrt1170/demo_apps/hello_world/cm7/IDE.yml
iar:
  project-templates: # Accodring to load sequence, this setting will take effect
    - scripts/guigenerator/templates/iar/app_jlinkswd/generic.ewp
    - scripts/guigenerator/templates/iar/app_jlinkswd/generic.ewd
    - scripts/guigenerator/templates/iar/general.eww
IDE option#
In general, IDEs support some special debugging settings, which are not implemented in the native CMake build system. For example, IAR support to selects the reset strategy to be used when the debugger starts, Keil MDK support to load application at startup, etc.
You can set IDE option for specific toolchain and specific target. If the setting is for all targets, please set it under __common__
Here is the example:
# mcuxsdk/boards/evkbmimxrt1170/cm7/IDE.yml
iar:
  config:
    __common__:
      debugger_setting:
        cmsisdap_resetlist: software
Note: If you want to replace the setting with the new one, just reset it in files loaded later.
For details of commonly used option settings, please refer to IDE Option Setting
Special functional scripts#
Some IDEs may use scripts to initialize the compilation environment before and after the compilation phase, or to process the image files generated by the compilation, or to initialize the flash before the start of debugging, etc. So we need to support the recording of these scripts in IDE.yml.
You can set a script in “files” field inside a section with attribute:
toolchains: The toolchain targeted by the IDE script
targets: The build configuration targeted by the IDE scripts, such as debug/release/flexspi_nor_debug/flexspi_nor_release, etc.
source: The relative path of the IDE script
attribute: The attribute of the script, Represents the function of the script
Here is the example:
macro-file: #setction name
  files:
  - source: examples/_boards/${board}/evkbmimxrt1170_cm7.mac
    attribute: macro-file
    toolchains: iar
Note: If you want to replace the script with the new one, please record them in files loaded later. To prevent replacing just one script and re-writing all the others, it is not recommended to record all files in one section. It’s best to put only one file in a section. For example:
macro-file: #setction name
  files:
    - source: examples/_boards/${board}/evkbmimxrt1170_connect_cm7.mac
      attribute: macro-file
      toolchains: iar
For details of supported attribute file, please refer to IDE Script Setting
Assembler/Compiler/Linker Flags#
The meta build system use CMake to create build artifacts. In general, CMake doesn’t provide abstraction of flags setting for all kinds of toolchains. So that developer should use the flags for assembler/compiler/linker which follows the rule by each toolchain. Here are links for you to refer:
[IAR][https://wwwfiles.iar.com/AVR/webic/doc/EWAVR_CompilerGuide.pdf]
[MDK][https://developer.arm.com/documentation/100748/0622/Using-Common-Compiler-Options]
[ARMGCC][https://gcc.gnu.org/onlinedocs/]
Assembler/Compiler/Linker flags are set with following CMake configuration function in CMake file, please refer to Configuration
For example, the following code sets optimization level for IAR compiler:
mcux_add_iar_configuration(
    TARGETS flexspi_nor_debug
    CC "-Ol"
    )
In the following sections, the commonly used settings are described.
Optimizations flags#
IAR
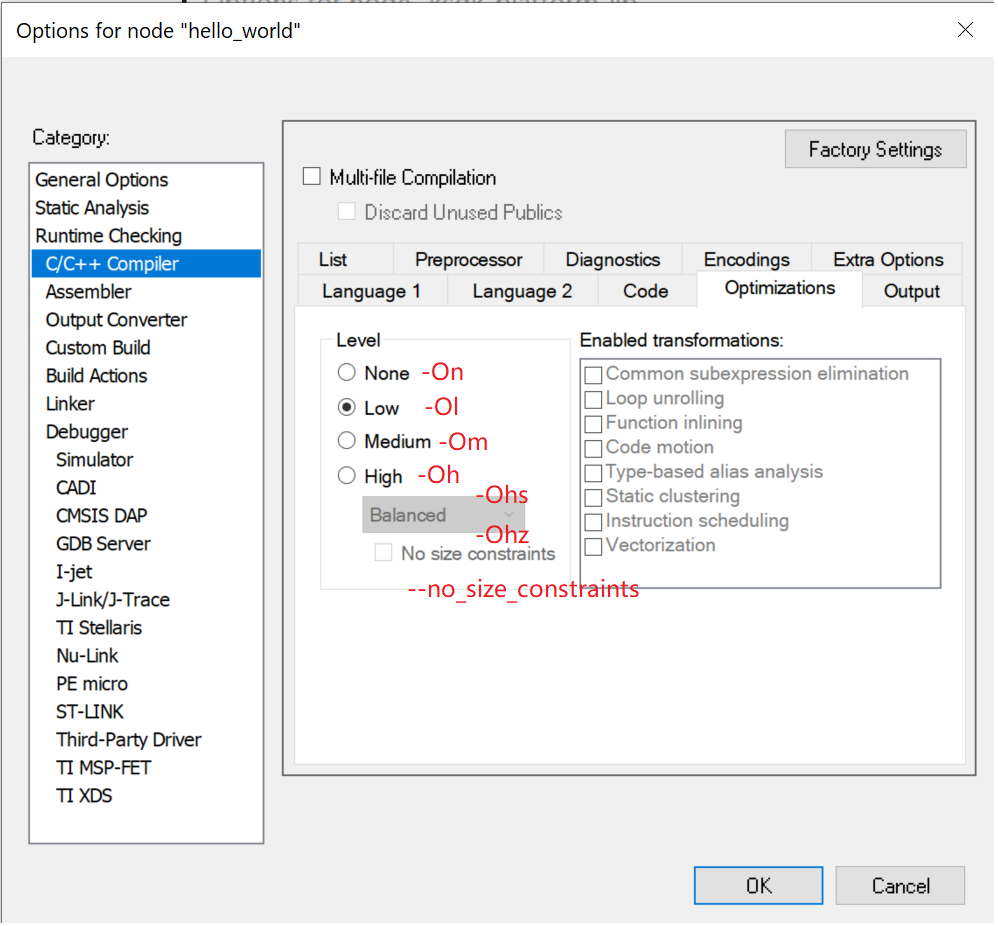
IAR supported compiler optimization flags are:
-On
-Ol
-Om
-Oh
-Ohs
-Ohz
Besides, IAR provides special optimization features:
–no_size_constraints
–no_cse
–no_unroll
–no_inline
–no_code_motion
–no_tbaa
–no_clustering
–no_scheduling
These settings are set up in the IAR GUI as shown here
MDK
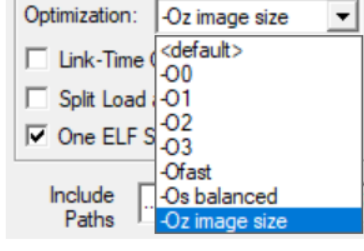
For ARM compiler v6, optimization flags are -O0/-O1/-O2/-O3/-Ofast/-Os/-Oz.
These flags match with IDE settings as below:
ARMGCC
For ARMGCC, optimization flag are -O0/-O1/-O2/-O3/-Os/-Ofast/-Og.
Note: Default optimization level is set in arch/${arch}/target and enabled by Kconfig item MCUX_PRJSEG_module.board.suite. Here is the default level for each toolchain:
toolchain\target |
debug |
release |
|---|---|---|
IAR |
-On |
-Oh |
MDK |
-O1 |
-Oz |
ARMGCC |
-O0 |
-Os |
Xtensa |
-O0 |
-Os |
CodeWarrior |
-opt level=1 |
-opt level=4 |
If your project needs different optimization level, please remove the default one and add the new flag.
Macro definition#
Macro is used to preprocess source files, it is a common setting for assembler/compiler. You can use CMake configuration function defined in Configuration to set macro definition.
The macro definition follow the pattern -Dname=value, or -Dname if no value provided.
For example:
mcux_add_iar_configuration(
    TARGETS flexspi_nor_debug
    AS "-DDEBUG"
    CC "-DDEBUG -DXIP_EXTERNAL_FLASH=1 -DFSL_SDK_DRIVER_QUICK_ACCESS_ENABLE=1"
    CX "-DDEBUG"
    )
Furthermore, mcux_add_macro can be used to simply the setting to omit -D prefix. For example:
mcux_add_macro(
    CC "XIP_BOOT_HEADER_ENABLE=1"
    TARGETS flexspi_nor_debug flexspi_nor_release
    TOOLCHAINS mdk
)
Heap Stack setting#
Heap and stack is setting by linker script. Generally SDK use symbol __stack_size__and __heap_size__ to set the size. To simplify heap stack setting, mcux_add_linker_symbol provides an unify way to set linker symbol for different toolchain. For example:
mcux_add_linker_symbol(
    SYMBOLS "__stack_size__=0x3000 __heap_size__=0x3000"
)
This setting is equivalent to setting with mcux_add_${toolchain}_configuration function:
IAR
IAR use linker flags
--config_def=__stack_size__=${stack size}and--config_def=__heap_size__=${heap size}For example
mcux_add_iar_configuration(
    LD "--config_def=__stack_size__=0x3000 --config_def=__heap_size__=0x3000"
)
MDK
MDK use linker flags
--predefine="-D__stack_size__=${stack size}"and--predefine="-D__heap_size__=${heap size}"For example
mcux_add_mdk_configuration(
	  LD "--predefine=\"-D__stack_size__=0x3000\" --predefine=\"-D__heap_size__=0x3000\""
)
ARMGCC
ARMGCC use linker flags
-Xlinker --defsym=__stack_size__=${stack size}and-Xlinker --defsym=__heap_size__=${heap size}For example
mcux_add_armgcc_configuration(
	  LD "-Xlinker --defsym=__stack_size__=0x3000 -Xlinker --defsym=__heap_size__=0x3000"
)
TrustZone#
TrustZone feature is enabled by compiler flags. It may be different for each toolchain.
IAR
mcux_add_iar_configuration(CC "--cmse")
Keil MDK
mcux_add_mdk_configuration(CC "-mcmse")
ARMGCC
mcux_add_armgcc_configuration(CC "-mcmse")
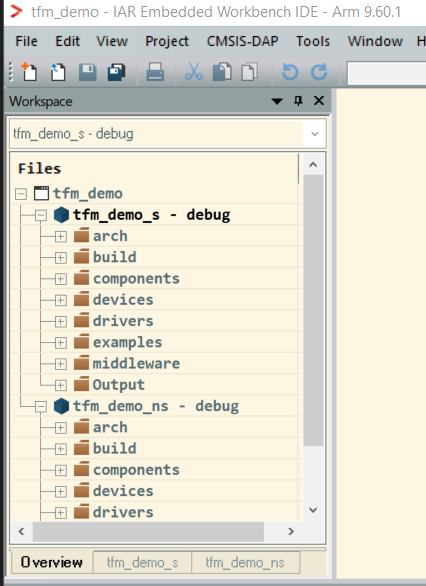
Multi-projects in one workspace#
This feature is used in GUI project generation to put multiple projects into one workspace and is only supported on IAR and KEIL toolchains now. You can use shared-workspace filed to name the workspace file, and list the path of the other projects in sharing-workspace.
Here is a demo of tfm_demo_s and tfm_demo_ns, both projects are contained into a shared workspace named tfm_demo:
IAR
iar:
  shared-workspace: tfm_demo
  sharing-workspace:
  - ../../tfm_demo_ns/iar/tfm_demo_ns
KEIL
mdk:
  shared-workspace: tfm_demo
  sharing-workspace:
  - ../../tfm_demo_ns/mdk/tfm_demo_ns
Then you can open the project to see both projects:
CodeWarrior
For CodeWarrior, only
sharing-workspaceis required. There is noshared-workspacefield because CodeWarrior adds cross-project references directly into the.projectfile. Each entry is a relative path to another project.codewarrior: sharing-workspace: - ../../mu_polling_secondary_core/codewarrior/mu_polling_secondary_core_dsp56800ef_core1
Keil MDK Specific Settings#
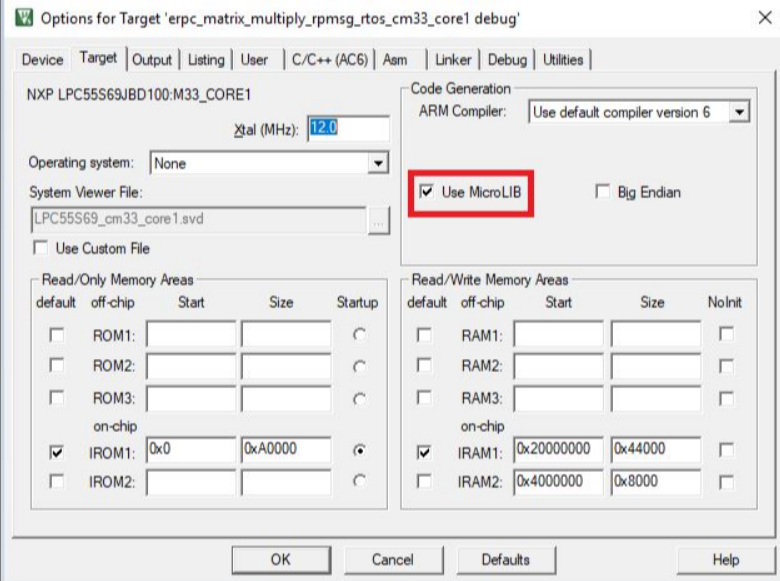
Change C library#
Keil use linker flag --library_type=lib to select the library to be used at link time.
If you don’t specify library, then the linker assumes --library_type=standardlib
If you want to use C micro-library (microlib), please set it as:
mcux_add_mdk_configuration(LD "--library_type=microlib")
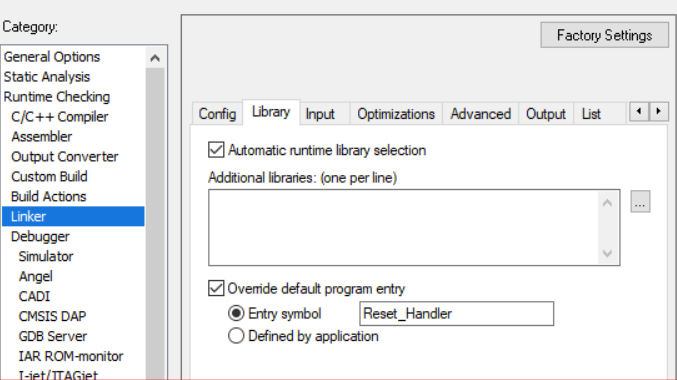
IAR Specific Settings#
Change entry symbol#
If you need to set the entry symbol for IAR, you can set linker flags in CMake:
mcux_add_iar_configuration(LD "--entry Reset_Handler")
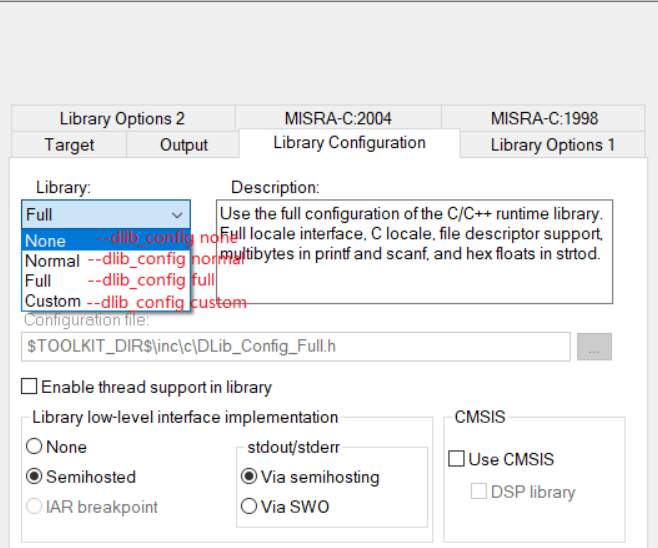
Change C library#
C/C++ runtime library configuration can be set with compiler flags, supported library types are:
–dlib_config none
–dlib_config normal
–dlib_config full
–dlib_config custom
For example:
mcux_add_iar_configuration(CC "--dlib_config full")
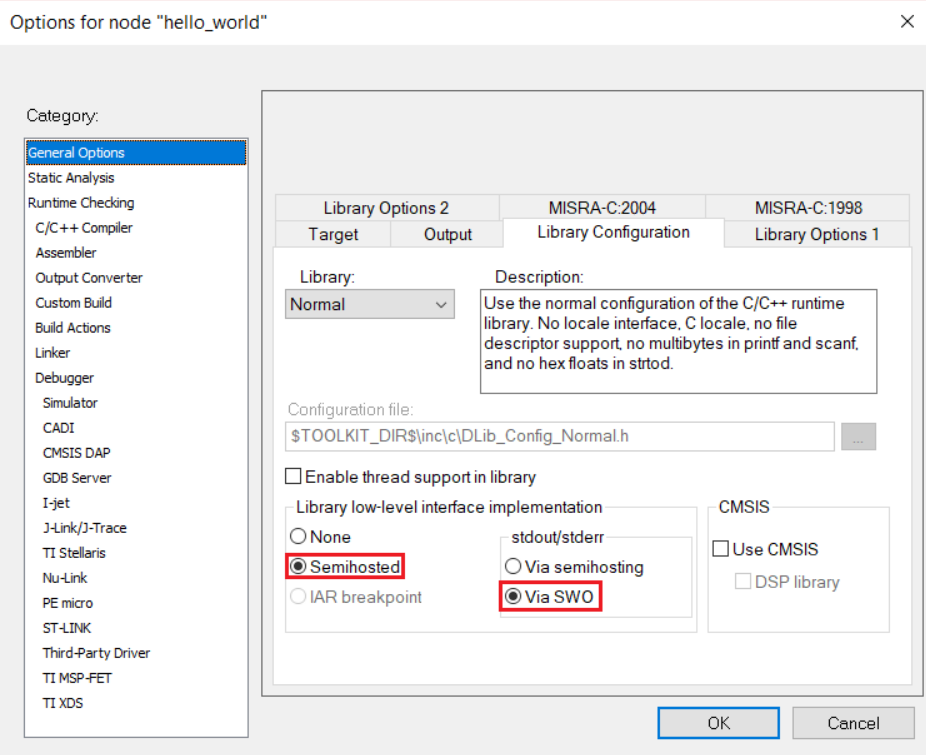
Semihosted option#
If you need to set semihosted option in IAR, a linker flag --semihosting can be set in CMake.
Further more, the default low-level interface is via semihosting, if using implementation with SWO,
an additional linker flag --redirect __iar_sh_stdout=__iar_sh_stdout_swo is needed.
Here is an example:
mcux_add_iar_configuration(LD "--semihosting --redirect __iar_sh_stdout=__iar_sh_stdout_swo")
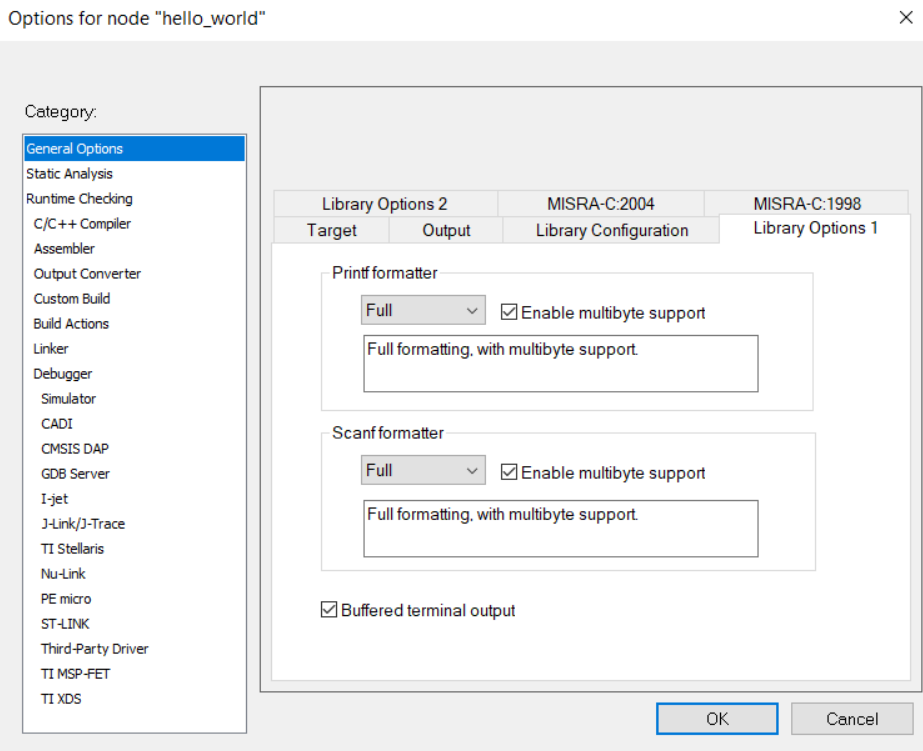
Change I/O option#
In IAR Library Options 1 tab, IDE provide configuration for printf formatter and scanf formatter.
For each printf formatting level, you can set ld-flags to configure it. Here are linker flags:
--redirect _Printf=_PrintfFull--redirect _Printf=_PrintfFullNoMb--redirect _Printf=_PrintfLarge--redirect _Printf=_PrintfLargeNoMb--redirect _Printf=_PrintfSmall--redirect _Printf=_PrintfSmallNoMb--redirect _Printf=_PrintfTiny
For each scanf formatting level, you can set ld-flags to configure it. Here are linker flags:
--redirect _Scanf=_ScanfFull--redirect _Scanf=_ScanfFullNoMb--redirect _Scanf=_ScanfLarge--redirect _Scanf=_ScanfLargeNoMb--redirect _Scanf=_ScanfSmall--redirect _Scanf=_ScanfSmallNoMb
Further more, you can enable buffered terminal output with ld-flags --redirect __write=__write_buffered.
Here is an example:
mcux_add_iar_configuration(
	  CC "--dlib_config full"
    LD "--redirect _Printf=_PrintfFull --redirect _Scanf=_ScanfFull --redirect __write=__write_buffered"
)
Source And Include Path#
The source and include path setting are set in CMake file, please refer to Source And Include
Pre-include File#
You can mark the file as pre-include file with mcux_add_source CMake function. For example:
mcux_add_source(
    PREINCLUDE TRUE
    SOURCES ./app_preinclude.h
)
This pre-include file will be prefixed for each compiler automaitcally. Such as --preinclue ./app_preinclude.h for IAR, -inclue ./app_preinclude.h for mdk and so on.
Linker file#
The Linker file setting are set in CMake file, please refer to CMake Extension Linker Setting
Link libraries#
The libraries are set in CMake file with CMake extension function mcux_add_configuration, please refer to CMake Extension Configuration Function
Pre-build/Post-build Command#
The pre/post build command can be set by CMake function mcux_add_custom_command, please refer to CMake Extension Pre/Post Build Command
IDE Option Setting#
The IDE option setting is set in IDE.yml. The option is set by the SETTING: VALUE hash data structure in yml format. For more details, please refer to IDE Option
Keil MDK#
Supported option for MDK are:
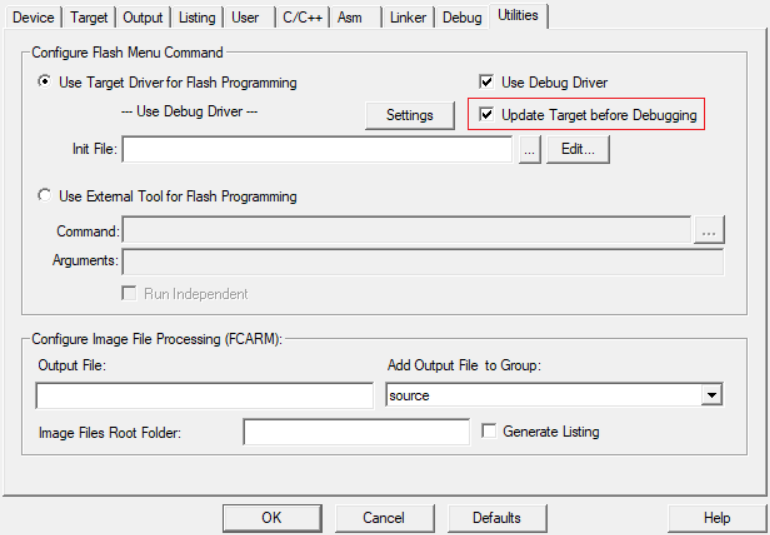
Update Target before Debugging for Keil
SETTING: update-before-debug
VALUE: true or false
For example:
mdk:
  config:
    __common__:
      update-before-debug: true
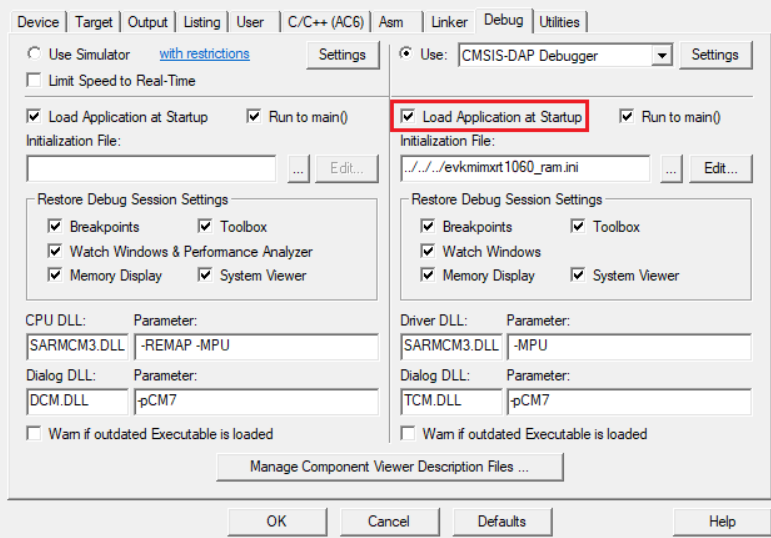
Load Application at Startup for Keil
SETTING: load_application
VALUE: true or false
For example:
mdk:
  config:
    __common__:
      load_application: true
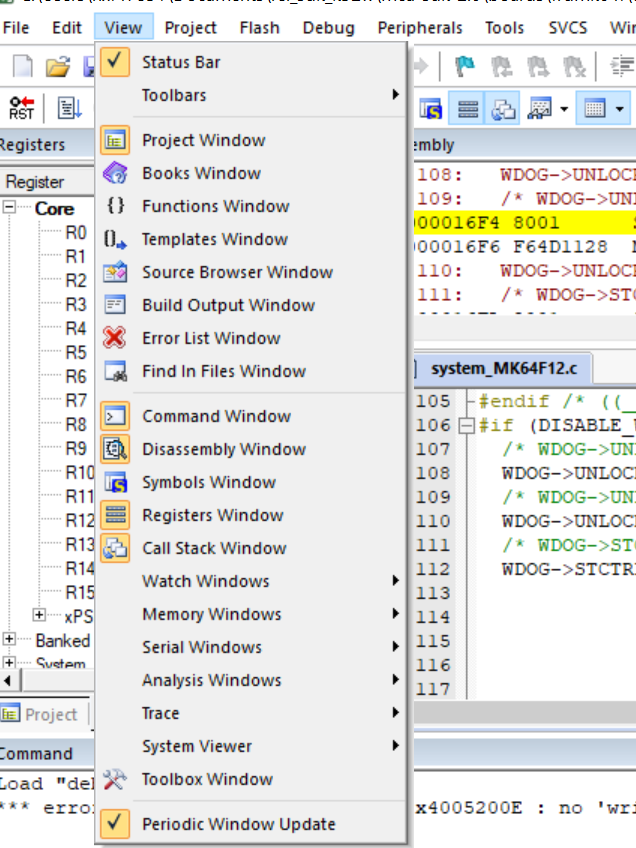
Set Periodic Window Update for Keil
SETTING: periodic_update
VALUE: true or false
For example:
mdk:
  config:
    __common__:
      periodic_update: true
IAR#
Supported option for IAR are:
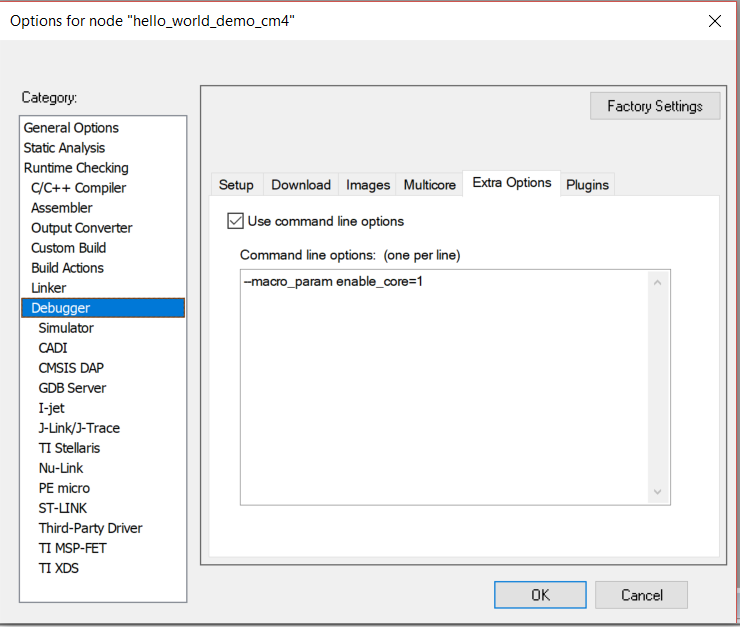
Debugger Extra Options
SETTING: debugger_extra_options
VALUE: Specific settings
For example:
iar:
  config:
    __common__:
      debugger_extra_options:
        - "--macro_param enable_core=1"
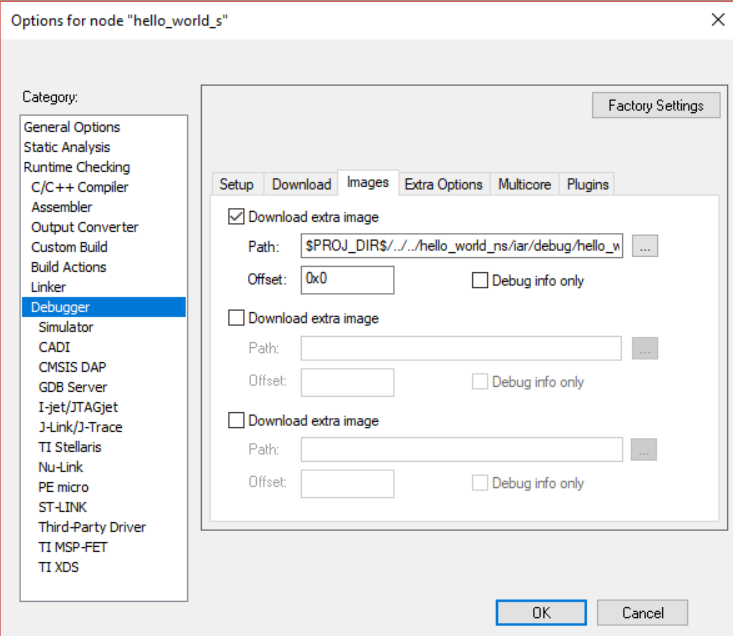
Download Extra Image
For multicore project, usually there are extra image needed when debugging, IAR support this setting, you can use
download-extra-imageto configure. For exampleiar: config: debug: download-extra-image: - path: ../../hello_world_ns/iar/debug/hello_world_ns.out offset: 0x0 debug_info_only: false
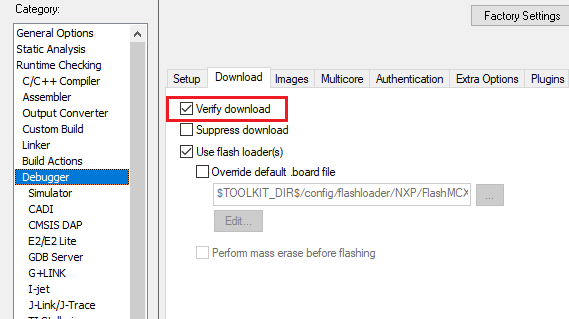
Verify download If you want to verify the code image with contents read back from target memory, you can set
verify_downloadto true. For example:iar: config: debug: debugger_setting: verify_download: true
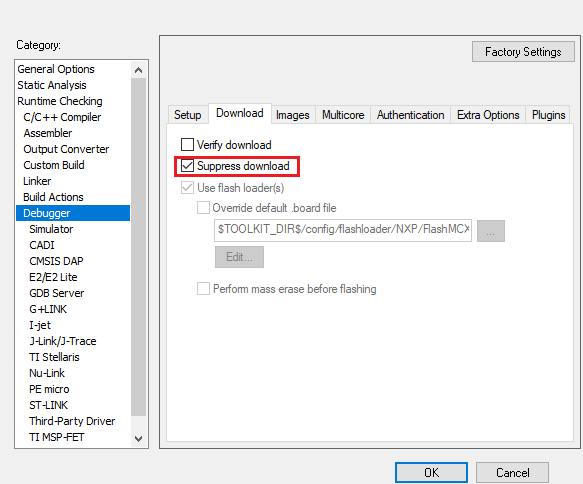
Suppress download
If you want to disable the downloading of the code to preserve the content of the flash, you can set
suppress_downloadto true. For example:iar: config: debug: debugger_setting: suppress_download: true
CodeWarrior#
Supported options for CodeWarrior are:
Connected Targets
Specifies which core(s) to connect during a debug session. This setting controls the
.launchfile properties including SMP mode, core index, and the SMPCores list. It is typically set under__common__so it applies to all build configurations. No need for single core devices.Example:
codewarrior:
  config:
    __common__:
      connected_targets: ${core_id}
IDE Script Setting#
The IDE script is set in IDE.yml. To record a script in yml, you should set at least the following properties:
source: The path of the script, it should be a path relative to ${SdkRootDirPath}
attribute: Mark the attribute of the script, help IDE know how to use it
toolchains: Indicates which toolchain this file should be used by
Besides, if the script is for specific target, like ram_0x1400_debug, you should add “targets” property.
Supported attributes will be introduced in the following sections.
Keil MDK#
Supported attribute for script files are:
initialization_file
For example:
initialization_file:
  files:
  - source: boards/${board}/evkbmimxrt1170_ram_cm4_0x1400.ini
    targets: ram_0x1400_debug ram_0x1400_release
    attribute: initialization_file
    toolchains: mdk

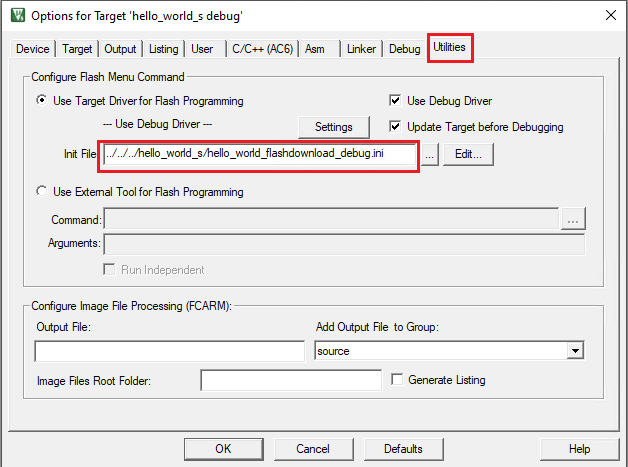
flash_programming_file
For example
flash_programming_file:
  files:
    - source: boards/${board}/trustzone_examples/hello_world/hello_world_s/hello_world_flashdownload_debug.ini
      attribute: flash_programming_file
      toolchains: mdk
      targets: debug
IAR#
Supported attribute for script files are:
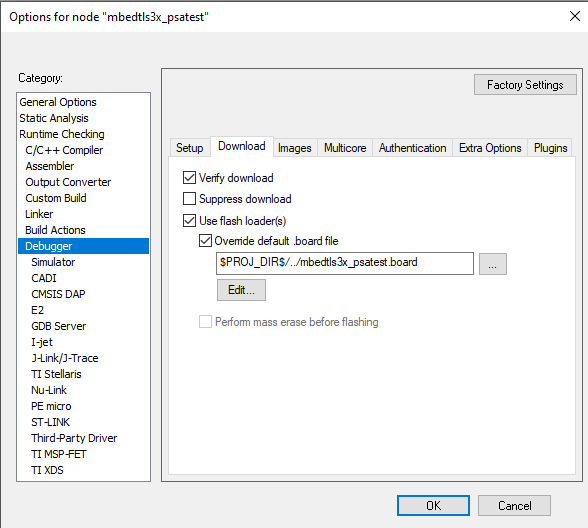
board-file
For example:
board-file:
  files:
    - source: boards/${board}/mbedtls3x_examples/mbedtls3x_psatest/mbedtls3x_psatest.board
      attribute: board-file
      toolchains: iar
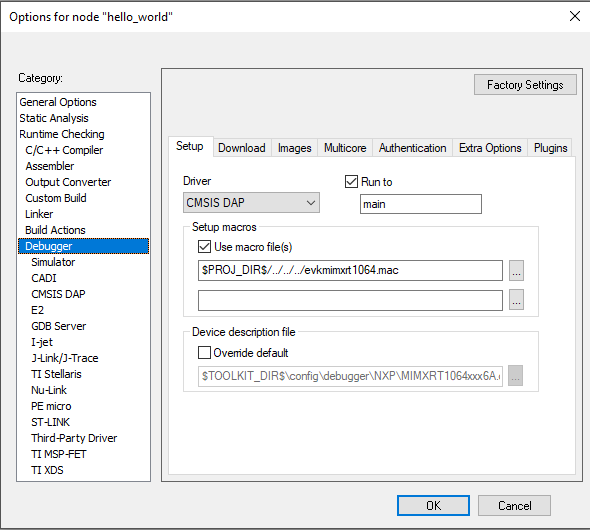
macro-file
For example
macro-file:
  files:
  - source: boards/${board}/evkmimxrt1064_sdram_init.mac
    targets: sdram_txt_debug sdram_txt_release
    toolchains: iar
    attribute: macro-file
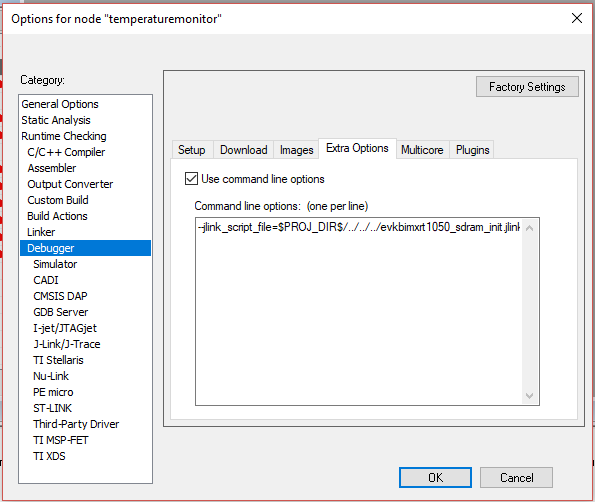
jlink_script_file
For example
jlink_script_file:
  files:
  - source: boards/${board}/evkbimxrt1050_sdram_init.jlinkscript
    attribute: jlink_script_file
    toolchains: iar
    targets: sdram_debug sdram_release
CodeWarrior#
Supported attribute for script files are:
target_initialization_fileSpecifies the TCL initialization script used by the CodeWarrior debugger to initialize the target before a debug session. For multicore devices, use the
apply_targetsfield to declare which core(s) this file applies to.For example:
target_initialization_file:
  files:
  - source: ${device_root}/${soc_portfolio}/${soc_series}/${device}/codewarrior/${device}${core_id_suffix_name}.tcl
    toolchains: codewarrior
    attribute: target_initialization_file
    project_path: "${device}/codewarrior"
    package_path: project-root-path
    apply_targets: ${core_id}
memory_config_fileSpecifies the memory configuration file (
.mem) used by the CodeWarrior debugger to describe the target memory layout. For multicore devices, use theapply_targetsfield to declare which core(s) this file applies to.Example:
memory_config_file:
  files:
  - source: ${device_root}/${soc_portfolio}/${soc_series}/${device}/codewarrior/${device}${core_id_suffix_name}.mem
    toolchains: codewarrior
    attribute: memory_config_file
    project_path: "${device}/codewarrior"
    package_path: project-root-path
    apply_targets: ${core_id}
IDE language Setting#
For GUI project, project language can be set to c or cpp in IDE.yml with project_language field. If not set, the default is c. For IAR C++ project, generally you can set project language to auto to let the compiler decide how to compile.
For example:
iar:
  project_language: auto
mdk:
  project_language: cpp
Ruby Environment Setup#
Use Provided Portable Ruby Environment (recommended)#
You can simply run west install_ruby to get a portable version of ruby with all required gems. It supports following platforms:
Windows
x86_64-LInux with glibc >= 2.17, compatible with most modern Linux distributions.
MacOS Big Sur or later (including M series chip).
Important
The west extension install_ruby is implemented in core repo scripts folder, please refer Get MCUXpresso SDK Repo to setup the repository. After the repository is ready, you should firstly run west config commands.allow_extensions true to enable west extensions otherwise you will get error unknown command install_ruby.
By default, portable_ruby will be extracted to User home directory ~/portable-ruby. You can use west install_ruby -o <path> if you want to extract it to another place.
Note
The portable ruby archive already have a top-level directory portable-ruby, so you don’t need to create an extra directory for extraction.
The bin dir of portable_ruby will be automatically added to your user PATH in Windows.
For Linux/macOS, please follow the guide in command line to add it to your shell profile:
# You have already install the latest portable ruby
# The active ruby is /home/user_name/.rbenv/shims/ruby
# Please append following line in your shell profile like .zshrc or .bashrc:
export PATH=/home/user_name/portable-ruby/3.1.4/bin:$PATH
Install Ruby Environment by Yourself#
Important
For IDE GUI project generation, ruby version equal or later than 3.1.2 is required.
For Windows#
Please download Ruby 3.1.x from https://rubyinstaller.org/downloads/, choose 32-bit or 64-bit according to your PC OS and Ruby+Devkit for simpler MSYS integration.
ruby installer package with DEVKIT can avoid most network issues during the installation of MSYS2 and MINGW development toolchains.
After download, install ruby in your PC:
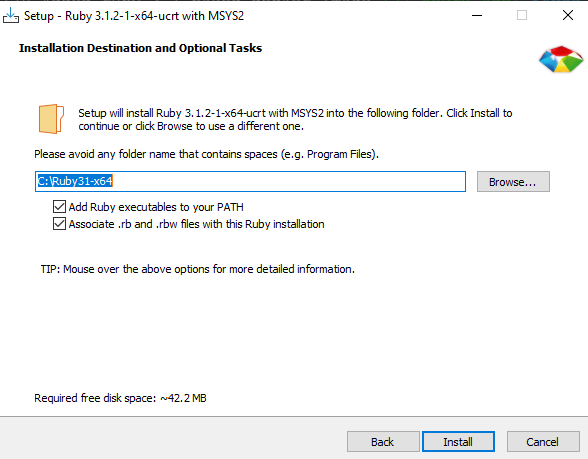
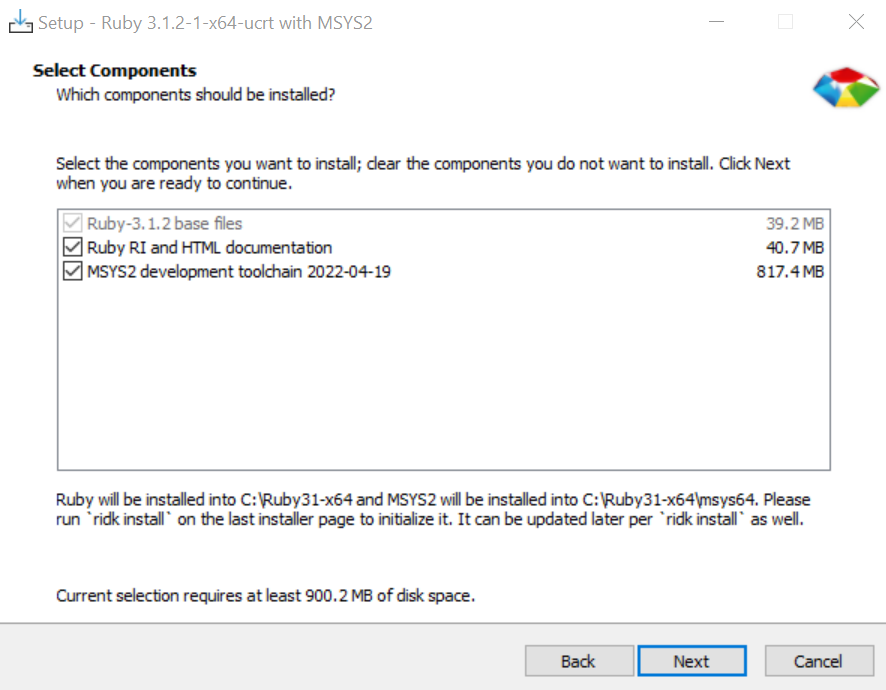
Please select MSYS2 development toolchain
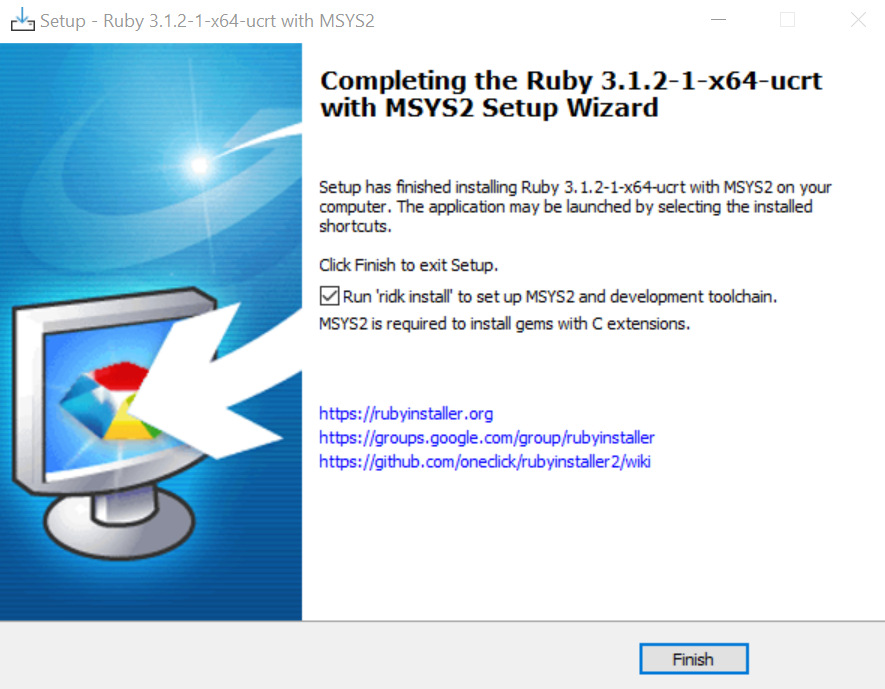
Tick “Run ‘ridk install’ to set up MSYS2 and development toolchain.”
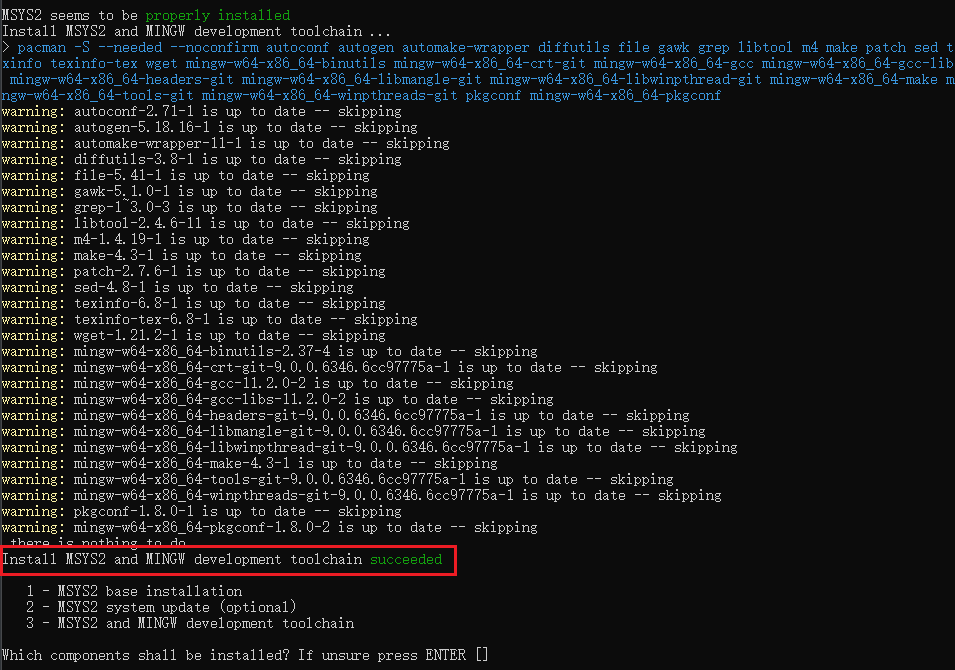
Choose the 3rd MSYS2 and MINGW development toolchains

Ignore the warnings and errors. When finished, it will print successed, then you can close the window.
Till now, ruby together with gem is ready, you can see check by:

You may need to restart/signout your OS to make environment variable work.
For Linux/MacOS#
Please use the version manager tool rbenv. It can help you avoid the complex configuration of package managers of different linux distribution.
If your platform does not support rbenv, please refer ruby-lang.org
Install necessary Gems#
Before you start install, please make sure you get the proper source for ruby gem. The default source is https://rubygems.org/ . You can run
gem source -l
to get
It is quite slow for China developers. For China developers, you can add additional source like
gem sources -r https://rubygems.org
# You can google for the best source according to your network status
gem sources -a https://mirrors.tuna.tsinghua.edu.cn/rubygems/
For developers who cannot access the default gem source, please edit the source line of the mcuxsdk/scripts/guigenerator/Gemfile to use an accessible source.
Install the latest RubyGems (This is critical to ensure you can get precompiled gems):
gem update --system
Then cd into mcuxsdk/scripts/guigenerator and run:
bundle install