Overview
LinkServer is a tool designed to launch and manage GDB servers for NXP debug probes.
It offers both graphical and command-line interfaces for programming target flash memory, along with an integrated test runner for automated workflows. It can be used within NXP MCUXpresso for Visual Studio Code, with custom GNU-based debug setups, or in headless environments for continuous integration and testing.
LinkServer can be used with CMSIS-DAP probes such as MCU-Link, LPC-Link2, LPC11U35-based and OpenSDA-based standalone or on-board debug probes from NXP.
This document covers LinkServer functionalities and provides a quick start guide for launching the server and connecting via GDB.
Installation
Go to the LinkServer homepage and download the LinkServer installer for your operating system and host architecture.
To install LinkServer and its associated components (MCU-LINK_installer and LPCScrypt), launch the installer and follow the wizard.
The default installation directory depends on the operating system:
Windows:
C:\NXP\macOS:
/Applications/Linux:
/usr/local/
Windows and macOS
To start the installer, double-click the LinkServer installer executable, for example:
Windows:
LinkServer_26.5.59.exemacOS:
LinkServer_26.5.59.aarch64.pkg
Linux
Open a terminal and navigate to the directory where the installer was downloaded
Ensure that the installer has execute permissions, for example:
chmod a+x LinkServer_26.5.59.x86_64.deb.bin
Start the installer with elevated privileges, for example:
sudo ./LinkServer_26.5.59.x86_64.deb.bin
Refer to LinkServer integration with IDEs for more details regarding the LinkServer usage in IDEs.
Functionalities
Lists the supported devices
Lists the available probes (connected); boots LPC-Link1 and LPC-Link2 probes, found in the DFU mode
Loads all JSON data files and reports potential errors (schema validation)
Exports the configuration of any device to a JSON file that can be used to customize the device configuration
Overrides the device configuration from the CLI (for example: core index, wire speed, flash driver, reset type)
Launches and manages GDB servers
Execute flash operations (erase, load, verify) without GDB
Run applications without GDB, suitable for CI/CD environments
Controls target boot configuration by driving the MCU-Link ISP_CTRL pins (available for probe, gdbserver, and flash commands)
Execute probe-specific commands:
Update the firmware on a MCU-Link probe if needed, without physical intervention
Show CMSIS-DAP probe information for a particular probe
Run a low-level script
Issue a wire timed reset
Limitations
On multicore targets, the flash and run operations are supported only on the primary core.
To program a flash region associated with a secondary core, use the corresponding region as mapped to the primary core.
Legacy LPC-Link1 / LPCXpresso V1 probes can fail to boot or operate on specific Windows 10 and Windows 11 systems because of DFU driver compatibility issues. For Windows 10 systems, the HVCI feature causes driver error code 39. To disable HVCI, set the ‘Enabled’ key to 0 (DWORD) value in:
HKEY_LOCAL_MACHINE\SYSTEM\CurrentControlSet\Control\DeviceGuard\Scenarios\HypervisorEnforcedCodeIntegrity
For Windows 11 systems, a possible workaround is to disable the Memory Integrity feature in Windows Security. More details here.
Quickstart
This quickstart demonstrates how to start debugging an FRDM-MCXN236 board with LinkServer and GDB.
The GDB server can be started using the gdbserver command. We must specify <DEVICE_NAME>:<BOARD> pair to identify the device we want to debug.
We do not know the exact board name, so let us try:
./LinkServer gdbserver :frdm-mcxn
CRITICAL: Critical error
ERRMSG: Exception: Multiple devices match the given substring, but none of them were exact matches. Please use the full <DEVICE_NAME>:<BOARD> pair to select the device.
Family    Device    Board         Cores
--------  --------  ------------  ------------------------
MCXN2XX   MCXN236   FRDM-MCXN236  cm33
MCXN9XX   MCXN947   FRDM-MCXN947  cm33_core0, [cm33_core1]
Two entries were found containing ‘frdm-mcxn’ in their board name.
To select one, we can provide the full
<DEVICE_NAME>:<BOARD> pair:
./LinkServer gdbserver MCXN236:FRDM-MCXN236
In this particular case, we could have also used ./LinkServer gdbserver n2:frdm-mcxn, since ‘n2’ is enough to discriminate between the two FRDM boards available.
At this point, if you have multiple probes connected, an error can occur.
INFO: Selected device MCXN236:FRDM-MCXN236
CRITICAL: Critical error
ERRMSG: Exception: Multiple probes detected, please specify a probe serial or index using --probe.
  #  Description                                    Serial                                            Device    Board         Capabilities
---  ---------------------------------------------  ------------------------------------------------  --------  ------------  ---------------------
  1  MCU-LINK FRDM-MCXN236 (r0E7) CMSIS-DAP V3.172  0IIDCTJPZV20K                                     MCXN236   FRDM-MCXN236  DEBUG, VCOM, SIO
  2  MCU-LINK on-board (r0C7) CMSIS-DAP V3.172      2VJ1PIIW3TVNQ                                                             DEBUG, PWR, VCOM, SIO
  3  DAPLink CMSIS-DAP                              0240000031754e45002e00189485001f6461000097969900                          DEBUG
Specify the probe index using the -p option. For example:
./LinkServer gdbserver n2:frdm-mcxn -p #1
Now, the GDB server is running and some messages are shown in the console.
INFO: Selected device MCXN236:FRDM-MCXN236
INFO: Selected probe #1 0IIDCTJPZV20K (MCU-LINK FRDM-MCXN236 (r0E7) CMSIS-DAP V3.172)
INFO: MCU-Link firmware update `check`: Probe ([0IIDCTJPZV20K] [MCU-LINK FRDM-MCXN236 (r0E7) CMSIS-DAP V3.172]) is already running the same firmware version as the included firmware version [3.172]
Firmware update `check`: not required - forced update can be performed using: `LinkServer probe #1 update forced`
INFO: Selected device matches probe's target identification info
GDB server listening on port 3333 in debug mode (core cm33)
Semihosting server listening on port 4444 (core cm33)
This information tells us that the server is awaiting a connection from GDB on port 3333. A semihosting server is also listening on port 4444. If your application uses semihosting, you can connect to this server using telnet or something similar.
Let us start the GDB client:
arm-none-eabi-gdb <PATH_TO_ELF_FILE>
Then, issue the following commands:
target remote :3333to connect to the server.mon semihost enato enable semihosting.loadto download the application to the board. After you connect, you must always issue aload, including in attach mode.
We can now debug the target from GDB (place breakpoints, continue and suspend the target, read registers, and so on).
The GDB server closes automatically when the GDB disconnects.
The server can also be closed from the terminal using CTRL+C.
Multicore
By default, LinkServer starts a GDB server for the primary core only. Option --core all can be used to start
one server for each core. The servers for the secondary cores are started in attach mode.
As an example, we use LPC55S69 with a multicore application.
Start the server using
./LinkServer gdbserver 55s69 -c all.
INFO: Selected device LPC55S69:LPCXpresso55S69
INFO: Booting LPC-LINK 2 probe
INFO: Selected probe #1 I3FWNTIW (LPC-LINK2 CMSIS-DAP V5.361)
INFO: GDB server listening on port 3333 in debug mode (core cm33_core0)
INFO: Semihosting server listening on port 4444 (core cm33_core0)
INFO: GDB server listening on port 3334 in attach mode (core [cm33_core1])
INFO: Semihosting server listening on port 4445 (core [cm33_core1])
We can see that two GDB servers were started. The one for the primary core (cm33_core0) is listening on port 3333, and the one for the secondary core (cm33_core1) is listening on port 3334. Also notice that the secondary cores are always displayed surrounded by square brackets.
First, start the GDB client, then connect to the primary server. This time all the GDB commands are specified from the command line:
arm-none-eabi-gdb <PATH_TO_ELF_FILE> -ex "target remote :3333" -ex "mon semihost ena" -ex "load".
Next, start another GDB for the secondary core:
arm-none-eabi-gdb <PATH_TO_ELF_FILE> -ex "target remote :3334" -ex "mon semihost ena" -ex "load".
Although the server for the secondary core is in attach mode, “load” must still be executed, even if no actual writes to flash/RAM occur.
Now, you are able to debug from GDB as usual. The LinkServer program closes when both GDB instances disconnect. CTRL+C in the LinkServer terminal can also be used to close all instances.
Custom device configurations
The command ./LinkServer gdbserver <DEVICE_NAME>:<BOARD> instructs LinkServer to use a certain device configuration
from the devices folder. When we want to use a custom device, we can pass a JSON file instead of the device name
and board pair.
Let us use device <DEVICE_NAME>:<BOARD> export FILE to extract the configuration of a device, edit it, and then pass it back to gdbserver.
Using the FRDM-K64F board again, we can run:
./LinkServer device k64fn:frdm export myconfig.json
This command extracts the configuration for this device into the myconfig.json file.
INFO: Selected device MK64FN1M0xxx12:FRDM-K64F
INFO: Device data written to myconfig.json
As an example we edit the /board/id property to change the board name, and delete the /debug/connect-script property.
myconfig.json after the changes:
{
  "copyright": "Copyright 2026 NXP",
  "license": "SPDX-License-Identifier: BSD-3-Clause",
  "version": "2.0.0",
  "vendor": "NXP",
  "device-dataset": [
    {
      "board": {
        "id": "CUSTOM-FRDM-K64F"
      },
      "device": {
        "id": "MK64FN1M0xxx12",
        "name": "MK64FN1M",
        "family": "K6x",
        "memory": [
          {
            "location": "0x00000000",
            "size": "0x00100000",
            "type": "Flash",
            "flash-driver": "FTFE_4K.cfx"
          },
          {
            "location": "0x20000000",
            "size": "0x00030000",
            "type": "RAM"
          },
          {
            "location": "0x1FFF0000",
            "size": "0x00010000",
            "type": "RAM"
          },
          {
            "location": "0x14000000",
            "size": "0x00001000",
            "type": "RAM"
          }
        ],
        "cores": [
          {
            "name": "cm4",
            "primary": true,
            "index": "0",
            "type": "cm4"
          }
        ]
      },
      "debug": {
        "protocol": "swd",
        "masserase-script": "kinetismasserase.scp",
        "swo": true
      }
    }
  ]
}
The new configuration can be used via the following command:
./LinkServer gdbserver myconfig.json
INFO: Selected device MK64FN1M0xxx12:CUSTOM-FRDM-K64F
INFO: Selected probe #1 0240000048824e450034700bdd89002e8761000097969900 (CMSIS-DAP)
GDB server listening on port 3333 in debug mode (core cm4)
Semihosting server listening on port 4444 (core cm4)
Notice that the new board name appears in the output log.
You can check out the meaning of each property using the JSON Schema at schemas/devices.schema.json.
If you prefer a more human-readable format, the schema is available in HTML or Markdown form in the docs/ folder.
Overriding device configuration
The <DEVICE_NAME>:<BOARD> argument, used for the gdbserver, flash, or run commands, instructs LinkServer to use a certain configuration from the devices folder, containing specific device properties.
When we want to override one or more default properties, we can use the --override <POINTER>=<VALUE> option on the command line. This option does not require modifying the original JSON file or using a separate custom JSON file.
Examples that override the default configuration loaded from FRDM-K64F.json when launching the GDB server for the FRDM-K64F board:
./LinkServer gdbserver --override /debug/connect-script= k64fn:frdmremoves the value ofconnect-script./LinkServer gdbserver --override /debug/connect-script="custom_kinetisconnect.scp" --override /debug/masserase-script="custom_kinetismasserase.scp" k64fn:frdmoverrides the values of multiple properties
Logging
By default, LinkServer only logs messages up to INFO level.
The logging level can be controlled using the --log-level <level> option.
The <level> must be in the range 0-5, corresponding to: DISABLED, CRITICAL, ERROR, WARNING, INFO, DEBUG.
Therefore, full DEBUG logging can be enabled using --log-level 5. The short form -l5 is also accepted.
Note: If provided, the --log-level option MUST be placed before any other command.
Examples:
./LinkServer -l5 probes./LinkServer -l5 flash --probe #2 k64fn:frdm load hello_world.axf --erase-all
Global configuration
Some LinkServer settings can be configured globally by creating a JSON file in ~/.linkserver/config.json, following the schema found in schemas/config.schema.json.
Currently, only default port ranges can be configured. LinkServer internally uses various lower-level processes, with which it communicates via sockets. Normally, it is not necessary for the user to know about these ports. If the default ranges are blocked, a global configuration file allows changing them.
Example of a configuration file:
{
  "ports": {
    "user-gdb": [3333, 4333],
    "user-semihosting": [4444, 5444],
    "internal-stub-gdb": [13333, 14333],
    "internal-stub-semihosting": [14444, 15444],
    "internal-stub-stdout": [15555, 16555],
    "internal-redlink": 23490,
    "internal-redlink-telnet": 23025
  }
}
user-gdb,user-semihosting,internal-stub-gdb,internal-stub-semihosting, andinternal-stub-stdoutexpect a pair of numbers representing the start and exclusive end of the port range.internal-redlinkandinternal-redlink-telnetexpect an exact port number.
Furthermore, the --config option allows specifying a custom path for the configuration file, instead of using the default one.
Note: If provided, the --config option MUST be placed before any other command.
Example:
./LinkServer -l5 --config custom_config.json probes
Commands
If no arguments are supplied to the launcher, it prints a help message and then exits, same as ./LinkServer -h.
This help message also contains all the commands that LinkServer supports.
The documentation below only presents the most important options. The commands can contain other options
that can be printed using the help command.
Help
help [CMD] prints the help for another command. Examples:
./LinkServer help gdbserver./LinkServer help flash erase./LinkServer help probe update
Probes
probes lists and boots all connected probes.
Probe
probe PROBE_ID COMMAND can be used to run some probe-specific commands:
update <mode>: Firmware update operations for the selected MCU-Link probedapinfo: Shows CMSIS-DAP probe information for the selected proberunscript FILE: Loads and runs a LinkServer scp (BASIC-like) scriptwiretimedreset <milliseconds>: Issues a wire timed resetwirebootconfig <data>: Controls the target boot configuration by driving the MCU-Link ISP_CTRL pins
Use ./LinkServer help probe update|dapinfo|runscript|wiretimedreset|wirebootconfig for more information and individual options for each probe command.
Devices
devices lists all built-in supported devices. The devices are listed in a table, showing: device family, device name,
board name, and cores. The secondary cores are always displayed surrounded by square brackets.
The device name and board can be used to filter the results by using --filter <DEVICE_NAME>:<BOARD>. Filtering is case insensitive.
If an exact match is found, only that match is shown. Otherwise, filtering is done using substrings.
Note: The Device column shows entries with a shorter, friendlier name instead of full device ID by default
(for example, MIMXRT1064 instead of MIMXRT1064xxxxA). To show the full device IDs (as defined in data sheets,
MCUXpresso SDKs, Open-CMSIS-Packs), pass the --id flag to the devices command. This flag only affects how
the device names are displayed, not the functionality itself. When selecting devices or filtering for devices,
both forms of device names are checked for a match.
Examples:
No filter:
./LinkServer devicesNo filter, show full device names:
./LinkServer devices --idFilter by device name:
./LinkServer devices -f k64fFilter by board name:
./LinkServer devices -f :frdmFilter by device name and board:
./LinkServer devices -f k64f:frdm
Device
device DEVICE COMMAND can be used to list or export the JSON configuration of a device.
The DEVICE parameter must be a <DEVICE_NAME>:<BOARD> pair (see devices --filter for details).
The available subcommands are:
info: Display the JSON configuration of the device in an easy-to-read format.export FILE: Export the JSON configuration data of the device to FILE.The exported JSON can be edited and passed to commands requiring target specification, like
gdbserver,flashorrun.The schema for the JSON file can be found at schemas/devices.schema.json. A more human-readable HTML or Markdown version of the schema can be found in the docs/ folder.
Example:
./LinkServer device k64fn:frdm export myconfig.json. After editing the file, the custom device can be used like so:./LinkServer gdbserver myconfig.json.
Gdbserver
gdbserver DEVICE starts and manages a gdbserver and a telnet server for semihosting.
The DEVICE parameter specifies the device that the probe is connected to.
It can either be a <DEVICE_NAME>:<BOARD> pair (see devices --filter for details), or a device configuration file
ending in .json that can be generated with the config command presented above.
It is not necessary to specify the probe if only one is connected. Otherwise, the probe serial/index must be specified
using --probe TEXT. If TEXT starts with #, then it is interpreted as the probe index, otherwise it is interpreted
as a probe serial substring (case insensitive).
After starting, GDB can connect using target remote :3333.
After connecting, a load command MUST be issued from GDB, even in attach mode.
If semihosting is used, mon semihost ena MUST also be issued.
Attach mode can be forced using --attach. load command must be issued from GDB after connecting.
A semihosting telnet server is also started with the default port 4444.
Semihosting must be enabled by executing monitor semihost enable from GDB.
If you want to use semihosting through GDB (not through telnet), first disable the telnet server by using --semihost-port -1.
Then, after connecting with GDB, execute set mem inaccessible-by-default off and mon semihost ena.
For multicore boards, one gdbserver and semihost server can be started per core. By default, the launcher starts
the server only for the primary core. All cores can be specified using --core all. Alternatively, specific cores can be
selected using the -c option multiple times (for example, -c cm7 -c cm4). When multiple cores are used, non-primary cores
are always started in the attach mode.
Ports can be specified using --gdb-port and --semihost-port options. If these ports are not specified,
LinkServer tries several ports starting from 3333 and 4444 respectively. If the port options are used, an error
occurs if the exact given port is not free. In addition, --semihost-port -1 can disable semihosting through telnet.
When using multiple cores, the ports are automatically incremented for each gdbserver instance.
Examples:
Select the device by substring:
./LinkServer gdbserver 55s69Select the device by full device name and board:
./LinkServer gdbserver MIMXRT1176xxxxx:MIMXRT1170-EVKSelect the probe by index:
./LinkServer gdbserver MIMXRT1176xxxxx:MIMXRT1170-EVK -p #2Start in attach mode:
./LinkServer gdbserver MIMXRT1176xxxxx:MIMXRT1170-EVK -aStart one server for each core:
./LinkServer gdbserver MIMXRT1176xxxxx:MIMXRT1170-EVK -c all
Flash
flash DEVICE COMMAND can be used to perform flash operations without GDB. The supported commands are:
blank: Check that the specified flash region is blank.dump: Dump the flash region specified by ADDR and SIZE to a given FILE.erase: Erase all flash.erase-range: Erase all flash sectors overlapping the range specified by ADDR and SIZE.load FILE...: Program the flash with the given FILE arguments.resurrect: Attempt to unlock the device by running a mass erase script.verify FILE...: Verify that the flash contents match the given FILE arguments.
Use ./LinkServer help flash COMMAND for more information and individual options for each flash command.
In addition, the flash command supports several connection options (for example: DEVICE, --probe), with the same meaning
as for the gdbserver command. Use ./LinkServer help flash for more information and options.
Note: As the help suggests, the options for the flash command must be supplied before DEVICE.
Examples:
Mass-erase flash and program it using an ELF file:
./LinkServer flash --probe #2 k64fn:frdm load hello_world.axf --erase-allLoad an ELF file and two binaries at offsets 0x20000 and 0x22000 respectively:
./LinkServer flash --probe #2 k64fn:frdm load hello_world.axf data1.bin:0x20000 data2.bin:0x22000
Refer to Flash Drivers for more details regarding the LinkServer flash support.
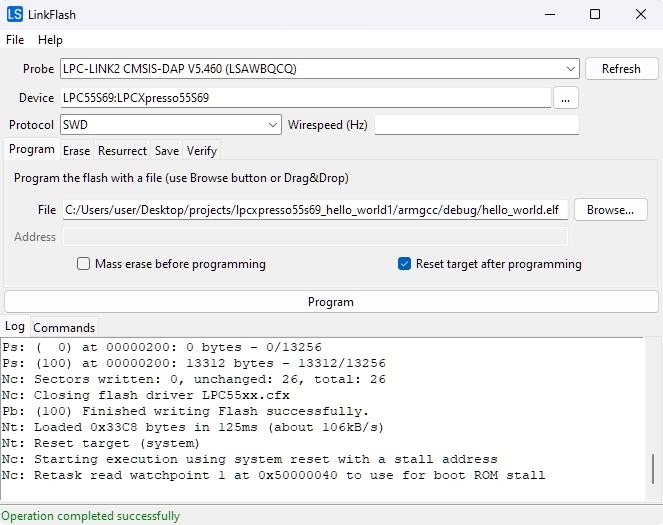
GUI
gui flash opens an application window for executing common flash operations using the graphical user interface.
Refer to LinkFlash for more details regarding the GUI flash support.
Example:
./LinkServer gui flash
Runner
run [OPTIONS] DEVICE FILE can be used to load, start execution, send input, and monitor output of applications for testing purposes without GDB.
Refer to Runner for more details regarding the CI/CD runner support.
Example: Run an ELF application by using semihosting I/O, connect via probe #1 and pass “test=2” to the application.
./LinkServer run --probe #1 --mode semihost --send "test=2" --args-mark "*ARGS*" k64fn:frdm hello_world.axf
Target boot configuration
Besides the connection options available for gdbserver and flash commands, there is the --bootconfig <data> option.
This option allows controlling the target boot configuration by driving the MCU-Link ISP_CTRL pins during resets.
This option is intended for board designs that include an on-board MCU-Link probe (running firmware version 3.108 or later).
For more details about the --bootconfig <data> option, check the help available for gdbserverand flash commands.
User-friendly boot modes names can be defined in the JSON configuration file specific to a device. For example, LPCXpresso55S36.json has the following “friendly” boot configuration names:
        "bootconfigs": {
          "internal": "xx00",
          "isp": "xx01",
          "flexspi": "xx10",
          "auto": "xx11"
        }
Examples:
flashcommand using boot configuration calledinternalin the JSON file:
./LinkServer flash --bootconfig internal lpc55s36 load lpcxpresso55s36_led_blinky.axfgdbserverandflashcommands using various boot configurations:
./LinkServer gdbserver --bootconfig xx00 lpc55s36
./LinkServer gdbserver --bootconfig flexspi lpc55s36
./LinkServer flash --bootconfig xx10 lpc55s36 load lpcxpresso55s36_hello_world_qspi_xip.axfturn off the previous target boot configuration:
./LinkServer gdbserver --bootconfig xxxx lpc55s36
Automatic MCU-Link firmware update
The automatic firmware update is supported for MCU-Link probes running MCU-Link CMSIS-DAP firmware V3.122 or later. Examples:
List the connected probes:
.\LinkServer probes
  #  Description                       Serial         Device    Board    Capabilities
---  --------------------------------  -------------  --------  -------  ----------------
  1  MCU-LINK (r0FF) CMSIS-DAP V3.122  OZ1UW42JY1TF1                     DEBUG, VCOM, SIO
Check if a firmware update is needed for the selected MCU-Link probe:
.\LinkServer probe '#1' update check
INFO: Selected probe #1 OZ1UW42JY1TF1 (MCU-LINK (r0FF) CMSIS-DAP V3.122)
INFO: MCU-Link firmware update `check`: Probe ([OZ1UW42JY1TF1] [MCU-LINK (r0FF) CMSIS-DAP V3.122]) is running a firmware version which is older than the included firmware version [3.146]
Firmware update `check`: recommended - auto update can be performed using: `LinkServer probe #1 update auto`
Perform the automatic firmware update:
.\LinkServer probe '#1' update auto
INFO: Selected probe #1 OZ1UW42JY1TF1 (MCU-LINK (r0FF) CMSIS-DAP V3.122)
INFO: MCU-Link firmware update `auto`: Probe ([OZ1UW42JY1TF1] [MCU-LINK (r0FF) CMSIS-DAP V3.122]) is running a firmware version which is older than the included firmware version [3.146] and will be updated
INFO: Preparing the selected probe ([OZ1UW42JY1TF1] [MCU-LINK (r0FF) CMSIS-DAP V3.122]) for firmware update to V3.146...
INFO: Checking if the probe has entered ISP mode using a timeout of 5 + 2 seconds to allow the OS to re-enumerate the USB device
INFO: Programming MCU-Link probe firmware [<path_to_LinkServer>\MCU-LINK_installer\scripts\program_CMSIS.cmd -s]
INFO: Checking if the probe has rebooted using a timeout of 5 seconds to allow the OS to re-enumerate the USB device
Firmware update `auto`: performed
Further attempts to update the firmware using
automode look like this:.\LinkServer probe '#1' update auto
INFO: Selected probe #1 OZ1UW42JY1TF1 (MCU-LINK (r0FF) CMSIS-DAP V3.122)
INFO: MCU-Link firmware update `auto`: Probe ([OZ1UW42JY1TF1] [MCU-LINK (r0FF) CMSIS-DAP V3.146]) is already running the same firmware version as the included firmware version [3.146]
Firmware update `auto`: not required
A
forcedfirmware update is useful when the version running on the probe is newer than the local version:.\LinkServer probe '#1' update forced
INFO: Selected probe #1 OZ1UW42JY1TF1 (MCU-LINK (r0FF) CMSIS-DAP V3.122)
INFO: MCU-Link firmware update `forced`: Probe ([OZ1UW42JY1TF1] [MCU-LINK (r0FF) CMSIS-DAP V3.148]) will be programmed using included firmware version [3.146]
INFO: Preparing the selected probe ([OZ1UW42JY1TF1] [MCU-LINK (r0FF) CMSIS-DAP V3.148]) for firmware update to V3.146...
INFO: Checking if the probe has entered ISP mode using a timeout of 5 + 2 seconds to allow the OS to re-enumerate the USB device
INFO: Programming MCU-Link probe firmware [<path_to_LinkServer>\MCU-LINK_installer\scripts\program_CMSIS.cmd -s]
INFO: Checking if the probe has rebooted using a timeout of 5 seconds to allow the OS to re-enumerate the USB device
Firmware update `forced`: performed
Low-level functions
LinkServer is using a low-level tool called redlinkserv to communicate with the ARM Cortex debug hardware directly via the debug probe.
Refer to Low-level functions for details.
Examples:
Use redlinkserv tool in command-line mode:
binaries/redlinkserv --commandlineredlink>probelist 1 Index = 1 Manufacturer = ARM Description = DAPLink CMSIS-DAP Serial Number = 0231000030514e45003b20067d7e00511f91000097969900 VID:PID = 0D28:0204 Path = \\?\hid#vid_0d28&pid_0204&mi_03#7&1f02e942&0&0000#{4d1e55b2-f16f-11cf-88cb-001111000030} redlink>probeopenbyindex 1 Probe Handle 1 Open redlink>wireswdconnect 1 DpID = 2BA01477 redlink>aplist 1 TAP 0: 2BA01477 Core 0: M4 APID: 24770011 ROM Table: E00FF003 TAP 0: 2BA01477 AP 1: APID: 001C0000 ROM Table: 00000000 redlink>corelist 1 TAP 0: 2BA01477 Core 0: M4 APID: 24770011 ROM Table: E00FF003 redlink>cmhalt 1 0 redlink>cmstep 1 0 PC = 0000175E, SP = 2000FFA0 redlink>cmstep 1 0 PC = 00001760, SP = 2000FFA0 redlink>cmrun 1 0 redlink>probeclosebyindex 1 Probe Handle 1 Closed redlink>exitUse a client connected to redlinkserv telnet port
23025after starting the GDB serverLaunch the GDB server:
./LinkServer gdbserver MK22FN512xxx12:FRDM-K22FINFO: Exact match for MK22FN512xxx12:FRDM-K22F found INFO: Selected device MK22FN512xxx12:FRDM-K22F INFO: Selected probe #1 0231000030514e45003b20067d7e00511f91000097969900 (DAPLink CMSIS-DAP) GDB server listening on port 3333 in debug mode (core cm4) Semihosting server listening on port 4444 (core cm4)
Connect Netcat utility to the LinkServer instance used by the GDB server launcher:
nc 127.0.0.1 23025redlink>wiregetspeed 1 Wirespeed = 10000000 Hz redlink>wireswdconnect 1 DpID = 2BA01477 redlink>
Maintenance commands
maint ide commands can be used to simplify integration of LinkServer with existing MCUXpresso IDE installations. Refer to LinkServer integration with IDEs for more details regarding the LinkServer usage in MCUXpresso IDE.
Use ./LinkServer maint ide for more information and options.
MCUXpresso IDE integration commands

COMMAND:
  associate  Associate with MCUXpresso IDE installation
  list       List compatible MCUXpresso IDE installations
  restore    Restore MCUXpresso IDE installation to default LinkServer
  select     Interactive MCUXpresso IDE selection
Examples:
Detect and list all MCUXpresso IDE installations that are compatible with this LinkServer version:
./LinkServer maint ide listConfigure an existing MCUXpresso IDE installation to use this LinkServer version:
./LinkServer maint ide associate C:\nxp\MCUXpressoIDE_24.9.25Revert an existing MCUXpresso IDE installation to use the default LinkServer version that shipped with that IDE version:
./LinkServer maint ide restore C:\nxp\MCUXpressoIDE_24.9.25Present an interactive menu that allows associating this LinkServer version with MCUXpresso IDE installations (detected or custom):
./LinkServer maint ide select
Detected MCUXpresso IDE installations:
1) MCUXpressoIDE_24.12.130
2) MCUXpressoIDE_24.9.25
3) Custom installation path
q) Quit
If you want to use this LinkServer version with one of the existing IDEs select its corresponding number, or `q` to exit
:
The gui maint command opens a GUI interface that allows selecting MCUXpresso IDE installations to associate with this LinkServer version.