Run an application using imx-mkimage
This section describes the steps to write a bootable SDK image to the eMMC/FlexSPI NOR flash for the i.MX processor.
Note: Attach core to debug code with J-Link probe.
The following steps describe how to write container image (flash.bin):
Connect the DEBUG UART slot on the board to your PC through the USB cable. The Windows OS installs the USB driver automatically and the Ubuntu OS finds the serial devices as well.
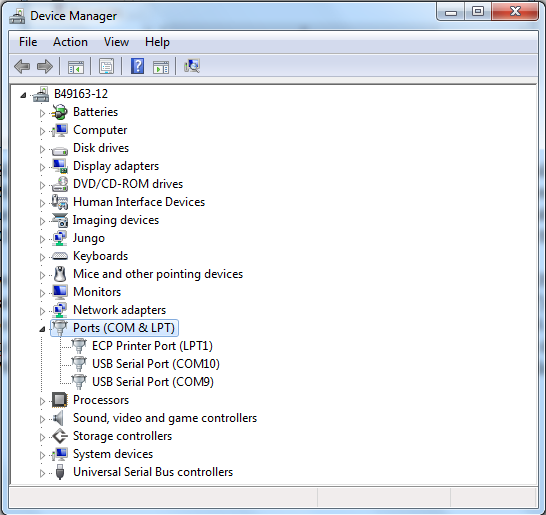
On Windows OS, open the device manager, find USB serial Port in Ports (COM and LPT). Assume that the ports are COM9 and COM10. One port is for the debug message from the Cortex-A35 and the other is for the Cortex-M33. The port number is allocated randomly, so opening both is beneficial for development. On Ubuntu OS, find the TTY device with name
/dev/ttyUSB*to determine your debug port. Similar to Windows OS, opening both is beneficial for development.|
|
Generate m33 firmware:
For RAM target:
$ ./build_debug.sh
or
$ ./build_release.sh
For FLASH target(XIP):
$ ./build_flash_debug.sh
or
$ ./build_flash_release.sh
Get
imx-mkimage,s400 firmware(mx8ulpa2-ahab-container.img),OPTEE(tee.bin),upower firmware(upower.bin),uboot-spl(u-boot-spl.bin),uboot(u-boot.bin), andTF-A(bl31.bin)from the Linux release package.Clone the
imx-mkimagefrom NXP public git.$ git clone https://github.com/nxp-imx/imx-mkimage
Check out the correct branch. The branch name is named after Linux release version which is compatible with the SDK. You can get the version information from corresponding Linux Release Notes document.
$ cd imx-mkimage
$ git checkout [branch name]
Get
s400 firmware(mx8ulpa2-ahab-container.img).$ cp mx8ulpa2-ahab-container.img iMX8ULP/
Get
upower firmware(upower.bin).$ cp upower.bin iMX8ULP/
Get
u-boot-spl.bin and u-boot.bin.For EVK-MIMX8ULP:
$ cp u-boot-spl.bin-imx8ulpevk-sd iMX8ULP/u-boot-spl.bin
$ cp u-boot-imx8ulpevk.bin-sd iMX8ULP/u-boot.bin
For EVK9-MIMX8ULP:
$ cp u-boot-spl.bin-imx8ulp-9x9-lpddr4-evk-sd iMX8ULP/u-boot-spl.bin
$ cp u-boot-imx8ulp-9x9-lpddr4-evk.bin-sd iMX8ULP/u-boot.bin
Get
bl31.bin.$ cp bl31-imx8ulp.bin-optee iMX8ULP/bl31.bin
Generate container image table with
imx-mkimage:boot type
A35
M33
SW5[8:1]
Single Boot
make SOC=iMX8ULP flash_singleboot For RAM target:
make SOC=iMX8ULP flash_singleboot_m33 Note: Does not support pack Flash target into flash.bin when boot type is single boot type.
|1000_xx00 Single Boot-eMMC| | |make SOC=iMX8ULP flash_singleboot_flexspiFor RAM target:
make SOC=iMX8ULP flash_singleboot_m33_flexspi Note: Does not support pack Flash target into flash.bin when boot type is single boot type.
|1010_xx00 Single Boot-Nor| |Dual Boot|make SOC=iMX8ULP flash_dualboot|For RAM target: make SOC=iMX8ULP flash_dualboot_m33
For Flash target: make SOC=iMX8ULP flash_dualboot_m33_xip
|1000_0010 A35-eMMC/M33-Nor| | |make SOC=iMX8ULP flash_dualboot_flexspi|1010_0010 A35-Nor/M33-Nor| |Low Power Boot|make SOC=iMX8ULP flash_dualboot|1000_00x1 A35-eMMC/M33-Nor| | |make SOC=iMX8ULP flash_dualboot_flexspi|1010_00x1 A35-Nor/M33-Nor|
**Note:**

-   For details, see `imx-mkimage/iMX8ULP/README`.
-   Does not support pack Flash target firmware to flash.bin when boot type is single boot type.

-   RAM target: debug/release.

-   Flash target: `flash_debug/flash_release`.

-   Need generate two flash.bin and download to emmc/flexspi2 nor flash of a35 and flexspi0 nor flash of m33, one for A35, another one for M33 when boot type is dual boot type or low power boot type.
Build the application (for example,
hello_world), get binary imagesdk20-app.bin, copy toimx-mkimageproject folderiMX8ULP/and rename tom33_image.bin.cp sdk20-app.bin <imx-mkimage path>/iMX8ULP/m33_image.bin
Under
imx-mkimageproject folder, execute the following command to generate m33 container image.When boot type is dual boot/low power boot type:
For RAM (TCM) target:
make SOC=iMX8ULP flash_dualboot_m33 (write flash.bin to flexspi0 nor flash of m33;
For Flash target:
make SOC=iMX8ULP flash_dualboot_m33_xip (write flash.bin to flexspi0 nor flash of m33);
When boot type is single boot type:
for RAM (TCM) target and sw5[8:1] = 1000_xx00 Single Boot-eMMC:
make SOC=iMX8ULP flash_singleboot_m33 (write flash.bin to emmc);
for RAM (TCM) target and sw5[8:1] = 1010_xx00 Single Boot-Nor:
make SOC=iMX8ULP flash_singleboot_m33_flexspi (write flash.bin to flexspi2 nor flash of
a35);
Copy the
flash.binimage to your tftpboot server.Write
flash.bin to flexspi0 nor flash. There are two ways:Write
flash.bin to flexspi0 nor flash with uboot.Switch to single boot type (
sw[8:1]=1000 0000) and boot the board, assuming your board can boot to U-Boot.At the U-Boot console, execute following commands to download image (from network) and flash to FlexSPI0 NOR flash.
setenv serverip <tftpboot server ip>
dhcp
tftpboot 0xa0000000 flash.bin
setenv erase_unit 1000
setexpr erase_size ${filesize} + ${erase_unit}
setexpr erase_size ${erase_size} / ${erase_unit}
setexpr erase_size ${erase_size} * ${erase_unit}
sf probe 0:0
sf erase ${erase_size}
sf write  0xa0000000 0 ${filesize}
Write
flash.bin to flexspi0 nor flash with JLink:J-Link>connect Device> TIF>s (Choose target interface as SWD, unless failed to do anything) Speed> J-Link>r J-Link>h J-Link>loadbin flash.bin 0x4000000
Write
flash.bin to emmc with uuu(only for the RAM target):Start
uuu.uuu -b emmc workable-flash.bin flash.bin (workable-flash.bin: uboot and m33 image are workable)
Enter serial download mode.
Change SW5[8:1] to 01xx_xxxx Serial Downloader.
Enter serial download mode with uboot.
=> fastboot 0
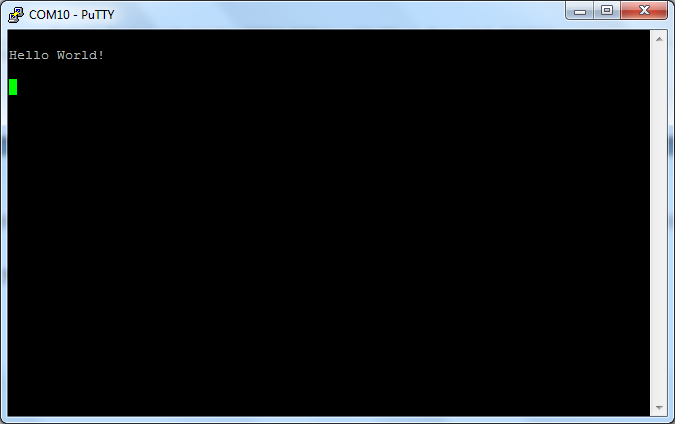
Open another terminal application on the PC, such as PuTTY and connect to the debug COM port (to determine the COM port number, see How to determine COM port). Configure the terminal with these settings:
115200
No parity
8 data bits
1 stop bit
Power off and switch to low-power boot mode (
sw5[8:1]=1000 0001), then repower the board.The
hello_worldapplication is now executed and a banner is displayed at the terminal. If this is not true, check your terminal settings and connections.|
|