Using support software features
This section describes certain support software features and how to include them in your application code:
Message queues are described in Section 6.9.1
Software timers are described in Section 6.9.2 The referenced API resources are detailed in Chapter 10.
Message queues
Communications between application tasks on a node are implemented via message queues. The application can create a dedicated message queue for a particular communication channel. A set of functions are provided to implement message queues, as indicated in Section 6.9.1.1below (these functions are detailed in Section10.1). The stack requires certain standard queues, as indicated in Section 6.9.1.2 below.
Note: To allow the device to enter sleep mode, the message queues must not contain any messages. All message queues must first be emptied.
General queue management
A queue can be created using the function ZQ_vZQueueCreate(). This function allows the queue size (number of messages that it can hold) and the size of a message to be specified. A queue is given a unique handle, which is a pointer to a tszQueuestructure containing up-to-date information about the queue (see Section101.2.1).
A message can be placed in a (created) queue using the function ZQ_bZQueueSend() and a message can be retrieved from a queue using the function ZQ_bZQueueReceive(). This is illustrated in the following figure.
Sending/Receiving a Message via a Message Queue
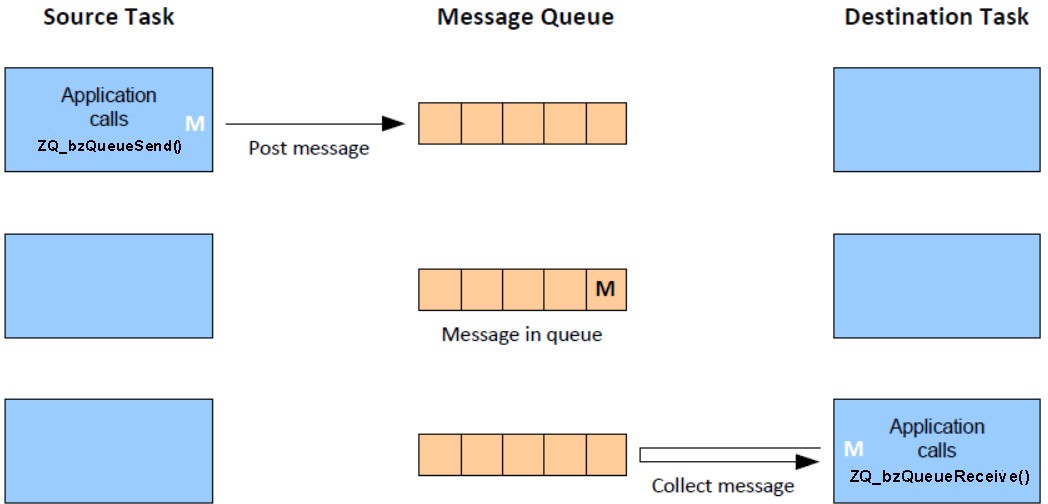
When the above two functions are called, the tszQueuestructure for the queue is automatically updated to reflect the new state of the queue. Retrieving a message results in the message being deleted from the queue. The application must regularly poll a message queue through which it expects to receive messages. It can do this by periodically calling the ZQ_bQueueIsEmpty() function, which checks whether the queue is empty. If the queue is not empty, it should call ZQ_bZQueueReceive() until there are no more messages in the queue. The number of messages currently waiting to be collected from the queue can be obtained using the function ZQ_u32QueueGetQueueMessageWaiting().
Parent topic:Message queues
Standard stack queues
Three standard queues must be created by the application for use by the stack:
Queue with handle zps_msgMlmeDcfmInd to receive IEEE 802.15.4 MAC command packets from other nodes
Queue with handle zps_msgMcpsDcfmInd to receive IEEE 802.15.4 MAC data packets from other nodes
Queue with handle zps_TimeEvents to receive internal software timer events (such as a timer expiry event)
Example code for the creation of these queues is provided below:
ZQ_vZQueueCreate(&zps_msgMlmeDcfmInd, MLME_QUEUE_SIZE, sizeof(MAC_tsMlmeVsDcfmInd),(uint8*)asMacMlmeVsDcfmInd);
ZQ_vZQueueCreate(&zps_msgMcpsDcfmInd, MCPS_QUEUE_SIZE, sizeof(MAC_tsMcpsVsDcfmInd),(uint8*)asMacMcpsDcfmInd);
ZQ_vQueueCreate(&zps_TimeEvents,TIMER_QUEUE_SIZE,sizeof(zps_tsTimeEvent), (uint8*)asTimeEvent);
You simply need to include the above code in your application. You do not need to process these queues in your code.
More information on the receive queues is provided in Received message queues.
Parent topic:Message queues
Parent topic:Using support software features
Software timers
The ZigBee 3.0 SDK provides resources that allow an application to implement and interact with software timers on the local node. Multiple software timers can be used concurrently and they are all derived from the same source counter, which is the ZigBee Tick Timer.
Note: To allow the device to enter sleep mode, no software timers should be active. Any running software timers must first be stopped and all timers must be closed.
Setting up timers
To set up software timers in your application code, you must:
Declare an array of
ZTIMER_tsTimerstructures (see Section 10.2.2.1), where each element/structure contains information on one timerCall the function ZTIMER_vTask() in the while loop of your application - this allows the stack software to automatically update the structure for each timer as the timer runs
For each timer, a user-defined callback function must be provided, which is referenced from the timer’s structure. This callback function, ZTIMER_tpfCallback(), is called when the timer expires (reaches its timed period) in order to perform any operations that the application requires as a result of the timer expiration.
Before any of the software timers can be used, they must be collectively initialized by calling the function ZTIMER_eInit(). This function takes the array of timer structures as an input.
Before an individual timer can be used, it must be opened using the function ZTIMER_eOpen(). Similarly, when the timer is no longer required, it should be closed using the function ZTIMER_eClose(). A timer is specified in these functions by means of its index in the array of timer structures.
Parent topic:Software timers
Operating timers
Once an individual software timer has been opened, it can be run one or more times before it is closed. A timer can be run by calling the function ZTIMER_eStart(). The timed period must be specified in milliseconds. On expiration of the timer, the user-defined callback function ZTIMER_tpfCallback() is called to perform any operations required by the application.
A running timer can be stopped before it expires by calling the function ZTIMER_eStop(). The status of an individual timer can be obtained at any time using the function ZTIMER_eGetState(). The possible reported states are Running, Stopped, Expired and Closed.
Parent topic:Software timers
Parent topic:Using support software features
Critical sections and Mutual Exclusion (Mutex)
The ZigBee 3.0 stack software provides features to prevent sections of application code from being preempted and/or re-entered. For example, when the application is writing data to memory, it may not be desirable for this operation to be interrupted and for an interrupt service routine to start writing to the same memory block.
Two features are provided to protect sections of application code:
Critical Section: A section of application code can be designated as a ‘critical section’, which means that the execution of this code section cannot be preempted by an interrupt with a priority level less than 12. A critical section should be short in order to avoid suspending interrupts for a long period of time.
Mutual Exclusion (Mutex): It may be desirable for a section of code not to be re-entrant. A ‘mutex’ can be associated with a code section to prevent it from being entered again before the current execution of the section has completed.
These features are described in more detail in the sub-sections below. The API resources to implement these features are detailed in Section 9.3.
Implementing a critical section
Interrupts with a priority level less than 12 cannot preempt the execution of a critical section of application code (though higher-priority interrupts can always preempt a critical section). This is illustrated in Figure 14 below, which shows the interplay between the main application thread and an interrupt service routine (ISR).
Priority of Main thread < Priority of Interrupt Service Routine (ISR) < 12
Critical Section Illustration
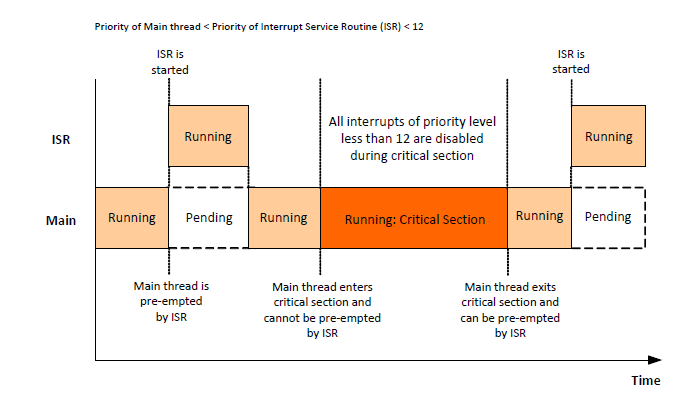
Critical section illustration
Time
A critical section of code must be delimited by the following two functions:
zps_eEnterCriticalSection() must be called at the start of the critical section.
zps_eExitCriticalSection() must be called at the end of the critical section.
A mutex can also be optionally associated with a critical section, to protect the section from re-entrancy. If required, the mutex can be specified in a parameter of zps_eEnterCriticalSection(). Mutexes are described in Section 5.9.3.2.
To implement critical sections, the application must maintain a ‘priority level’ value u8Level(see Section 9.3.2.1) which contains the current priority level of the main application thread (when critical sections are not being executed). When a critical section is entered, the priority level of the main thread is increased such that interrupts with a priority of 11 or less cannot preempt the main thread. At the end of the critical section, the priority level of the main thread is returned to the value that was contained in u8Levelbefore the critical section was entered.
Parent topic:Implementing a critical section
Parent topic:Critical sections and Mutual Exclusion (Mutex)
Implementing a Mutex
A mutex can be associated with a section of application code to prevent the section from being re-entered before the current execution of the section has finished. The section of code to which the mutex will be applied must be delimited by the following two functions:
zps_u8GrabMutexLock() must be called at the start of the code section.
zps_u8ReleaseMutexLock() must be called at the end of the code section.
It is also possible to apply a mutex to a critical section, as described in Section 5.9.3.1.
When applying a mutex, a pointer must be provided to a user-defined mutex function with the following prototype:
((bool_t*) (*) (void))
This function must define and maintain a Boolean flag which indicates whether the corresponding mutex is active (TRUE) or inactive (FALSE). This flag is used by the API functions to determine whether the specified mutex is available. If this flag reads as FALSE at the start of the relevant code section, the mutex is applied and the above mutex function must set the flag to TRUE, but if the flag is already TRUE then the mutex cannot be applied (and the API function returns with a failure).
To implement mutex protection, the application must maintain a ‘priority level’ value u8Level(see Section 9.3.2.1) which contains the current priority level of the main application thread (when mutex-protected sections are not being executed). When a mutex is applied, the priority level of the main thread is increased such that interrupts with a priority of 11 or less cannot preempt the main thread. When the mutex is released, the priority level of the main thread is returned to the value that was contained in u8Levelbefore the mutex was applied.
Parent topic:Critical sections and Mutual Exclusion (Mutex)
Parent topic:Using support software features
Parent topic:Application coding with ZigBee PRO APIs