Updating OpenSDA firmware
Any NXP hardware platform that comes with an OpenSDA-compatible debug interface has the ability to update the OpenSDA firmware. This typically means to switch from the default application (either CMSIS-DAP/mbed/DAPLink or P&E Micro) to a SEGGER J-Link. This section contains the steps to switch the OpenSDA firmware to a J-Link interface. However, the steps can be applied to restoring the original image also. For reference, OpenSDA firmware files can be found at the links below:
J-Link: Download appropriate image from www.segger.com/opensda.html. Choose the appropriate J-Link binary based on the table in Default debug interfaces. Any OpenSDA v1.0 interface should use the standard OpenSDA download (in other words, the one with no version). For OpenSDA 2.0 or 2.1, select the corresponding binary.
CMSIS-DAP/mbed/DAPLink: DAPLink OpenSDA firmware is available at www.nxp.com/opensda.
P&E Micro: Downloading P&E Micro OpenSDA firmware images requires registration with P&E Micro (www.pemicro.com).
Perform the following steps to update the OpenSDA firmware on your board for Windows and Linux OS users:
Unplug the board’s USB cable.
Press the Reset button on the board. While still holding the button, plug the USB cable back into the board.
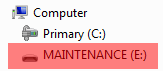
When the board re-enumerates, it shows up as a disk drive called MAINTENANCE.
|
|
Drag and drop the new firmware image onto the MAINTENANCE drive.
Note: If for any reason the firmware update fails, the board can always reenter maintenance mode by holding down Reset button and power cycling.
These steps show how to update the OpenSDA firmware on your board for Mac OS users.
Unplug the board’s USB cable.
Press the Reset button of the board. While still holding the button, plug the USB cable back into the board.
For boards with OpenSDA v2.0 or v2.1, it shows up as a disk drive called BOOTLOADER in Finder. Boards with OpenSDA v1.0 may or may not show up depending on the bootloader version. If you see the drive in Finder, proceed to the next step. If you do not see the drive in Finder, use a PC with Windows OS 7 or an earlier version to either update the OpenSDA firmware, or update the OpenSDA bootloader to version 1.11 or later. The bootloader update instructions and image can be obtained from P&E Microcomputer website.
For OpenSDA v2.1 and OpenSDA v1.0 (with bootloader 1.11 or later) users, drag the new firmware image onto the BOOTLOADER drive in Finder.
For OpenSDA v2.0 users, type these commands in a Terminal window:
> sudo mount -u -w -o sync /Volumes/BOOTLOADER
> cp -X  <path to update file> /Volumes/BOOTLOADER
Note: If for any reason the firmware update fails, the board can always reenter bootloader mode by holding down the Reset button and power cycling.