Install Xplorer Toolchains
In this chapter:
Xtensa Software Tools Platform Support
The Xtensa Software Tools are officially supported on the following platforms:
**Windows:**Win 10 64-bit, Win 8 64-bit, Win 7 64-bit
**Linux:**RHEL 6 64-bit (with ‘Desktop’ package installed)
There may be compatibility issues with other versions of Linux or Windows, especially when using the IDE. Also note that security-enhanced Linux (SELinux) is not a supported platform because the OS can prevent different shared libraries (including Xtensa Tools) from loading.
For details on platform support and installation guidelines, see the Xtensa Development Tools Installation Guide.
Parent topic:Install Xplorer Toolchains
Install the Xtensa Xplorer IDE and Tools
To install the Xtensa Xplorer IDE and tools:
Go to the URL https://tensilicatools.com/download/fusion-f1-dsp-sdk-for-rt500/ and log in.
Note: Ensure to register, if you are accessing the page for the first time. You must use your corporate email address to register.
|

|
You receive an email confirmation with an activation link from ‘Tensilica Tools’ no-reply@tensilicatools.com.
Note: Ensure to check the spam folder if this email is not in your inbox. Click the activation link to complete the registration.
Login with your credentials to see the available materials for download.
Download and install the XTENSA Xplorer IDE V10.1.11 for your operating system (Windows or Linux).
Download the DSP Configuration V10.1.11 for your operating system. This is installed later through the IDE. For details, see Install RT500 DSP Build Configuration.
Note: NXP recommends version 10.1.11 of the Xtensa Xplorer IDE and tools for use with the RT500 DSP.
Parent topic:Install Xplorer Toolchains
Install License Key
Xtensa development tools use FLEXlm for license management. FLEXlm licensing is required for tools such as the Xtensa Xplorer IDE, Xtensa C and C++ compiler, and Instruction Set Simulator (ISS).
Currently RT500 supports node-locked license for Xtensa tools. A node-locked license permits tools to run on a specific computer, tied to the MAC address of the primary network interface that is permanently attached to the machine.
Identify PC MAC Address
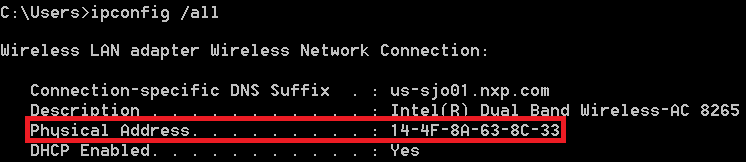
To generate the correct license file, identify the appropriate MAC for the computer you plan to run Xtensa tools on. Remove ‘-‘ or ‘:’ symbols in the MAC address.
|
|
|
|
Note: Linux NOTE MAC address MUST be associated with eth0 interface. If not, FLEXlm cannot perform the license checkout and you will not be able to compile or simulate you code. If your host has the MAC address associated with another interface. For example: em1, you may use the following approach, or another approach recommended by your IT team to rename the interface to eth0.
# Add udev rule for naming interface
$ sudo vim /etc/udev/rules.d/70-persistent-net.rules
# udev rule (replace ‘XX’ with the MAC address of your PC):
SUBSYSTEM=="net", ACTION=="add", ATTR{address}=="XX:XX:XX:XX:XX:XX", NAME="eth0"
# Change "em1" to "eth0" in your interfaces file.
$ sudo vim /etc/network/interfaces
# Restart udev or reboot machine
$ sudo reboot
Parent topic:Install License Key
Download License Key
To download the license key:
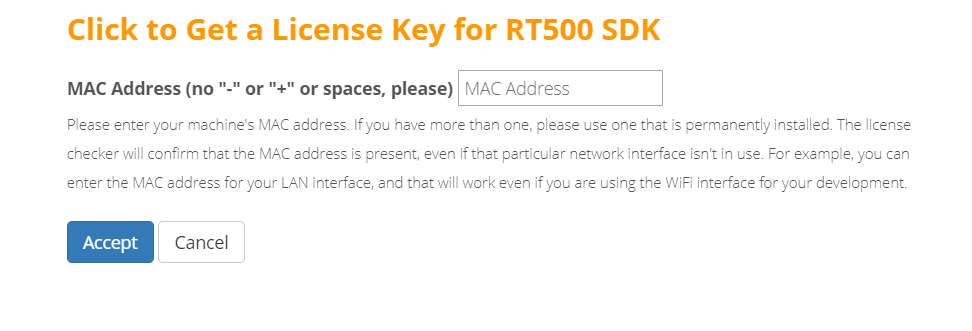
Click the CLICK TO GET A LICESNE KEY FOR RT500 SDK button.
|

|
Click the Accept button.
|
|
The following message appears.
|
|
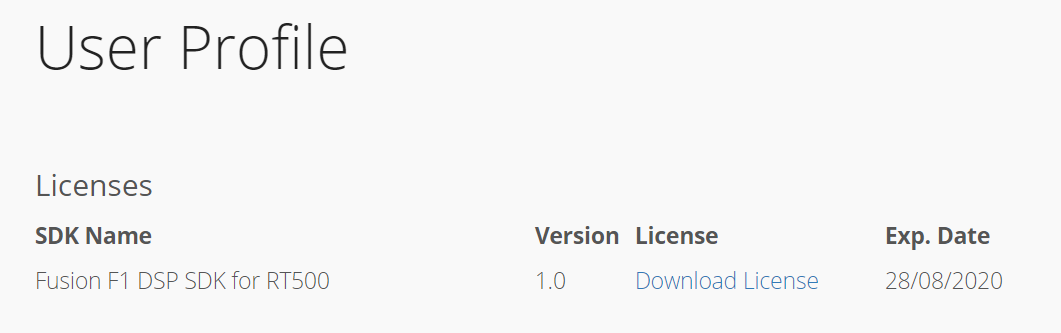
Check the license in the user-profile or the email.
|
|
The license file gets generated.
Download the license file.
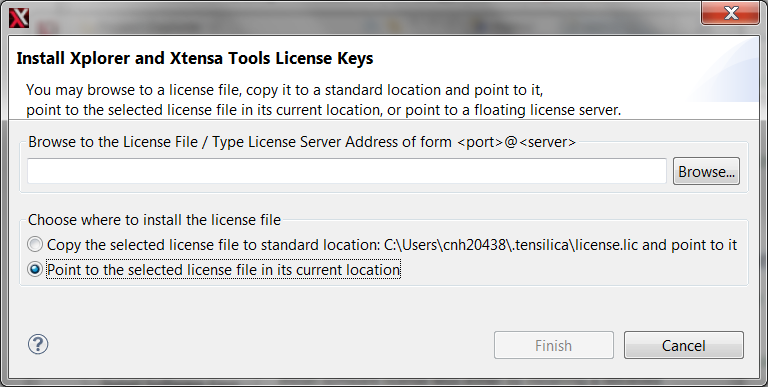
Open the recently installed Xplorer V10.1.11, select menu Help - Xplorer License Keys > Install Software Keys.
Select the license key file.
Click the Finish button.
|
|
**Note:** The generated license file only supports debug/run on the RT500 device target. It does not support software simulation/Xplorer ISS. Contact Cadence directly if you have special must run software simulations.
Parent topic:Install License Key
Parent topic:Install Xplorer Toolchains
Install RT500 DSP Build Configuration
‘Build Configuration’ is a term that describes all parameters and necessary build includes for the Tensilica processor implementation you are developing with. It is mandatory to install a specific build configuration before starting development on RT500.
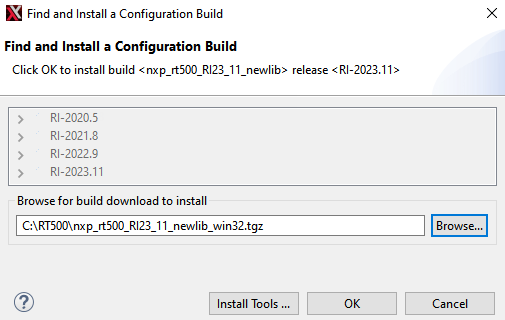
The build configuration is provided by NXP as a binary file that can be imported into the Xplorer IDE. This file can be downloaded for your OS from the Tensilica URL.
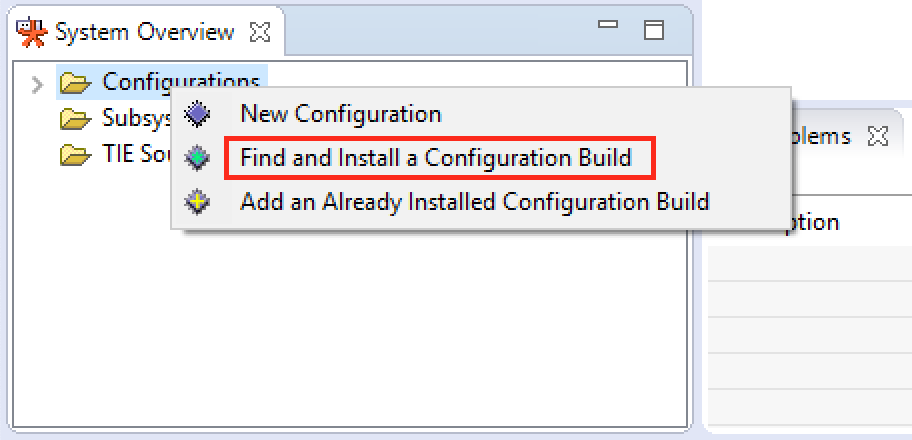
The build configuration can be installed into the IDE using the ‘System Overview’ panel which is in the lower left corner by default. If this panel is not visible, it can be toggled using menu item Window > Show View - System Overview.
|
|
|
|
Select the directory and click OK.
Parent topic:Install Xplorer Toolchains
Install Xtensa On Chip Debugger Daemon
The Xtensa On Chip Debugger Daemon (xt-ocd), is a powerful gdb-based debugging tool. It is not installed by default with the Xplorer IDE. A self-extracting executable installer is included with the IDE, which can be found at the following location:
Windows
C:\usr\xt-ocd-14.11-windows64-installer.exe
Linux
~/xtensa/XtDevTools/downloads/RI-2023.11/tools/xt-ocd-14.11-linux64-installerr
At this moment xt-ocd supports J-Link and ARM RVI/DSTREAM probes over Serial Wire Debug (SWD) for RT500. xt-ocd installs support for J-Link probes but does not install the required J-Link drivers which must be installed separately. The RT500 requires J-Link software version 6.46 or newer.
Note: When installing xt-ocd on Linux, you must manually add a symlink to the installed J-Link driver:
ln -s <jlink-install-dir>libjlinkarm.so.6 <xocd-install-dir>/modules/libjlinkarm.so.6
xt-ocd is configured with an XML input file ‘topology.xml’ that you will need to modify to fit your debugger hardware. Using J-link as example, use below content to replace the original template.
Note: You must replace ‘usbser’ section to your own JINK serial number (9 digits number on the back of the J-Link hardware).
<configuration>
<controller id='Controller0' module='jlink' usbser='600100000' type='swd' speed='1000000' locking='1'/>
<driver id='XtensaDriver0' dap='1' xdm-id='12' module='xtensa' step-intr='mask,stepover,setps' />
<chain controller='Controller0'>
<tap id='TAP0' irwidth='4' />
</chain>
<system module='jtag'>
<component id='Component0' tap='TAP0' config='trax' />
</system>
<device id='Xtensa0' component='Component0' driver='XtensaDriver0' ap-sel='3' />
<application id='GDBStub' module='gdbstub' port='20000' sys-reset='0'>
<target device='Xtensa0' />
</application>
</configuration>
Below showing another topology.xml example for ARM RealView ICE (RVI) and DSTREAM debug probes.
<configuration>
<controller id='Controller0' module='rvi' />
<driver id='XtensaDriver0' debug='' inst-verify='mem' module='xtensa' step-intr='mask,stepover,setps'/>
<driver id='TraxDriver0'   module='trax' />
<chain controller='Controller0'>
<tap id='TAP0' irwidth='4' />
</chain>
<system module='jtag'>
<component id='Component0' tap='TAP0' config='trax' />
</system>
<device id='Xtensa0' component='Component0' driver='XtensaDriver0' xdm-id='12' />
<device id='Trax0'   component='Component0' driver='TraxDriver0' xdm-id='12' />
<application id='GDBStub' module='gdbstub' port='20000' >
<target device='Xtensa0' />
</application>
<application id='TraxApp' module='traxapp' port='11444'>
<target device='Trax0' />
</application>
</configuration>
Congratulations! Now you have all Xplorer toolchains installed.
For more details, about Xtensa software tools, build configurations, or xt-ocd daemon, see the full set of documents in Xplorer menu Help > PDF Documentation.
Parent topic:Install Xplorer Toolchains
Install Xtensa Software Tools without IDE
The Xtensa Software Tools optionally be installed without the use of the IDE, which may be desired for use in a command-line only Linux environment, or for better compatibility with an unsupported Linux environment.
The command-line tools package is available as a redistributable zip file that is extracted with an Xplorer IDE install. The IDE must be installed one time in your organization to gain access to the tools package, which is then available at:
~/xtensa/XtDevTools/downloads/RI-2023.11/tools/ XtensaTools_RI_2023_11_linux.tgzz
With the tools package and the DSP Build Configuration package available from, the Tensilica Tools download site (see Xtensa Software Tools Platform Support, the toolchain can be set up as follows.
# Create Xtensa install root
mkdir -p ~/xtensa/tools
mkdir -p ~/xtensa/builds
# Set up the configuration-independent Xtensa Tool:
tar zxvf XtensaTools_RI_2023_11_linux.tgz -C ~/xtensa/tools
# Set up the configuration-specific core files:
tar zxvf nxp_RT500_RI23_11_newlib_linux_redist.tgz -C ~/xtensa/builds
# Install the Xtensa development toolchain:
cd ~/xtensa./builds/RI-2023.11-linux/nxp_RT500_RI23_11_newlib/install
\--xtensa-tools./tools/RI-2023.11-linux/XtensaTools \
--registry ./tools/RI-2023.11-linux/XtensaTools/config
Parent topic:Install Xplorer Toolchains