
Encrypted XIP using IPED#
This document extends the documentation of MCUBoot and encrypted XIP in OTA examples and provides an additional information related to the IPED module.
1. Introduction#
IPED (Inline Prince Encryption/Decryption for off-chip flash) is encryption unit for external flash specific for NXP RW61x, RT700 and MCXN MCUs.
Note: The extension currently supports only IPED module based on GCM algorithm in RW61x devices.
Following image shows configuration of metadata structure used for devices with IPED.

The IPED engine generates an 8-byte authentication tag for each 32-byte block of encrypted data. When storing this encrypted data in Flash memory, the FlexSPI controller organizes it in a specific pattern:
Each block of 32 bytes of ciphertext is followed by 8 bytes of authentication tag data (total: 40 bytes per unit)
The authentication tags are stored physically in flash but are hidden from the CPU’s logical address space (AHB read, fetch) - the CPU only sees the decrypted payload
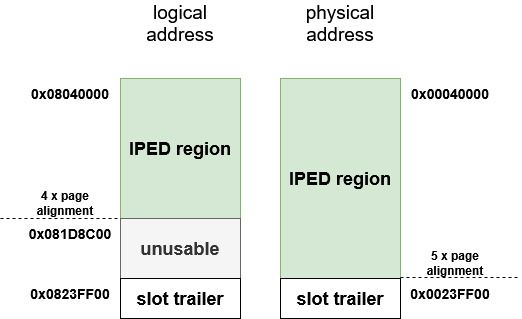
Due to this interleaving scheme, the actual physical flash consumption is (5/4)× the logical address space visible to the CPU
Following image shows an example of a valid IPED regions configuration - logical to physical address mapping
There are several points to be aware when utilizing IPED in an OTA process
Resulting consumption of physical memory
range of IPED region is defined in terms of logical address but the physical memory consumption is 1.25× the logical memory consumption
OTA process must ensure that installed OTA image doesn’t overlap the maximal size of IPED region, for example by adjusting the output binary size in linker file and/or doing checks of the image size before the encryption process
Flash operations have to satisfy boundaries of the flash page/sector size and encryption unit size
due internal software arbitration only ROM IAP for flash writes can be used
size of data chunk must be aligned to 4 * page size, no partial writes are allowed - last data chunk must be padded with dummy bytes
The whole IPED initialization, metadata handling and image re-encryption are resolved in encrypted_xip_platform_iped.c, bootutil_hooks.c and flash backend porting layer.
Additional information for IPED in RW61x can be found in its reference manual.
2. Encryption of MCUboot (OVERWRITE_ONLY only)#
Encrypting the mcuboot partition is required only for case when a private key used for offline encryption is embedded in bootloader code as C array, otherwise, it’s optional.
To simplify the workflow, the MCUXpresso Secure Provisioning Tool (SEC tool) is used.
To provision the device and encrypt the bootloader perform the following steps:
Erase the device
Build
mcuboot_opensourceGet the device into ISP mode
Typically on development boards hold the ISP button and press the reset button
Open the SEC tool and create new workspace for RW61x target device
Test the ISP connection in SEC tool
Switch to PKI management tab
Click Generate keys (leave default settings)
Build Image
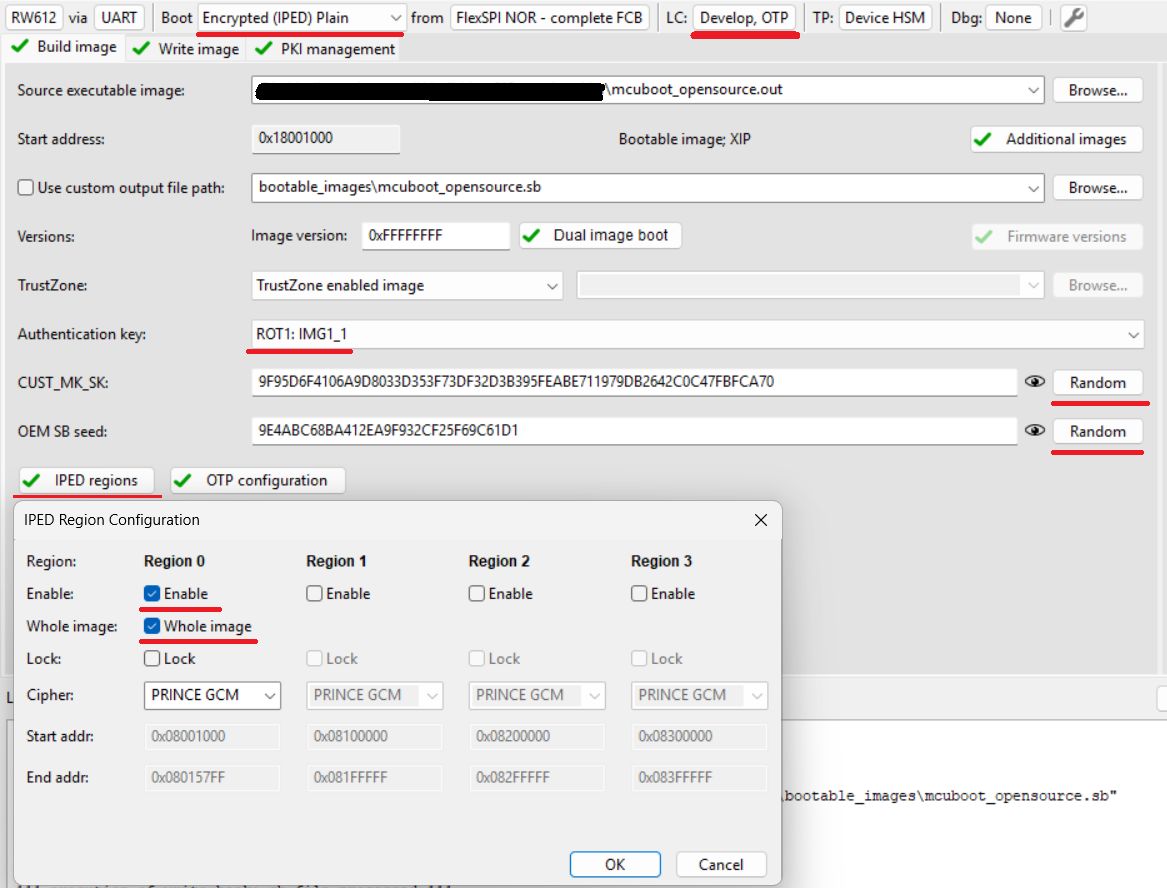
Boot: Encrypted (IPED) Plain
Select or
mcuboot_opensourceoutput binary or ELF image as Source executable imageLifecycle: Develop, OTP
Select an authentication key and generate CUST_MK_SK and OEM SB seed
Click Build image
Configure IPED regions
Click IPED regions
Configure Region 0 for MCUBoot partition as shown in following image (Region 1 is reserved for execution slot)
Write image
Click Write image
Note: This operation provisions the device with RKTH and CUST_MK_SK permanently, but the board will still be usable for development purposes as OTP BOOT_CFG0 (fuseword 15) remains intact. An user is advised to save SEC tool workspace (or atleast the keys somewhere) for future use.
3. Initial SB3 image, OTA SB3 image (FLASH_REMAP only)#
Note: Encrypted XIP with FLASH_REMAP support is currently in an experimental state. The mode can be evaluated only with ota_mcuboot_basic example
Due of customized placement of configuration structures out of FCB, an initial SB3 is required for safe deployment during end-product manufacturing. SB3 container can be also used as secure capsule for signed image providing an encryption during the OTA image transport. Additional information can be found ib SB3 documentation
Note: The device must be provisioned with RKTH and CUST_MK_SK. For provisioning, you can follow the previous chapter.
To simplify the workflow, the MCUXpresso Secure Provisioning Tool (SEC tool) is used.
Build
ota_mcuboot_basicand sign image byimgtoolas usual.Look into ota_examples/_common/sb3_templates and ota_examples/_common/binaries directories and copy the template and additional binaries to your
$sec_tool_workspacerw61x_IPED_initial_image.yamlfor the initial imagerw61x_IPED_ota_slot0_image.yamlorrw61x_IPED_ota_slot1_image.yamlfor OTA imageiped_conf_magic_page.binmagic (confirmation) for configuration structureslot_trailer_page.binMCUboot slot trailer with confirmation flag (required for DIRECT-XIP mode)
Extract the FCB from
mcuboot_opensourcebinary and place it insource_imagesfoldernxpimage utils binary-image extract -b mcuboot_opensource.bin -a 0x400 -s 512 -o parsed_fcb.bin
In SEC tool open Tools/SB Editor and click Import to import the template
Check and eventually fix paths to keys and image binary
click Generate
alternatively use SPSDK directly:
nxpimage sb31 export -c template.yaml
For initial image:
Get the device into ISP mode
Typically on development boards hold the ISP button and press the reset button
Test the ISP connection in SEC tool
The initial image can be loaded using
blhostblhost -t 100000 -p COM3,115200 receive-sb-file initial_image_slot_0.sb
For OTA update using SB3 follow instructions MCUBoot and encrypted XIP in OTA examples.