MCUXpresso Installer
Setting up an embedded development environment often involves configuring multiple tools, such as compilers, linkers, debuggers, libraries, and build systems, which can be time-consuming and complex. The MCUXpresso Installer simplifies this process by managing these dependencies for you. With its intuitive interface, the installer lets you choose high-level development options and set up your workspace quickly and easily. This streamlined approach ensures a consistent and reliable setup, allowing you to focus on development instead of installation and configuration tasks.
Installation
There are two ways to install the MCUXpresso Installer:
Automatic Installation - From the Quickstart Panel in MCUXpresso VS Code, click the Open MCUXpresso Installer button.
If the extension does not detect an existing installation, it automatically downloads and launches the tool for you.Manual Installation - Alternatively, you can download and install the MCUXpresso Installer manually using the links below:
Manual installation steps:
Windows: Download and run the .exe installer.
Ubuntu: Download the .deb.bin file, make it executable (chmod +x
<file>), then run it (sudo ./<file>- administrator privileges are required to configure the necessary permissions).macOS: Download the .dmg, open it, and drag the Installer to the Applications folder.
After installation, the Installer layout can be found in the following locations:
Windows: %userprofile%\AppData\Local\Programs\MCUXpressoInstaller
Linux: $HOME/MCUXpressoInstaller
macOS: Available in the Applications folder after mounting the .dmg file
The MCUXpresso Installer provides options to install:
Python environments for specific SDK requirements;
Git for the ability to clone source repositories and add version control;
Zephyr SDK minimal bundle if you want to develop applications based on Zephyr. Also, some additional libraries and tools are required for the build process;
GNU Arm Toolchain if you want to develop applications based on MCUXpresso SDK. The toolchain includes extra NXP libraries and headers to facilitate various extra features like semihosting stubs, macros to create MTB support (for Arm Cortex-M0+), macros to allow code/data to be placed into alternate memory banks;
LinkServer, Segger J-Link, and PEmicro debug probes software support;
MCUXpresso Configuration Tools lets developers quickly build a custom SDK and configure pins, clocks, and peripherals to generate initialization C code or register values for custom board support.
MCUXpresso Secure Provisioning Tool simplifies the generation and provisioning of bootable executables on NXP MCU devices.
GUI Guider is an HMI design tool for embedded GUI and host-side FreeMASTER visualization design using LVGL.
FreeMASTER is a tool for real-time debug monitor that enables runtime visualization and control of application variables.
MCUXpresso Installer involves a few steps, aiming to install (or upgrade to a minimal required version) the dependencies.
Default view
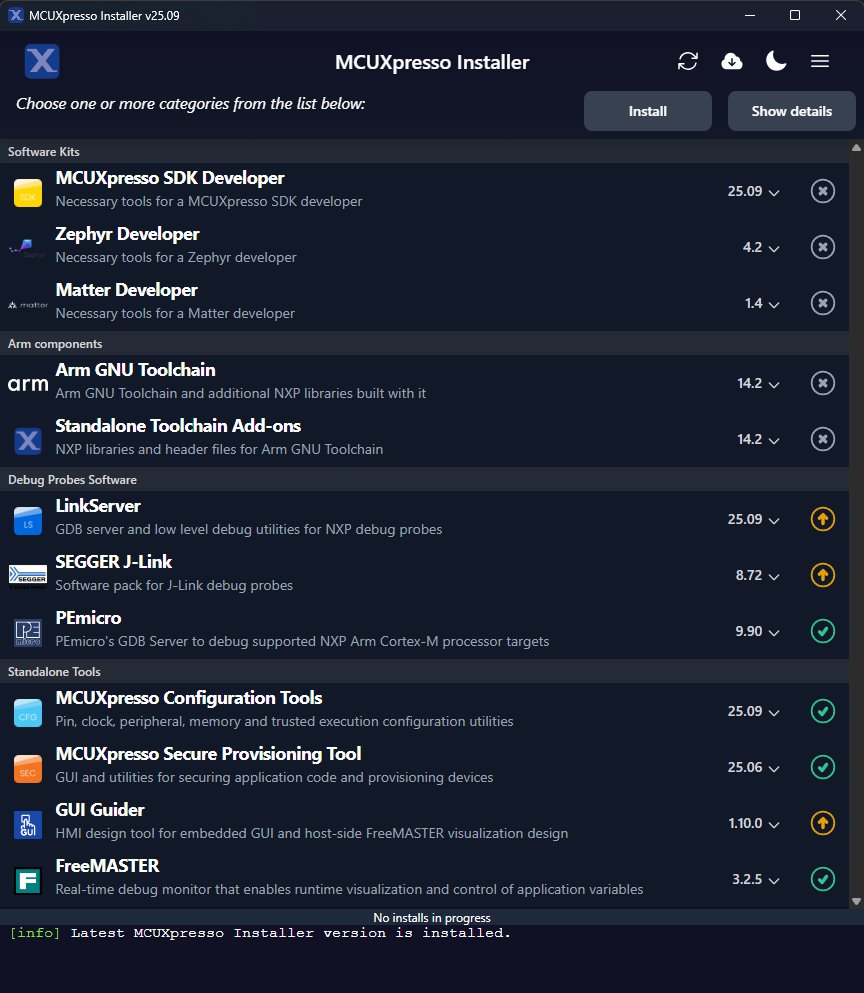
You can select one or multiple items from the available list. Once at least one package is selected, the two top-right buttons “Install”, and “Show details” become enabled.
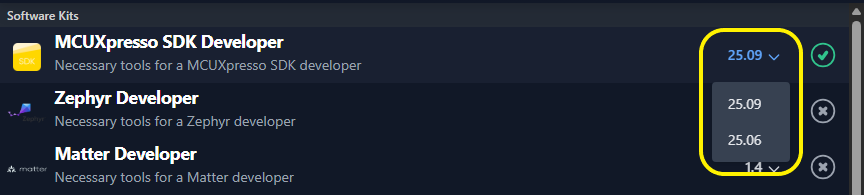
To select the version of the package to install, click the dropdown menu next to each package. This lets you choose between different available versions.
The “Install” button installs all components from selected packages that do not exist at the required versions.
Custom view

Clicking the “Show details” button opens a panel on the right side, displaying all components from the selected packages.
The component list is interactive. Individual components can be added or removed to customize the toolset to be installed. Selection can include one, multiple, or all components across one or more packages.
The “Install” button operates on the customized list of components, not on the full package bundles.
When one or more components are selected or deselected, the corresponding parent package is marked as partially selected (indeterminate state). When all components within a package are selected or deselected, the parent package is automatically marked as selected or deselected, respectively. Similarly, when a package is selected or deselected, all of its components are selected or deselected accordingly.
Component dependencies across packages are managed automatically. Some components (for example, Git, Python) appear in multiple packages (for example, Zephyr Developer, MCUXpresso SDK Developer). Their selection states are synchronized - selecting or deselecting one, mirrors the change in the others. If a full package is selected, its components are also selected in other packages where they are present.
Special case: to avoid inconsistencies, when a package is deselected, its components are deselected only within that package - they remain unchanged in other packages.
The detailed panel is shown when the user clicks “Show details”, and hidden when the “Hide details” button is clicked.
Software kits environments
MCUXpresso SDK Developer - it contains necessary dependencies for users targeting to develop applications based on MCUXpresso SDK.
Zephyr Developer - aims to create an environment for Zephyr RTOS based applications.
Matter Developer - includes the necessary components that must be installed to set up a development environment for Matter applications.
MCUXpresso Virtual Environment
Python, pip, west, and other Python requirements are installed in a Python virtual environment on:
Windows: %userprofile%/.mcuxpressotools
Linux and macOS: $HOME/.mcuxpressotools
Python is installed under the .mcuxpressotools directory and used exclusively from that location. The Python virtual environment is created based solely on this Python installation.
The Python virtual environment name includes the Python version used to create the virtual environment (for example: .mcux-venv-3.12).
MCUXpresso Venv Terminal shortcut
The desktop shortcut feature automatically creates shortcuts on the desktop of the user when MCUXpresso Installer is installed on the user system.

These shortcuts provide direct access to activate and use the virtual environments without navigating through complex file structures. The shortcut provides the option to choose between multiple virtual environments and automatically configures the Arm GCC toolchain for immediate use.
The feature is available on all platforms:
Windows: A desktop shortcut on the Windows desktop
Linux: A desktop shortcut in the desktop environment of the user
macOS: An application included in the disk image file
When you launch the shortcut for the first time, you can choose between multiple installed virtual environments. The shortcut then scans the .mcuxpressotools directory and displays all detected Arm GCC toolchain versions. You can choose whether to set the ARMGCC_DIR environment variable. If selected, the toolchain is configured and a ready-to-use virtual environment is activated.

Arm components
Arm GNU Toolchain - toolchain for MCUXpresso SDK development plus NXP extension pack used to provide extra functionalities (that is, extra runtime libraries, semihosting, trace, multicore, and so on).
Standalone Toolchain Add-ons - NXP toolchain extension pack used to provide extra functionalities. They can be used on top of an Arm GNU Toolchain distribution (that is, runtime libraries, semihosting, trace, multicore, and so on). It is built and tested with a specific baseline version of the Arm GNU Toolchain. That version determines the version number of the package. However, it can also be applied to a custom user-installed Arm GNU Toolchain to take advantage of all MCUXpresso for VS Code extension features.
Note: Multiple versions of Arm GNU Toolchain and Standalone Toolchain Add-ons are available to download and install.
The latest version of the Arm Components is available on all operating systems, while version 13.2 is unavailable on Ubuntu 24.04 due to missing system dependencies.
Debug probes software
LinkServer - gdb server and low-level debug utilities for NXP debug probes.
Segger J-Link - software pack for J-Link debug probes.
PEmicro - PEmicro gdb server to debug supported NXP Arm Cortex-M processor targets.
Standalone Tools
MCUXpresso Configuration Tools - pin, clock, peripheral, memory, and trusted execution configuration utilities.
MCUXpresso Secure Provisioning Tool - GUI and utilities for securing application code and provisioning devices.
GUI Guider - HMI design tool for embedded GUI and host-side FreeMASTER visualization design using LVGL.
FreeMASTER - Real-time debug monitor that enables runtime visualization and control of application variables.
Package and component status, version, and updates
Each package and component indicates with a colored badge its update status as following:
 (green badge): package or component is up to date. The tooltip indicates the installed version of a component or, if there is a package, the installed version for each component.
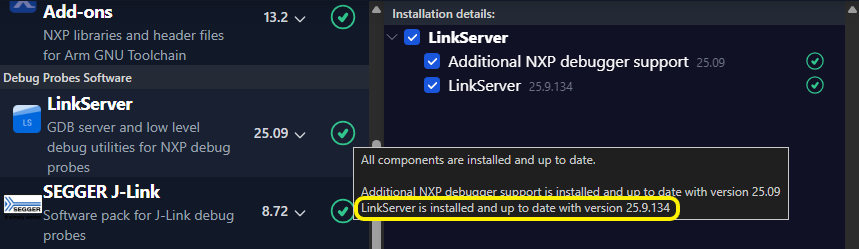
 (gray badge): package or component missing. The tooltip indicates each component, its status, and installed version. If this component or package is needed, select it and install it.
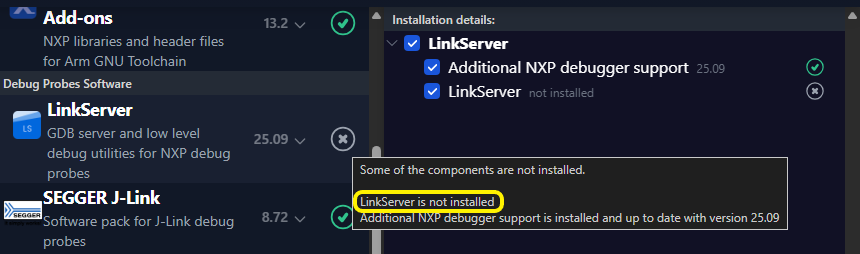
 (yellow badge): package or component with an older version than the latest one available. The tooltip indicates the installed component version and the newer available version. If you intend to use this component, update it. If there is a package, the tooltip indicates which components have available updates.
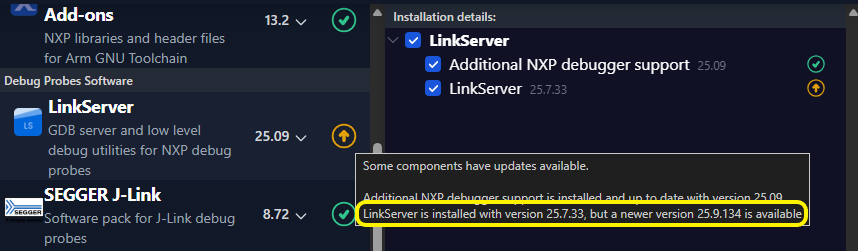
 (blue badge): package or component with an older version than the latest one available. The tooltip indicates that the component needs a manual update. If you intend to use this component, it is recommended to update it. If there is a package, the tooltip indicates which components have available updates.
 (red badge): package or component does not meet the minimum required version or the versions are incompatible. The tooltip indicates the minimum required version. If you intend to use this component, it is highly recommended to update it. If there is a package, the tooltip indicates which components can be updated.
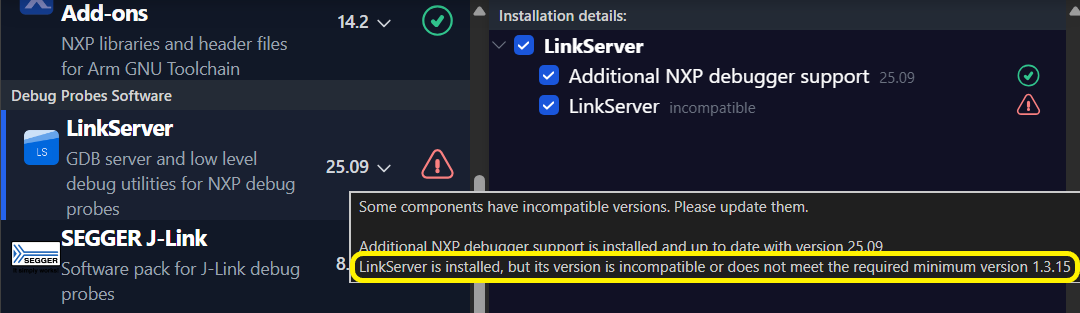
Once the installation process starts, a console with a progress bar displays the status and execution details. The colored badge status is also updated at the end of the installation process.

The console output displays details of where a tool is downloaded from and also the command used to install it.

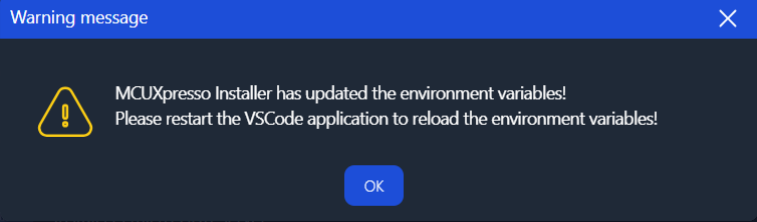
If the MCUXpresso Installer updates the environment variables, a pop-up notifies the user that a VS Code extension restart is required for the changes to take effect.
If errors occur, the console reports the encountered issues. If the cause of error can be fixed by the user, pressing again the “Install” button restarts the previous component selection. The installer skips previously installed components after finding the minimal version exists.
A check for component updates is available on the toolbar, forcing a rescan of installed tools.

A context menu is available within the console area, to allow Select All, Copy, and Clear operations over the generated log. You can also zoom in and out within the console log. All operations are also available as keyboard shortcuts:
- Select All - Ctrl + A
- Copy - Ctrl + C
- Clear - Ctrl + X
- Zoom in and out - Ctrl + mouse wheel

Undoing the latest installation
The Undo latest installation feature offers the possibility to revert automatically the components installed during the latest installation process.
Revert : Completely uninstall the specified component, maintaining the older versions of the component, which existed prior to the latest installation process.
The components able to maintain the older version are the ones installed under the%USERPROFILE%(or $HOME on Unix systems)/.mcuxpressotoolslocation (such as Arm GNU Toolchain, CMake), or standalone tools, which have individual installation locations for each version (such as LinkServer, MCUXpresso Config Tools).
Some components (such as Git, 7-Zip, or PEMicro) are installed in a single global location that is overwritten during updates. Because of this limitation, the previous version cannot be preserved or restored upon uninstall.
The PATH environment variable is also returned to its value prior to the latest installation process, if applicable.
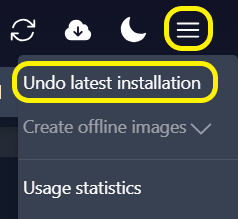
The action can be triggered via the Undo latest installation button, located under the drop-down menu of MCUXpresso Installer. Upon successfully completing a component installation, the button becomes active.
When you click the button, a list of components successfully installed during the latest installation process appears.
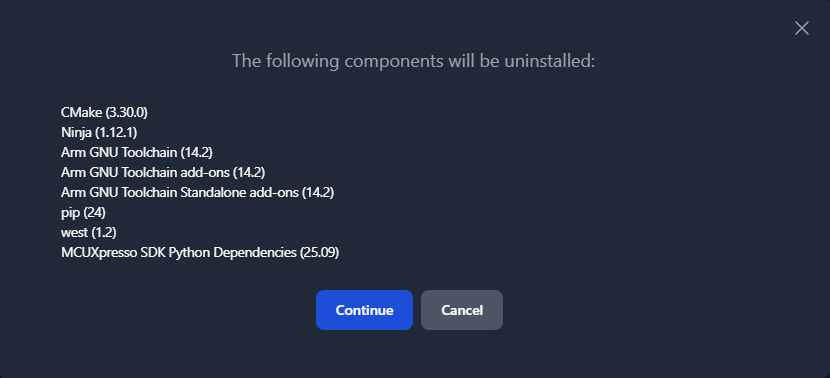
Upon pressing Continue, the undo process begins for the specified components.
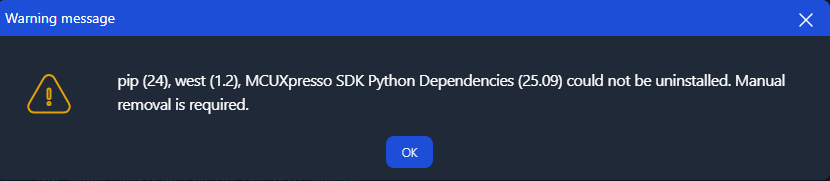
Note: The undo operation does not affect certain components (such as Git, 7-Zip, Python, pip, west, Python dependencies), as modifying them automatically can harm the global environment.
After the completion of the undo process, a list of such components is presented to the user in the form of a warning pop-up message.
The user can manually remove these components.
Issue reporter
The Issue Reporter is a built-in tool that helps you submit bug reports or feature requests directly from the MCUXpresso Installer. It has system and error information automatically collected and prefilled.
The Issue Reporter is accessible from the dropdown menu in the top-right corner of the installer. Click the menu icon and select “Issue reporter”.

Report types
When the Issue Reporter dialog opens, you can choose between two report types from the “Select report type” dropdown:
Bug Report - Report a problem or unexpected behavior encountered during installation
Feature Request - Suggest a new feature or improvement
Bug Report
When Bug Report is selected, the dialog automatically collects and displays the following information:
System Information - Operating system details (platform, version, architecture).
Application Version - The currently running MCUXpresso Installer version.
Error Log - Any errors recorded during the current session (for example, failed downloads, installation failures).
Note: All file paths in the error log are automatically sanitized. User-specific paths (home directory, tools directory, cache) are replaced with generic tokens (for example, <USER_HOME>, <MCUX_TOOLS>) to protect your privacy before submission.
You can also provide other details in the free-text field at the bottom of the report. Describe the steps to reproduce the issue, what you expected to happen, or any other relevant context.
A copy to clipboard button is available in the top-right corner of the report content box, allowing you to copy the full report content manually.

Feature Request
When Feature Request is selected, a text area is shown where you can describe the feature you want to request.

Submitting the report
Two submission options are available:
Continue on GitHub - Opens your default browser and navigates to the MCUXpresso for VS Code GitHub Issues page with the report title and body prefilled.
Requirements:
A valid GitHub account is required to submit the issue.
GitHub imposes a character limit on URL-encoded issue bodies. If the report content exceeds this limit (~4000 characters), the “Continue on GitHub” button is disabled. In this case, use the “Export to file” option instead and attach the file manually when creating the issue.
Export to File - Opens a Save dialog prompting you to choose a location and filename (default: issueReporter.txt). The report is saved as a plaintext file with the same section as the one displayed in the main window.
Notes
Error data is only collected during active installation operations. Errors from background operations (for example, version checks at startup) are not included.
Dark/light theme
From the top toolbar, the user can switch between dark and light themes.

