
Arm GCC#
This section describes the steps to create an M4 project with Arm GCC, rearrange source and project files, adjust project settings, and delete function.
Create an M4 project#
To create an M4 project, perform the following steps:
Copy the folder <install_dir> boards\evkbmimxrt1170\edgefast_open_examples\a2dp_source \cm4 into another folder in which the example should be enabled. In this case, copy the folder <install_dir> boards\evkbmimxrt1170\edgefast_open_examples\a2dp_source \cm4 into*<install_dir> boards\evkbmimxrt1170\edgefast_open_examples\peripheral_ht\cm4*.
Open the file CMakeLists.txt located in the path: <install_dir> boards\evkbmimxrt1170\edgefast_open_examples\peripheral_ht\cm4\ armgcc.
Search and replace all a2dp_source_cm4 with peripheral_ht_cm4, and then save the files.
Parent topic:Arm GCC
Rearrange source files#
To rearrange source files, perform the following steps:
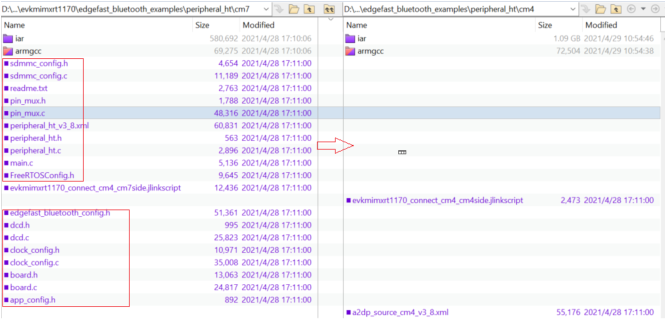
Open the folder <install_dir>boards\evkbmimxrt1170\edgefast_open_examples\peripheral_ht\cm4 and delete all files with the extensions *.c and *.h.
Copy the files with the extensions *.c and *.h in the folder <install_dir>boards\evkbmimxrt1170\edgefast_open_examples\peripheral_ht\cm7 to the folder <install_dir>boards\evkbmimxrt1170\edgefast_open_examples\peripheral_ht\cm4.
|
|
Parent topic:Arm GCC
Rearrange project files#
To rearrange project files, perform the following steps:
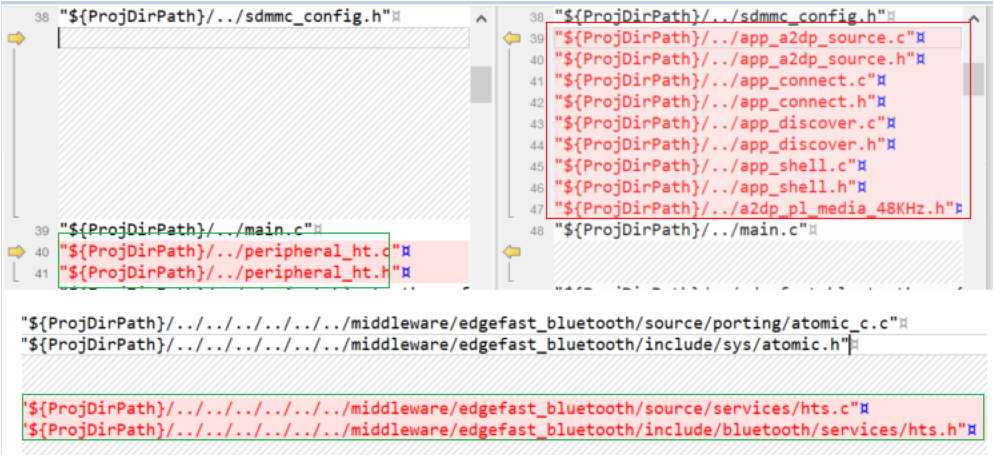
Open the CMakeLists.txt of the two examples respectively. The two files are in the <install_dir>boards\evkbmimxrt1170\edgefast_open_examples\peripheral_ht\cm7\armgcc and <install_dir>boards\evkbmimxrt1170\edgefast_open_examples\peripheral_ht\cm4\armgcc folders respectively.
Search the section add_executable. Compare the difference between the two sections. Remove files that do not exist in the cm7 project but are available in the cm4 project. Add the files that exist in the cm7 project but are not available in the cm4 project into the cm4 project. For example, in the following figure, the files in the red box should be removed and the files in the green box must be added into the cm4 project.
Parent topic:Arm GCC
Adjust project setting#
To adjust the project settings, perform the following steps:
Open the flags.cmake of the two examples respectively. The two files are in the <install_dir>boards\evkbmimxrt1170\edgefast_open_examples\peripheral_ht\cm7\armgcc and <install_dir>boards\evkbmimxrt1170\edgefast_open_examples\peripheral_ht\cm4\armgcc folders respectively.
Search the CMAKE_C_FLAGS_DEBUG section.
Compare the macro between the two sections.
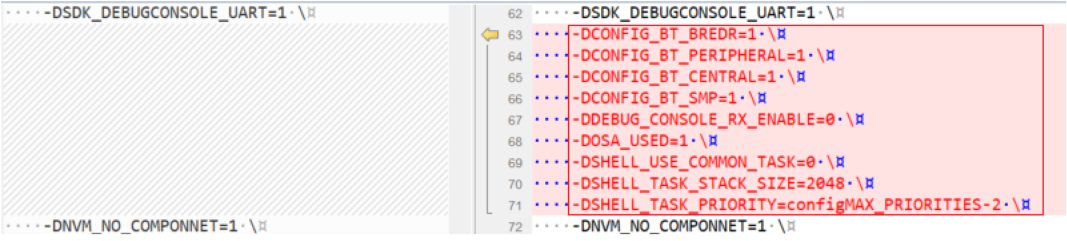
Add the macros that do not exist in the cm4 project but are available in the cm7 project into the cm4 project. The rule is that macro setting should be same.
Delete the macros highlighted in the red rectangle.
|
|
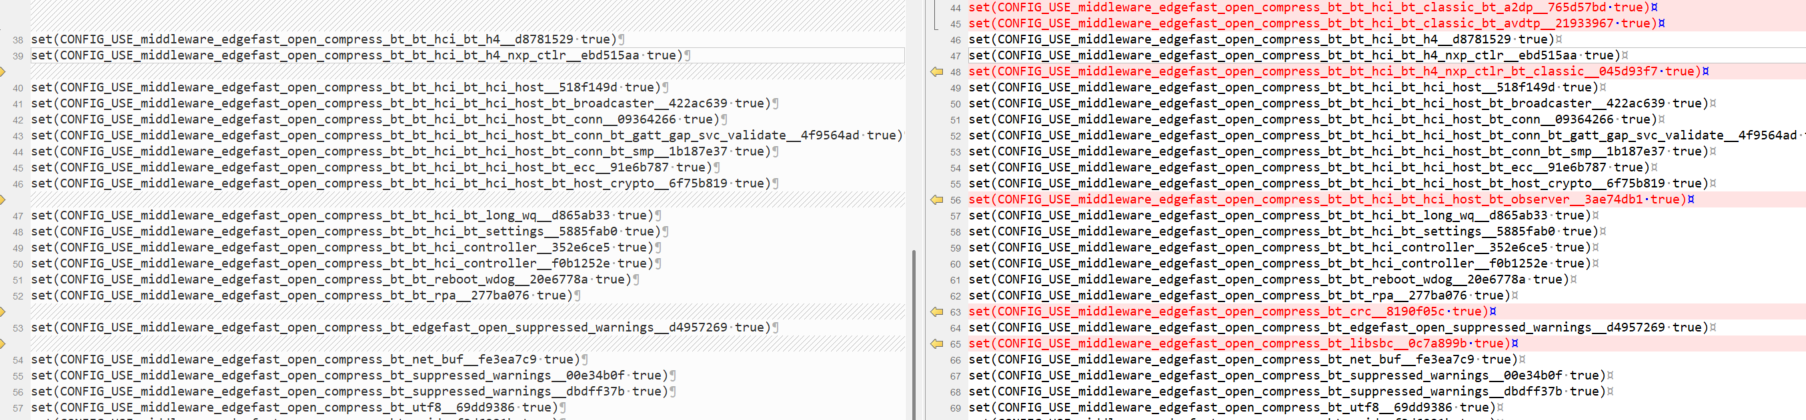
Open the config.cmake of the two examples respectively. The two files are in the <install_dir>boards\evkbmimxrt1170\edgefast_open_examples\peripheral_ht\cm7\armgcc and <install_dir>boards\evkbmimxrt1170\edgefast_open_examples\peripheral_ht\cm4\armgcc folders respectively. The config.cmake file controls which middleware components and drivers are compiled into the project. Since the cm4 project is initially copied from a2dp_source, its config.cmake contains middleware dependencies specific to a2dp_source (such as classic Bluetooth, A2DP, AVDTP, etc.), which are incorrect for the target example. To fix this, derive the cm4 config.cmake from the cm7 config.cmake of the target example, and apply the following cm7-to-cm4 adaptations:
Replace the middleware component selections with those from the cm7 project’s config.cmake. For example, the peripheral_ht example requires
middleware_edgefast_open_bt_htsinstead ofmiddleware_edgefast_open_bt_a2dp,middleware_edgefast_open_bt_avdtp,middleware_edgefast_open_bt_classic, andmiddleware_edgefast_open_libsbc. Copy the entire middleware section from the cm7 config.cmake to ensure the correct components are selected. The following figure shows the middleware component differences between the peripheral_ht config.cmake (left) and the a2dp_source config.cmake (right). The lines highlighted in red on the right side are the a2dp_source-specific components that must be replaced.Change the core configuration at the end of the file. Replace:
set(CONFIG_CORE cm7f)withset(CONFIG_CORE cm4f)set(CONFIG_FPU DP_FPU)withset(CONFIG_FPU SP_FPU)set(CONFIG_CORE_ID cm7)withset(CONFIG_CORE_ID cm4)
Replace the cache driver. Change
set(CONFIG_USE_driver_cache_armv7_m7 true)toset(CONFIG_USE_driver_cache_lmem true). The M7 core uses the ARMv7-M cache controller, while the M4 core uses the Local Memory Controller (LMEM) for cache operations.Remove the boot header configurations. Delete the following two lines, as the M4 core does not use its own boot header:
set(CONFIG_USE_board_boot_header true)set(CONFIG_USE_device_boot_header true)
Remove the MU driver. Delete the line
set(CONFIG_USE_driver_mu true). The Messaging Unit (MU) driver is used for inter-core communication initiated from the M7 side and is not required in the M4 project.The following figure shows the driver and core configuration differences between the peripheral_ht config.cmake (left) and the a2dp_source config.cmake (right). The lines highlighted in red on the right side are the entries that must be removed or replaced for the M4 project.

Parent topic:Arm GCC
Delete function#
As a final step, remove the function “SCB_DisableDCache() in main.c.
On the completion of the above steps, the M7 project successfully migrates to an M4 project. You can now download and debug the M4 example project.
Parent topic:Arm GCC