RoArm‑M3 Robotic arm demo#
1. Introduction#
The RoArm‑M3 is a compact, desktop robotic arm with 5+1 DoF. It supports USB/serial and a JSON command protocol. It also provides ROS 2 examples, including a MoveIt 2 Servo based keyboard teleoperation node for controlling a real arm. This demo targets the NXP-provided i.MX 95, i.MX 8M Plus EVK, and FRDM-IMX8M platforms using Robotics Edge Platform, which bundles ROS2 and robotics assets for i.MX.
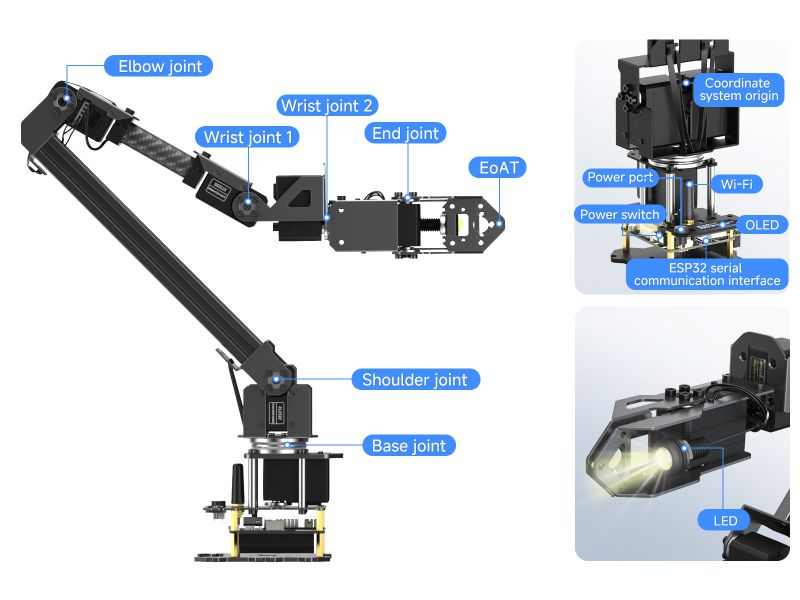
The following are annotations of various parts and commonly used interfaces of the robotic arm:
2. System architecture#
2.1 High-level architecture (ROS 2 / MoveIt 2)#
        flowchart TD
    subgraph ROS2 on i\.MX95/i\.MX8M Plus
        A1[Keyboard Teleop roarm_moveit_servo/keyboardcontrol]
        B1[MoveIt Servo ]
        B2[ros2_control Controllers ]
        B3[RoArm Driver / JSON Bridge]
    end
    subgraph  Link
        C1[USB / UART]
        C2[JSON commands / bus‑servo protocol]
    end
    subgraph  Hardware
            D1[RoArm‑M3 driver board]
        D2[serial bus servos]
    end
    A1 --> B1 --> B2 --> B3 --> C1 --> C2 --> D1 --> D2
Architecture components:
MoveIt 2 Servo: Provides smooth, real-time end-effector velocity and joint jog control
ros2_control: Manages hardware interface and controller life cycle
RoArm Driver: Translates ROS commands to JSON protocol
Device Interface: Accepts USB control and JSON commands for position control, torque management, and feedback
3. Software components#
3.1 ROS 2 packages#
The following packages are included in the Robotics Edge Platform for RoArm-M3:
roarm_moveit_servoMoveIt Servo component for real-time arm servoing and teleoperation
Provides low-latency Cartesian and joint-space control
python3-roarm-sdkPython 3 SDK for RoArm robotic arm control
Provides Python API for interfacing with RoArm hardware
roarm-descriptionURDF (Unified Robot Description Format) and mesh files for RoArm
Contains robot model descriptions, visual meshes, and collision geometries
roarm-driverLow-level hardware driver for RoArm robotic arm
Handles communication with motor controllers and sensors
roarm-m3Main package for RoArm M3 robotic arm variant
Core functionality and configurations specific to the M3 model
roarm-moveitMoveIt configuration package for RoArm
Contains motion planning configurations, controllers, and launch files
roarm-moveit-cmdCommand-line interface tools for RoArm MoveIt control
Provides CLI utilities for testing and controlling the arm
roarm-moveit-ikfast-pluginsIKFast inverse kinematics solver plugins for RoArm
Provides fast analytical IK solutions for motion planning
roarm-moveit-servoRoArm-specific MoveIt Servo integration
Customized servo control implementation for RoArm hardware
roarm-msgsROS message definitions for RoArm
Custom message types for RoArm-specific communication
4. Hardware setup#
4.1 Prerequisites#
The following hardware is required for running the demo described in this document.
NXP i.MX 95 or i.MX 8M Plus board with power supply.
Waveshare RoArm-M3 with a suitable power adapter (for example, 12V/5A).
USB-C cable for board serial console or power.
USB cable for connecting RoArm-M3 to the i.MX board.
A pre-built SD card image from the
Robotics Edge Platformproject
4.2 Hardware connection#
        flowchart LR
    subgraph Host
        IMX[i.MX 95/i.MX 8M Plus EVK/FRDM]
    end
    subgraph Arm
        ARM[RoArm‑M3 driver board]
    end
    IMX -- USB/Serial --> ARM
Connect the RoArm-M3 to the i.MX board via USB.
Insert the pre-built SD card into the i.MX board.
Connect the board to a host PC via USB-C for serial console access (using a tool like
picocomorminicom).Power on the RoArm-M3, then power on the i.MX board.
5. Running the demos#
5.1 Keyboard Teleoperation Demo#
This demo demonstrates real-time control of the RoArm-M3 using keyboard input with MoveIt 2 Servo.
5.1.1 Start the RoArm driver#
First, identify the serial port of the RoArm-M3:
ls -l /dev/serial/by-id/
Expected Output:
total 0
lrwxrwxrwx 1 root root 13 May 29 18:20 usb-Silicon_Labs_CP2102N_USB_to_UART_Bridge_Controller_641a3d6bf500f
0118eb8c5295c2a50c9-if00-port0 -> ../../ttyUSB0
Note: The device name may vary (for example,
/dev/ttyUSB0,/dev/ttyUSB1). Use the correct device name in the following command.
Start the RoArm driver node:
source /opt/ros/jazzy/setup.bash
export ROARM_MODEL=roarm_m3
ros2 run roarm_driver roarm_driver --ros-args --remap serial_port:=/dev/ttyUSB0
Keep this terminal running for all subsequent operations.
5.1.2 Launch MoveIt 2 Servo#
Open a second terminal and start the MoveIt 2 Servo control node:
source /opt/ros/jazzy/setup.sh
export ROARM_MODEL=roarm_m3
ros2 launch roarm_moveit_servo servo_control.launch.py
Keep this terminal running.
5.1.3 Start keyboard control#
Open a third terminal (via SSH or another serial console session), then run:
source /opt/ros/jazzy/setup.bash
export ROARM_MODEL=roarm_m3
ros2 run roarm_moveit_servo keyboardcontrol
source /opt/ros/jazzy/setup.bash
export ROARM_MODEL=roarm_m3
ros2 run roarm_moveit_servo keyboardcontrol
Expected output:
Reading from keyboard
---------------------------
All commands are in the planning frame
Use 'j' to select joint jog.
Use 1|2|3|4|5| keys to joint jog. 'g' to control gripper; 'r' to reverse the direction of jogging.
Use 't' to select twist
Use 'w' and 'e' to switch between sending command in planning frame or end effector frame
Use arrow keys and the '.' and ';' keys to Cartesian jog
'Q' to quit.
Note: To receive keyboard input, keep this terminal window active and in focus.
5.1.5 Control commands#
Joint Control:
Key |
Action |
|---|---|
1 |
Control base joint |
2 |
Control shoulder joint |
3 |
Control elbow joint |
4 |
Control wrist joint |
5 |
Control roll joint |
g |
Control gripper (open/close) |
r |
Reverse joint movement direction |
Exit:
Press Q to exit keyboard control
5.2 MoveIt Task Constructor (MTC) Demonstrations#
The MoveIt Task Constructor (MTC) provides task-level motion planning capabilities for complex manipulation tasks.
5.2.1 Start the RoArm Driver Node#
If the driver is not already running as listed in the section Start RoArm Driver, start it in a first terminal:
source /opt/ros/jazzy/setup.bash
export ROARM_MODEL=roarm_m3
ros2 run roarm_driver roarm_driver --ros-args --remap serial_port:=/dev/ttyUSB0
5.2.2 Launch MTC Demo#
Open a second terminal and start the MTC demo framework:
source /opt/ros/jazzy/setup.sh
export ROARM_MODEL=roarm_m3
ros2 launch roarm_moveit_mtc_demo demo.launch.py
5.2.3 Cartesian Demonstration#
This demo demonstrates Cartesian path planning for the end-effector.
Open a third terminal and run:
source /opt/ros/jazzy/setup.sh
export ROARM_MODEL=roarm_m3
ros2 launch roarm_moveit_mtc_demo run.launch.py exe:=cartesian
5.2.4 Cartesian Modular Demonstration#
This demo shows modular task composition with Cartesian motions.
Press Ctrl+C in the third terminal to stop the previous demo, then run:
source /opt/ros/jazzy/setup.sh
export ROARM_MODEL=roarm_m3
ros2 launch roarm_moveit_mtc_demo run.launch.py exe:=cartesian_modular
5.2.5 Pick and Place Demonstration#
This demo demonstrates a complete pick-and-place manipulation task.
Press Ctrl+C in the third terminal to stop the previous demo, then run:
source /opt/ros/jazzy/setup.sh
export ROARM_MODEL=roarm_m3
ros2 launch roarm_moveit_mtc_demo run.launch.py exe:=pick_place