Introduction
MCUXpresso Config Tools set is a suite of evaluation and configuration tools that help you from initial evaluation to production software development. With MCUXpresso Config Tools, you can configure NXP Cortex-M processors and generate initialization of SDK-drivers. The MCUXpresso Config Tools is intended for general use and aims to help hardware designers, software engineers, embedded engineers, and field application engineers (FAEs).
The tool is distributed free of charge. The installer for Windows, Linux, or Mac can be downloaded from https://www.nxp.com/.
To compile the generated code, an MCUXpresso SDK package is required. You can download SDK packages from http://mcuxpresso.nxp.com. The SDK package contains many example projects that can help you get started.
Use the link in the installation folder to start the tool. As the first step in the tool, you must create a configuration. The following use cases are described in the document:
Starting with SDK example or existing project- It is useful for new users to start with the example project for an NXP evaluation board of for users that already have a toolchain project with sources generated by the tool. Supported toolchain are Keil μVision, IAR Embedded Workbench, CodeWarrior, Arm GCC and SDK West.
Starting with new configuration - It is useful to start with a new configuration for a custom board or with an existing toolchain project that does not contain any tool configuration yet.
Creating a new configuration
You can create a configuration from the Start development wizard or by selecting File > New from the Menu bar.
If you start creating your development for any NXP board or kit, we recommended you start with an MCUXpresso SDK example to create a configuration for a board or a kit. Such a configuration contains board-specific settings. If you select a processor, the configuration will be empty.
After the new configuration is created, you can continue by importing an existing configuration from an MEX file. It is useful if you already have a configuration available or if you want to reuse a previous configuration. To import an existing configuration from an MEX file, select File > Import… > Import configuration (*.mex) from the Menu bar.
Cloning an SDK example
You can create a configuration by cloning an SDK example project for IAR Embedded Workbench, Keil μVision, CodeWarrior Development Studio, and/or GCC ARM Embedded (command line). The resulting project contains all source files and libraries to build the project and can be easily customized, shared, or put under a control version system.
Note: The creation (cloning) of the projects based on the SDK examples will no longer be supported in the future releases of the MCUXpresso Config Tools. Instead, use use the MCUXpresso SDK CMake, Kconfigbased build. For detailed documentation, see the SDK Build And Configuration System documentation.
SDK example cloning is supported for MCUXpresso SDK 2.2 and higher.
Note: To be able to clone an SDK example or create a “hello_world” project, you must first download an SDK package. For more information about SDK packages offered by NXP Semiconductors, refer to the MCUXpresso Software Development Kit.
Note: If the server is unavailable, and device data is not cached, creating the project fails.
Cloning SDK
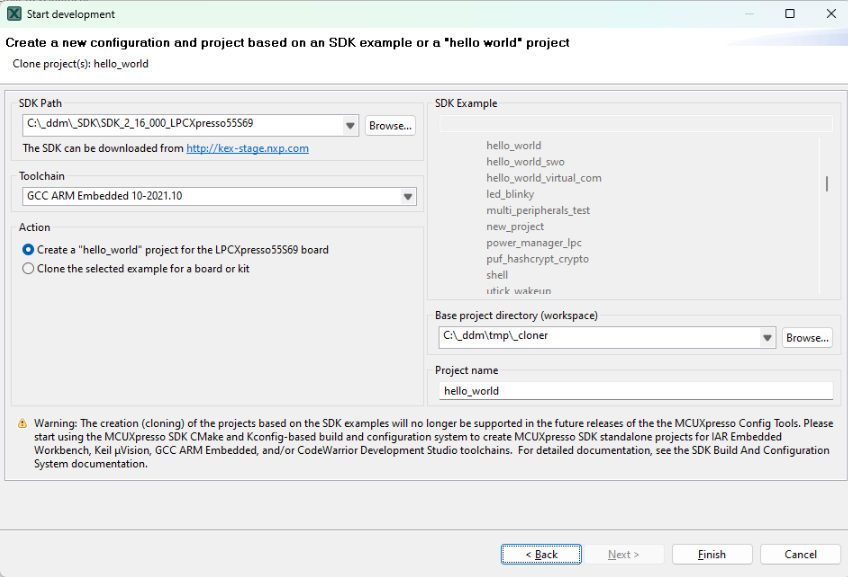
To clone an SDK example, do the following:
In the Start development wizard, select Create a new configuration based on an SDK example or a “hello world” project. Alternatively, in the Menu bar, select File > New.
Click Next.
Specify the path to your locally saved SDK package.
Choose the toolchain that you want to create the project for.
Choose the SDK example that you want to clone.
Specify a base project directory to save your project to.
Specify the project name.
Click Finish.
You can also create a basic, minimally customized “hello_world” project without having to select an SDK example from the package. To create a “hello_world” project, do the following:
In the Start development wizard, select Create a new configuration based on an SDK example or a “hello world” project. Alternatively, in the Menu bar, select File > New.
Click Next.
Specify the path to your locally saved SDK package.
Choose the toolchain that you want to create the project for.
Select Create “hello_world”.
Specify a base project directory to save your project to.
Specify the project name.
Click Finish.
The Config Tools Overview window shows the details of the configuration and supported tools. Now, select a tool by clicking its icon.
Creating a new toolchain configuration
You can create a configuration for an existing toolchain project. Once done, configuration files associated with the project are updated directly.
MCUXpresso Config Tools currently supports the following toolchains:
IAR Embedded Workbench
Keil MDK uVision
Arm GCC
CodeWarrior with SDK
SDK West
Note: For proper functionality of Config Tools, it is required that the toolchain project originates from the SDK package or has been created using the cloning feature of Config Tools.
To create a configuration based on an existing IDE/Toolchain project, do the following:
In the Start development wizard, select the Create a new configuration based on an existing IDE/Toolchain project. Alternatively, in the Menu bar, select File > New.
Click Browse.
Select the project file and confirm by clicking OK.
Click Finish.
Creating a new standalone configuration
You can create a new configuration that is not part of any toolchain project.
You can later include this configuration in a project by saving the configuration (MEX) file in the toolchain project folder.
Creating a new configuration
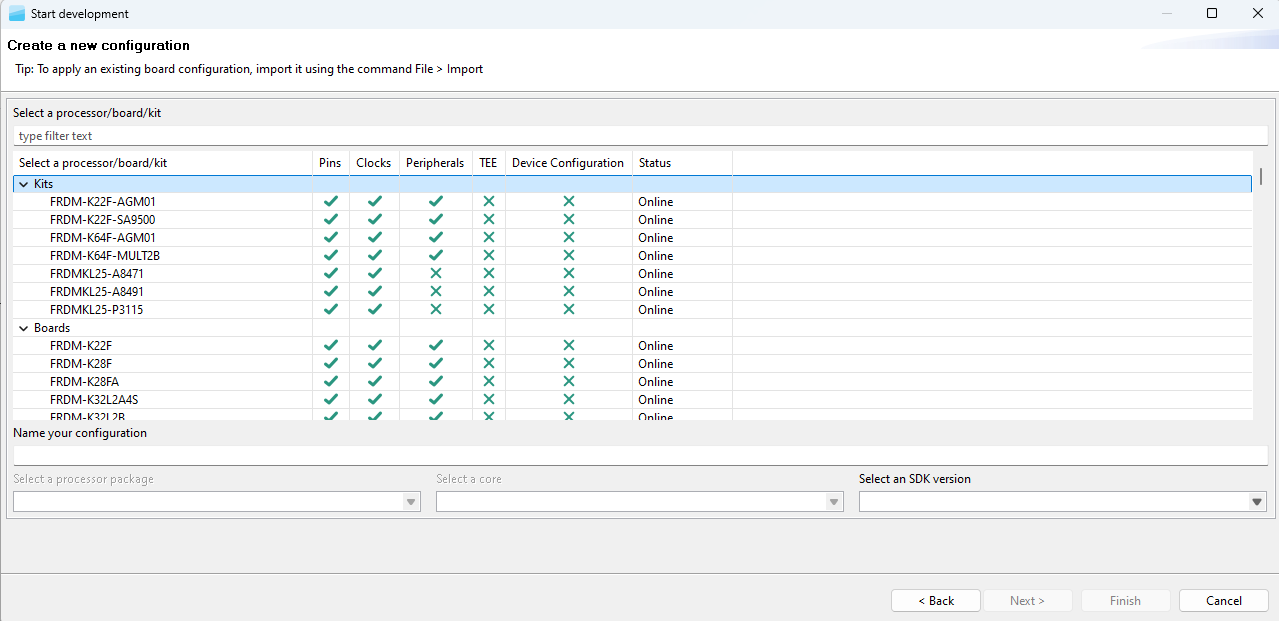
To create a standalone configuration, do the following:
In the Start development wizard select Create a new standalone configuration for processor, board, or kit. Alternatively, in the Menu bar, select File > New.
Click Next.
Select the processor, board, or kit from the list.
Note: If you are working offline, you will only see locally saved options. For more information, see the Working offline section of User Guide for MCUXpresso Config Tools (Desktop) (document GSMCUXCTUG)
Name your configuration. Optionally, you can select processor package, core, and SDK version.
Click Finish.
Select tool
The right-hand side of the toolbar contains tool-selection buttons. Use these buttons to switch between the tools.
Name |
Description |
|---|---|
Enables you to configure the pins of a device. Pins tool enables you to create, inspect, change, and modify any aspect of the pin configuration and muxing of the device. |
|
Enables you to configure initialization of the system clock (core, system, bus, and peripheral clocks) and generates the C code with clock initialization functions and configuration structures. |
|
Enables you to configure the initialization for the MCUXpresso SDK drivers. |
|
Enables you to generate a Device Configuration Data (DCD) image using the format and constrains specified in the boot ROM reference manual. |
|
Enables you to configure the security policies of memory areas, bus masters, and peripherals, to isolate and safeguard sensitive areas of your application. |
Pins Tool
In the Pins tool, you can display and configure the pins of the processor. Basic configuration can be done in the Pins, Peripheral Signals, or Package views.
More advanced settings (pin electrical features) can be adjusted in the Routed Pins view.

Pins Tool
Clocks Tool
In the Clocks tool, you can display and modify clock sources and outputs. Use the Clocks Table view to set clock sources and outputs, More advanced settings can be adjusted via the Clocks Diagram and Details views. Global settings of the clocking environment such as run modes, MCG modes, and SCG modes can be modified in the Clocks Table, Clocks Diagram, in Functional group properties, and in the Details view.

Clocks Tool
Peripherals Tool
In the Peripherals tool, you can configure the initialization of selected peripherals and generate code for them. In the Peripherals view, select the peripherals to configure and confirm the addition of the configuration component. Then you can select the mode of the peripheral and configure the settings within the settings editor.
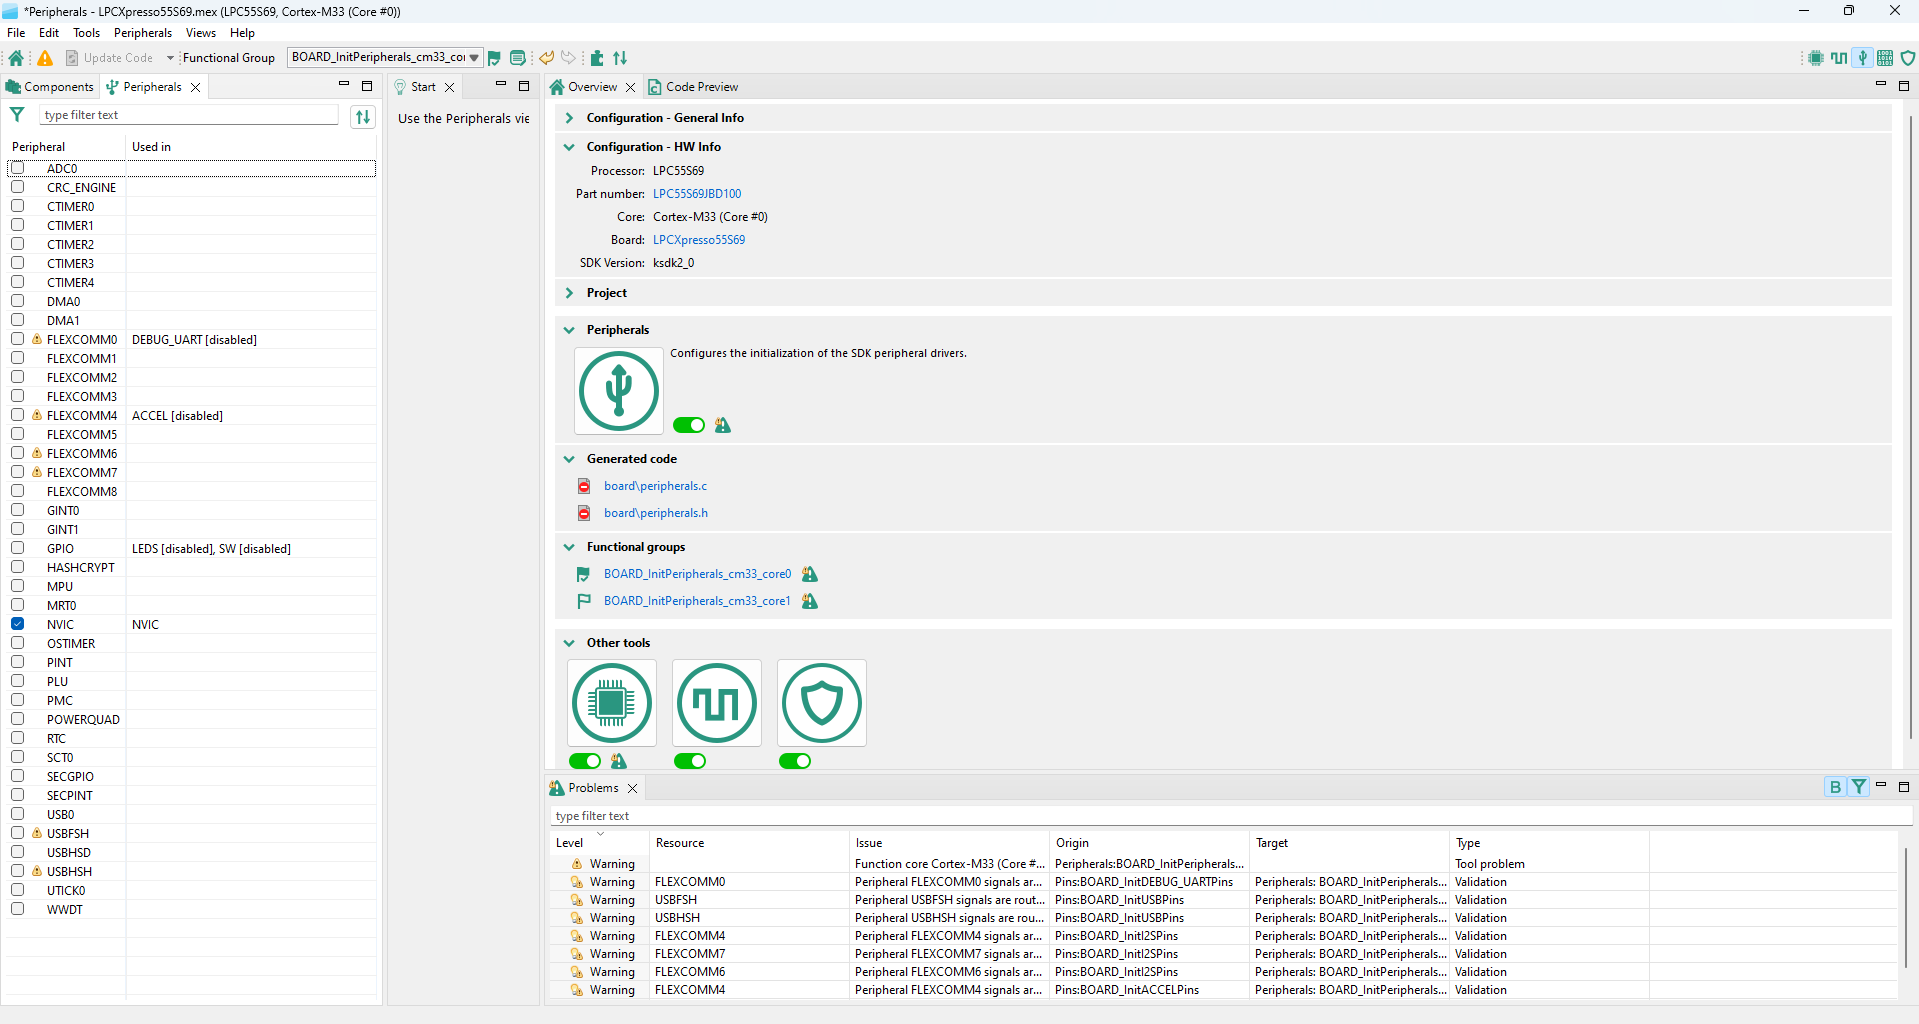
Peripherals Tool
Device Configuration Tool
The Device Configuration tool allows you to configure the initialization of memory interfaces of your hardware. Use the Device Configuration Data (DCD) view to create different types of commands and specify their sequence, define their address, values, sizes, and polls.
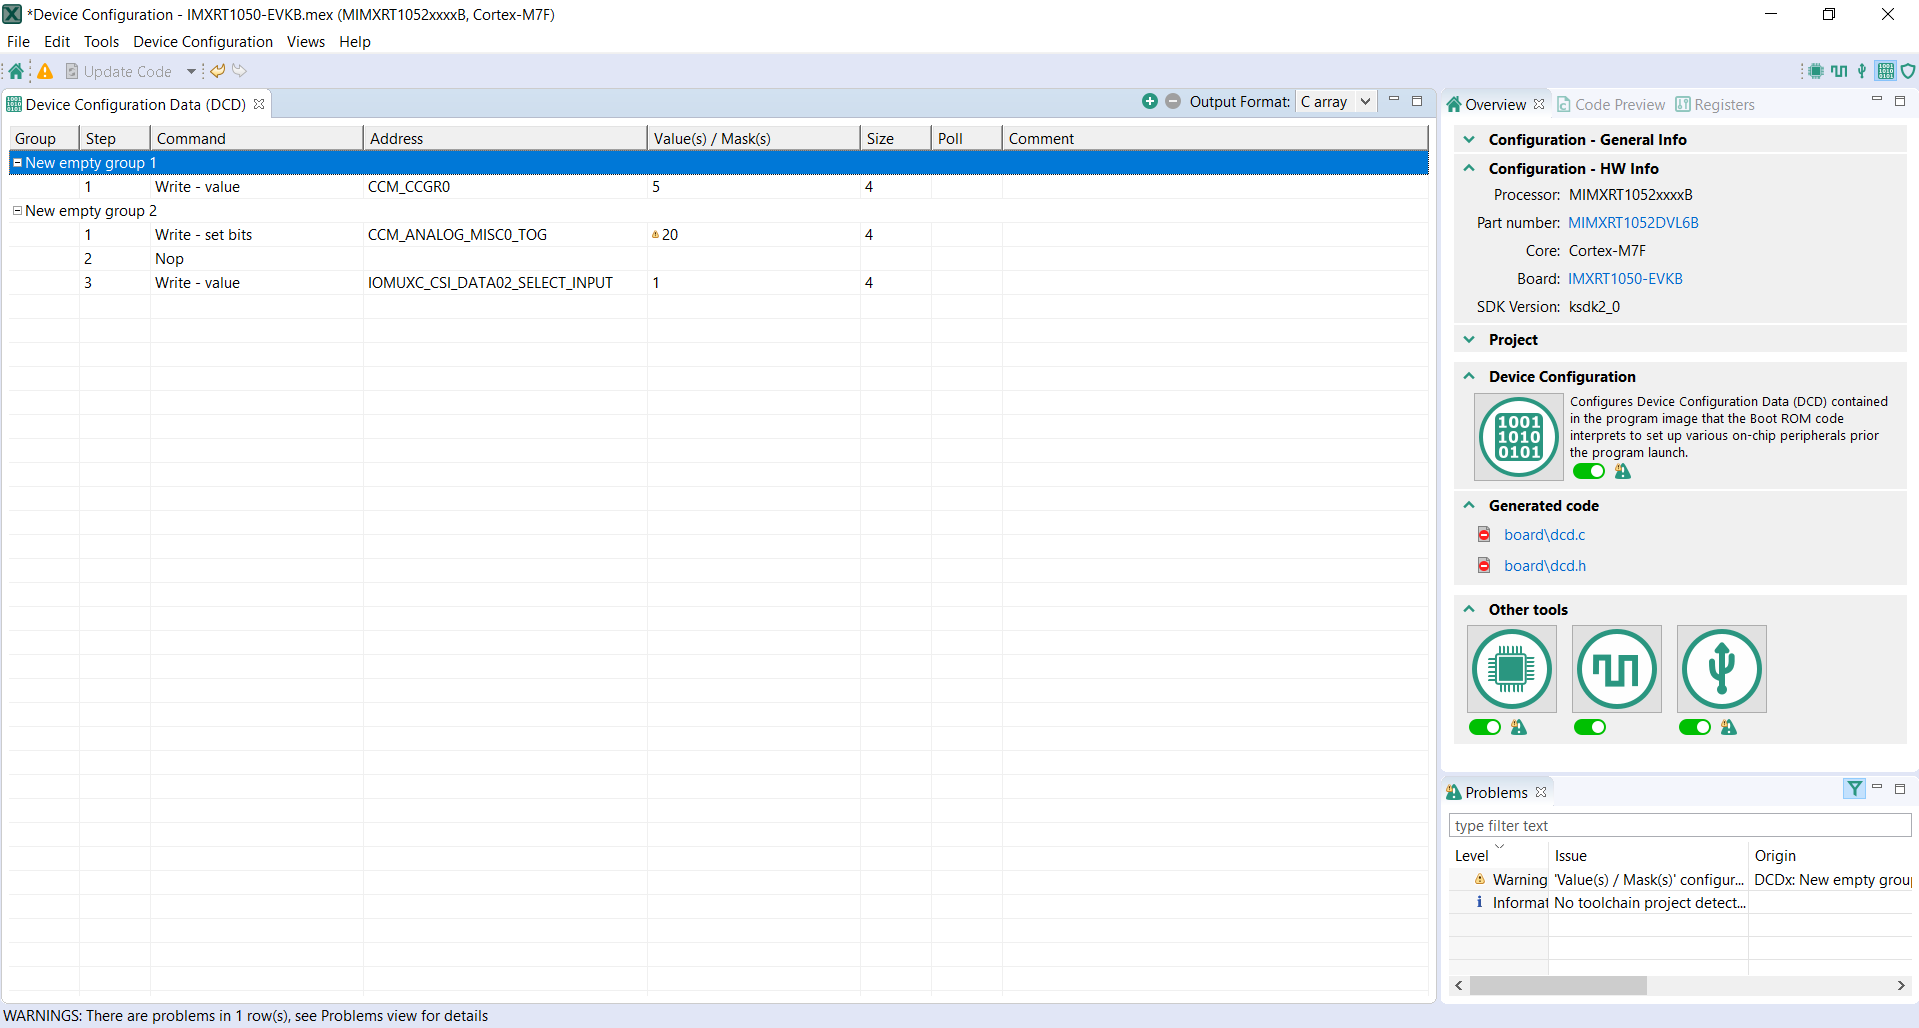
Device Configuration tool
Trusted Execution Environment Tool
In the Trusted Execution Environment, or TEE tool, you can configure the security policies of memory areas, bus masters, and peripherals, to isolate and safeguard sensitive areas of your application.
You can set the security policies of different parts of your application in the Security Access Configuration and its subviews, and review these policies in the Memory Attribution Map, Access Overview and Domains Overview views. Use the User Memory Regions view to create a convenient overview of memory regions and their security levels.
You can also view the registers handled by the TEE tool in the Registers view, and inspect the code in the Code Preview tool.
Note: For your configuration to come into effect, make sure you have enabled the relevant enable secure check option in the Miscellaneous subview of the Security Access Configuration view.
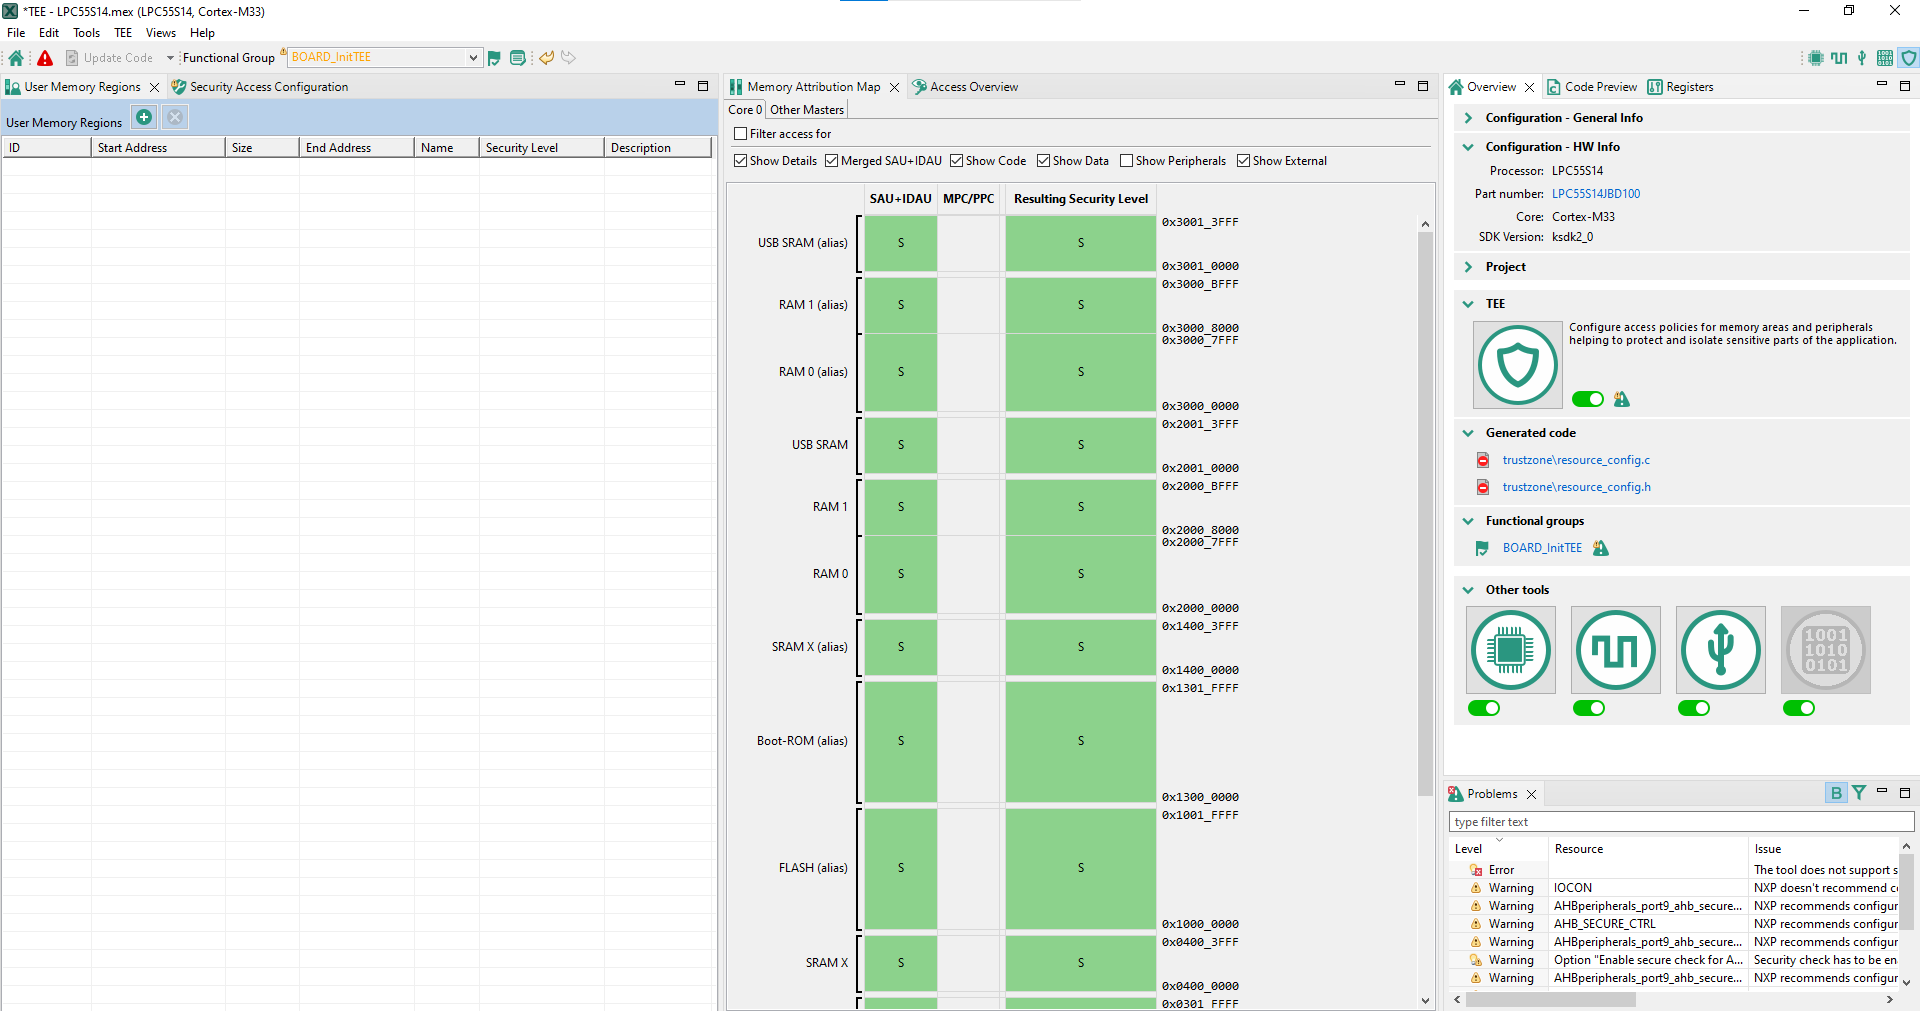
TEE tool user interface (SAU+IDAU)
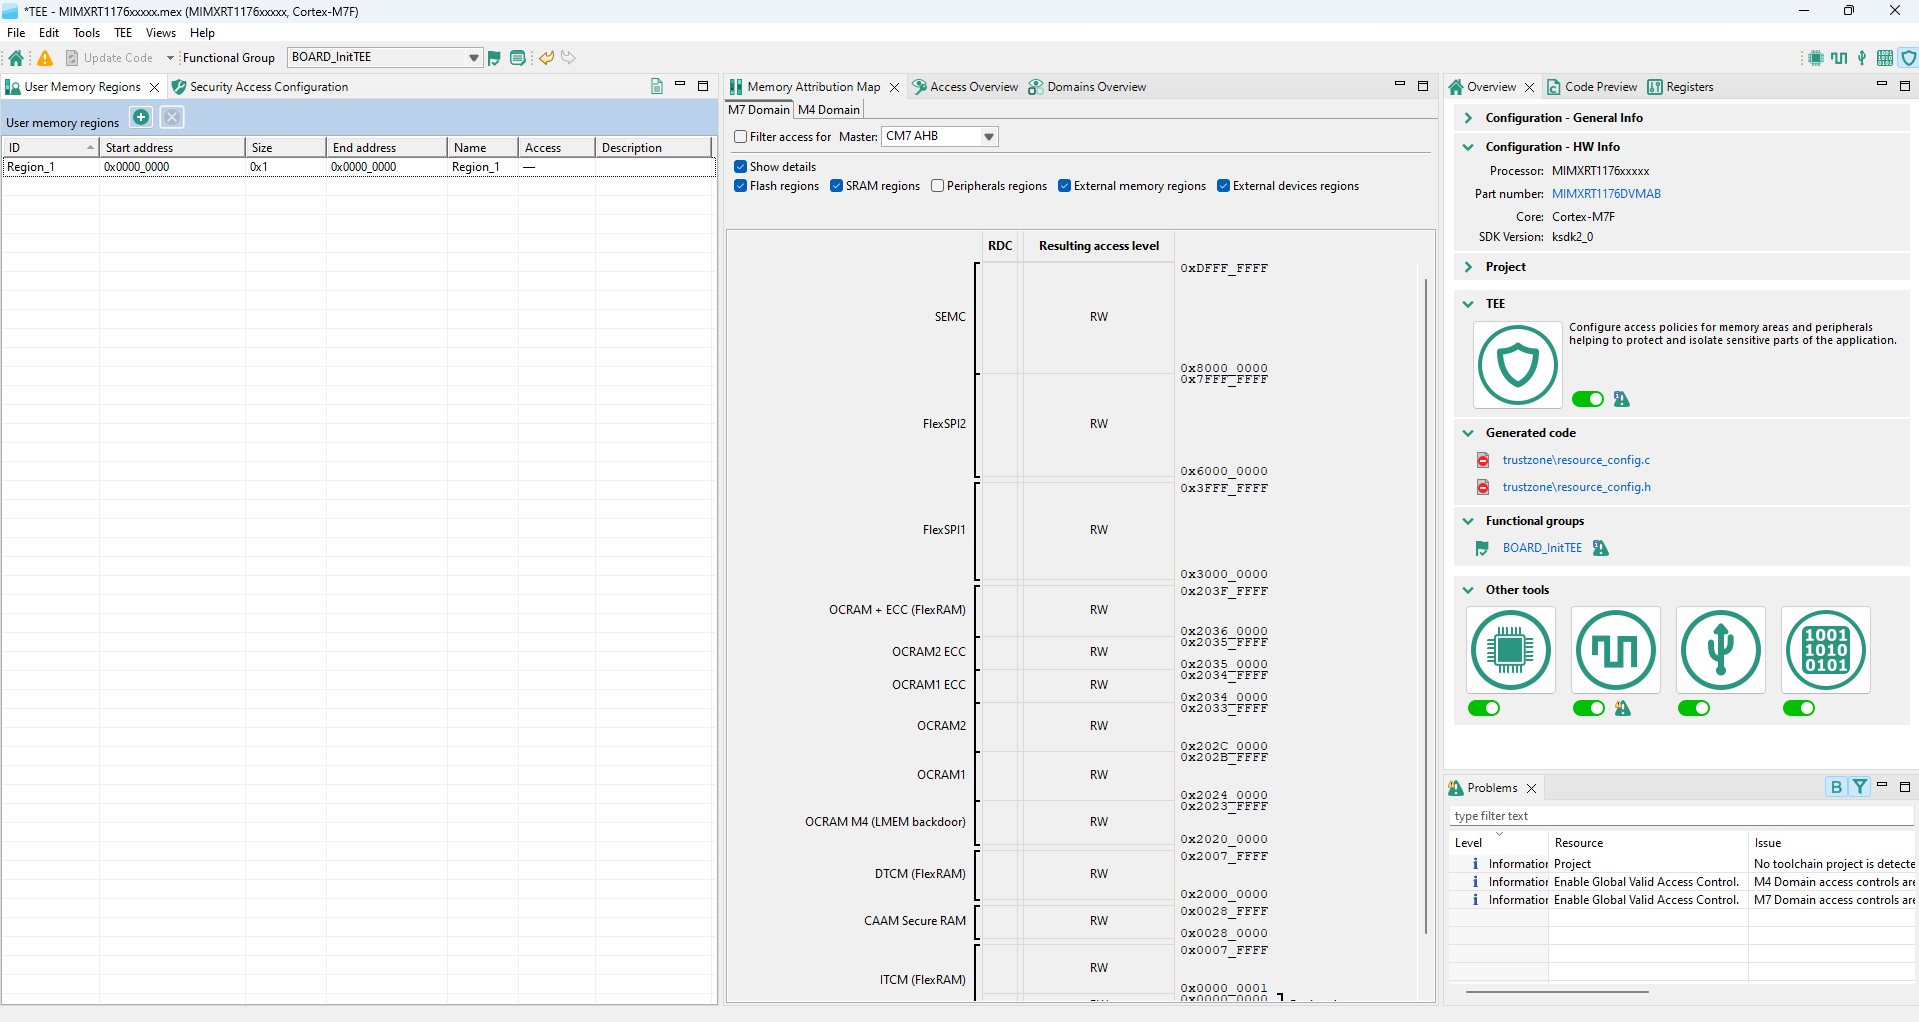
TEE tool user interface (RDC)
Generate code
You can update source files generated by the MCUXpresso Config Tools by clicking the Update Code button. The command opens a dialog with a list of files that will be regenerated and allows to select which tools will generate the code.

Update Code button
Alternatively, you can also export a selected source file by clicking the export button in the Code Preview view.
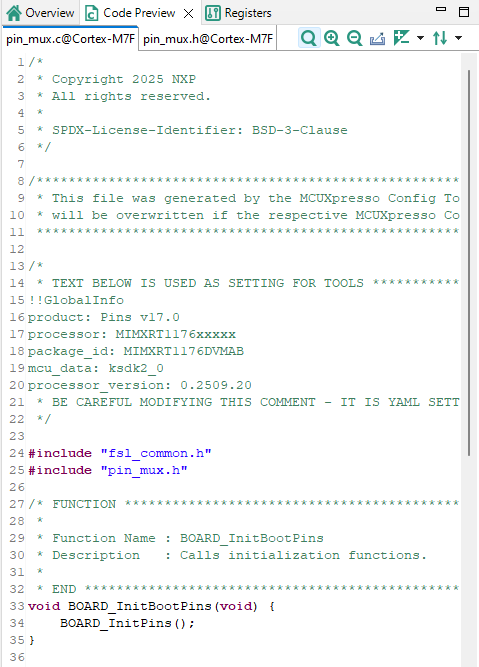
Code Preview
Note about the source code in the document
Example code shown in this document has the following copyright and BSD-3-Clause license:
Copyright 2026 NXP Redistribution and use in source and binary forms, with or without modification, are permitted provided that the following conditions are met:
Redistributions of source code must retain the above copyright notice, this list of conditions and the following disclaimer.
Redistributions in binary form must reproduce the above copyright notice, this list of conditions and the following disclaimer in the documentation and/or other materials must be provided with the distribution.
Neither the name of the copyright holder nor the names of its contributors may be used to endorse or promote products derived from this software without specific prior written permission.
THIS SOFTWARE IS PROVIDED BY THE COPYRIGHT HOLDERS AND CONTRIBUTORS “AS IS” AND ANY EXPRESS OR IMPLIED WARRANTIES, INCLUDING, BUT NOT LIMITED TO, THE IMPLIED WARRANTIES OF MERCHANTABILITY AND FITNESS FOR A PARTICULAR PURPOSE ARE DISCLAIMED. IN NO EVENT SHALL THE COPYRIGHT HOLDER OR CONTRIBUTORS BE LIABLE FOR ANY DIRECT, INDIRECT, INCIDENTAL, SPECIAL, EXEMPLARY, OR CONSEQUENTIAL DAMAGES (INCLUDING, BUT NOT LIMITED TO, PROCUREMENT OF SUBSTITUTE GOODS OR SERVICES; LOSS OF USE, DATA, OR PROFITS; OR BUSINESS INTERRUPTION) HOWEVER CAUSED AND ON ANY THEORY OF LIABILITY, WHETHER IN CONTRACT, STRICT LIABILITY, OR TORT (INCLUDING NEGLIGENCE OR OTHERWISE) ARISING IN ANY WAY OUT OF THE USE OF THIS SOFTWARE, EVEN IF ADVISED OF THE POSSIBILITY OF SUCH DAMAGE.
Revision history
Document ID |
Release date |
Description |
|---|---|---|
MCUXDQS v.15.0 |
25 March 2026 |
Updated for v.26.03 |
MCUXDQS v.14.0 |
16 December 2025 |
Updated for v.25.12 |
MCUXDQS v.13.0 |
18 September 2025 |
Updated for v.25.09 |
MCUXDQS v.12.0 |
20 June 2025 |
Updated for v.25.06 |
MCUXDQS v.11.0 |
17 March 2025 |
Updated for v.25.03 |
MCUXDQS v.10.0 |
15 January 2025 |
Updated for v.24.12 |
MCUXDQS v.9.0 |
24 September 2024 |
Updated for v.16.1 |
MCUXDQS v.8.0 |
1 July 2024 |
Updated for v.16 |
MCUXDQS v.7.0 |
19 April 2024 |
Updated for v.15.1 |
MCUXDQS v.6.0 |
10 January 2024 |
Updated for v.15 |
MCUXDQS v.5.0 |
31 July 2023 |
Updated for v.14 |
MCUXDQS v.4.0 |
2 January 2023 |
Updated for v. 13 |
MCUXDQS v.3.0 |
20 September 2022 |
Updated for v.12.1 |
MCUXDQS v.2.0 |
30 June 2022 |
Updated for v.12 |
MCUXDQS v.1.0 |
22 December 2021 |
Screenshots are updated. |
MCUXDQS v.0 |
23 June 2021 |
Initial version |