MCXN - OTA update by using SB3 file#
In this walkthrough, if possible, the lifecycle of the device is not changed for development purposes, so the device can be restored to its initial state. In real scenarios, transitioning the chips to the corresponding lifecycle is based on specific requirements.
Common information related to SB3 is available in the documentation ‘OTA update by using SB3 file’.
1. Provision the device#
The device must be provisioned to support SB3 processing. To simplify the workflow, the MCUXpresso Secure Provisioning Tool (SEC tool) is used.
To provision the device perform the following steps:
Erase the device
Build
mcuboot_opensource+ota_mcuboot_basicorota_rom_basicproject depending what you want to evaluateGet the device into ISP mode - typically on development boards hold the ISP button and press the reset button
Open the SEC tool and create new workspace for MCXN target device, test the ISP connection
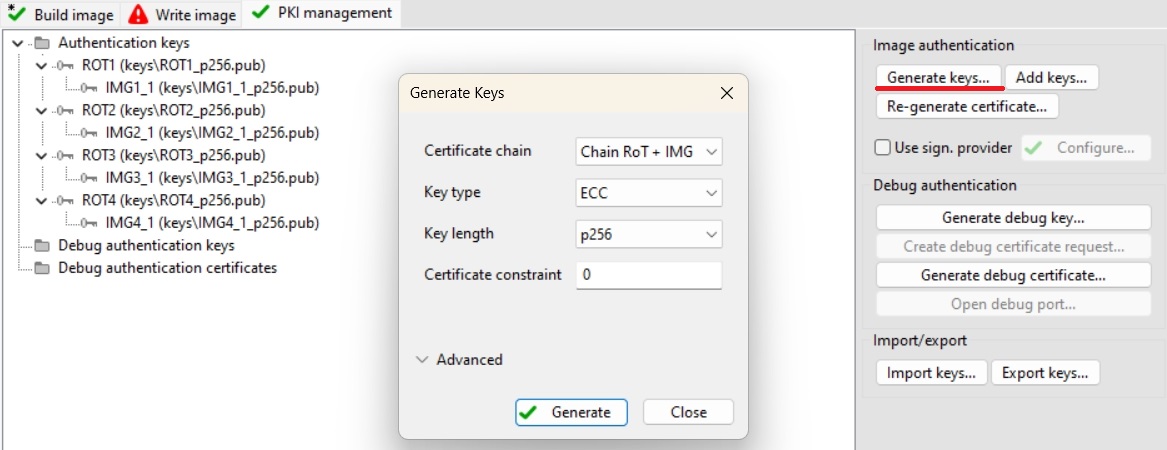
Switch to PKI management tab
Click Generate keys (leave default settings)
Build Image tab
Boot: Plain signed from IFR/Onchip flash based on
mcuboot_opensourceorota_rom_basiclocationLifecycle: Develop
Select an authentication key and generate CUST_MK_SK and OEM SB seed
Enable Dual image support if you evaluate
ota_rom_basicDefine Image version 1
Target dual boot image: Image 1
Image 1 size:
For MCXN9xx/5xx select 0x100000 (1MB)
For MCXN2xx select 0x80000 (512kB)
Following image is for MCUboot use case

Following image is for ROM only use case

Click Build image
Write image tab
Click Write image

2. Prepare OTA images#
2.1 ROM bootloader only use case#
MCXN uses flash remapping based on swap mechanism so SB3 OTA file always target Image 1 memory region.
Build Image tab
Increase Image version from 1 to 2
Build image
Rename generated SB3 file
bootable_images/ota_rom_basic.sbtoota_rom_basic_image_1_v2.sb
2.2 MCUboot bootloader use case#
Build
ota_mcuboot_basicand sign image byimgtoolas usual by following steps in specificexample_board_readme.mdfor your board. Copy the signed binary to your $sec_tool_workspace/source_imagesLook into ota_examples/_common/sb3_templates directory and copy SB3 configuration templates for your device to your $sec_tool_workspace/configs
MCXN:
mcxn_sb3_cfg_primary_slot.yaml
In SEC tool open Tools/SB Editor and click Import to
sb3_config_mcxn_secondary_slot.yamlCheck and eventually fix paths to keys and image binary
click Generate


Note: Optionally, we can also create initial SB3 file containing initial (first) ota_mcuboot_basic application for primary/secondary slot (generated with additional --pad --confirm imgtool arguments) to simulate manufacturing process, otherwise the initial signed image can be also loaded directly using ISP or other preferred method as usual.
3. Firmware update#
For demonstration purpose we use ExtraPutty tool as this fork of classic Putty has XMODEM support. Alternatively TeraTerm can be used.
3.1 ROM bootloader only use case#
Run initial
ota_rom_basicapplication loaded in chapter 1.Note: alternatively unsigned application via debug session using preferred IDE (IAR, MCUX, VSCode) - in this case the
imagecommand returns invalid information as there is no valid image header to parse
Check image state and active flag location with
imagecommandSee active flag location to specify inactive image slot
Send the OTA image
Run
xmodem_sb3commandSend
ota_rom_basic_image_1_v2.sbtargetting inactive slot via Files Transfer/Xmodem (1k)
Reboot the device with
rebootcommandCheck image update with
imagecommand
Here is an example of serial output:
*************************************
* Basic ROM application example     *
*************************************

$ image
Flash REMAP_SWAP disabled
IMAGE 0:
    <IMG_VERSION 0x1 LENGTH 36820 EXEC_ADDR 0x28004000>
    *ACTIVE*
IMAGE 1: Invalid image header
$ xmodem_sb3
Started xmodem processing SB3
Initiated XMODEM-CRC transfer. Receiving... (Press 'x' to cancel)
CCCC
Received 37880 bytes
SB3 has been processed
$
$ reboot
System reset!

*************************************
* Basic ROM application example     *
*************************************

$ image
Flash REMAP_SWAP active
IMAGE 0:
    <IMG_VERSION 0x1 LENGTH 36820 EXEC_ADDR 0x28004000>
IMAGE 1:
    <IMG_VERSION 0x2 LENGTH 36820 EXEC_ADDR 0x28004000>
    *ACTIVE*
$
3.2 MCUboot bootloader use case#
Load and run initial
ota_mcuboot_basicapplication as usual - alternatively load initial SB3 viablhostandreceive-sb-filecommand.Check image state and active flag location with
imagecommandSee active flag location to specify inactive image slot
Erase inactive slot with
image erasecommandNote: not needed if the SB file contains the erase command
Send the OTA image
Run
xmodem_sb3commandSend
ota_mcuboot_secondary_slot.sbtargetting inactive slot via Files Transfer/Xmodem (1k)
Mark installed image ready for test
Run
image testcommand
Reboot the device with
rebootcommandCheck image update with
imagecommandMark the updated slot with confirm flag using
image acceptand check the state again withimagecommand again
hello sbl.
Bootloader Version 2.2.0
Primary   slot: version=1.0.0+1000
Image 0 Secondary slot: Image not found
Image 0 loaded from the primary slot
Bootloader chainload address offset: 0x40000
Reset_Handler address offset: 0x40400
Jumping to the image


Booting the primary slot - flash remapping is disabled

*************************************
* Basic MCUBoot application example *
*************************************

$ image
Image 0; name APP; state None:

  Slot 0 APP_PRIMARY; offset 0x0; size 0x100000 (1038576):
    <IMAGE: size 28828; version 1.0.0+1000>
    SHA256 of image payload: E069B6127A708EE88B39...
    log_addr 0x0
    *ACTIVE*

  Slot 1 APP_SECONDARY; offset 0x100000; size 0x100000 (1038576):
    <No Image Found>

$ image erase
Erasing inactive slot...done
$ xmodem_sb3
Started xmodem processing SB3
Make sure this device is provisioned to accept secure binary and its load address is 0x100000
Initiated XMODEM-CRC transfer. Receiving... (Press 'x' to cancel)
CCCCC
Received 51200 bytes
SB3 has been processed
$
$ image test
write magic number offset = 0x43ff00
$ reboot
System reset!
hello sbl.
Bootloader Version 2.2.0
Primary   slot: version=1.0.0+1000
Secondary slot: version=1.1.0+1000
writing copy_done; fa_id=1 off=0x1fffe0 (0x43ffe0)
Image 0 loaded from the secondary slot
Bootloader chainload address offset: 0x240000
Reset_Handler address offset: 0x240400
Jumping to the image


Booting the secondary slot - flash remapping is enabled

*************************************
* Basic MCUBoot application example *
*************************************

$ image
Flash REMAP_SWAP active.

Image 0; name APP; state Testing:

  Slot 0 APP_PRIMARY; offset 0x0; size 0x100000 (1038576):
    <IMAGE: size 28828; version 1.0.0+1000>
    SHA256 of image payload: E069B6127A708EE88B39...
    log_addr 0x0 remaps to 0x100000

  Slot 1 APP_SECONDARY; offset 0x100000; size 0x100000 (1038576):
    <IMAGE: size 28828; version 1.1.0+1000>
    SHA256 of image payload: E069B6127A708EE88B39...
    log_addr 0x100000 remaps to 0x0
    *ACTIVE*

$ image accept
$ image
Flash REMAP_SWAP active.

Image 0; name APP; state Permanent:

  Slot 0 APP_PRIMARY; offset 0x0; size 0x100000 (1038576):
    <IMAGE: size 28828; version 1.0.0+1000>
    SHA256 of image payload: E069B6127A708EE88B39...
    log_addr 0x0 remaps to 0x100000

  Slot 1 APP_SECONDARY; offset 0x100000; size 0x100000 (1038576):
    <IMAGE: size 28828; version 1.1.0+1000>
    SHA256 of image payload: E069B6127A708EE88B39...
    log_addr 0x100000 remaps to 0x0
    *ACTIVE*

$